FoneDog Screen Recorder
FoneDog Screen Recorder
Special Offer
Special Offer


By Gina Barrow, Last updated: August 17, 2019
Facebook is a popular social media app that is useful in keeping connected with your family and friends by sharing important moments in your life as well as finding friends easily.
Many are wondering how to retrieve deleted messages from the Facebook Messenger app from iOS if they were accidentally deleted especially the important ones. Generally, some of the messages on Facebook can be valuable in many ways, and losing them can be a troublesome ordeal.
Part 1. How to recover Facebook Messenger messages on iOS devicesPart 2. How to archive my Facebook Messenger messagesPart 3. How to retrieve deleted messages by using FoneDog iOS Data Recovery Part 4. Let’s wrap it up
People Also ReadAn Ultimate Guide On Facebook Messenger IssuesHow to Recover Deleted Messages from iPhone for FreeHow to Recover Deleted Messages from iPhone XS
Luckily, there are several ways on how to recover your deleted or lost messages on the Facebook Messenger app including using a messenger recovery app.
An initial method to try out to recover deleted messages on your Facebook Messenger app is to use the app itself. The process is relatively simple if you have archived the messages.
Open the Facebook Messenger app and proceed to the recent conversations. Go to the search bar that you can find at the top section of the screen and check the conversation.
Another approach in retrieving a deleted message on Facebook Messenger is to get in touch with the person who received the message. Ask him/her to send it back to you. In such instances, make sure you politely ask your friend to send the deleted conversation back since you accidentally deleted it.
You can utilize the Download Settings option on your Facebook profile to retrieve the archived messages. Remember that it only allows you to retrieve archived messages only, not those that were accidentally deleted.
Go to your Facebook profile. Proceed to the “General Account Settings” option and go to “Download Copy of Facebook Data”. Tap on the “Start My Archive” and go to “And More”. Simply key in the credentials of your profile and you will receive an email.
You can go to the link and access your email. The next step is to tap on the “Download Archive” tab where a zip file is provided that contains your Facebook data. There are several HTML files within the zip folder. Tap on the file labeled as “Messages” to access your Facebook messages.
While using Facebook, you might have saved many messages which includes conversations with family and friends. There are several reasons why you might want to delete the messages on your Facebook Messenger on your iOS devices such as to free up space for other files, remove useless messages or those that are undesirable.
If there is a need to delete messages on your Facebook Messenger app, there are two options – archive or delete. Remember that there is a distinct difference between the two. Once you archive a message, it is removed from your chat list but you can still access them in the future. If you delete a message, it is gone forever unless you are going to use a messenger recovery app.
Since the Facebook Messenger app does not provide a way to recover any of your deleted conversations, using a messenger recovery app is the only solution.
Once you decide to archive the messages on your Facebook Messenger app, simply follow these steps.
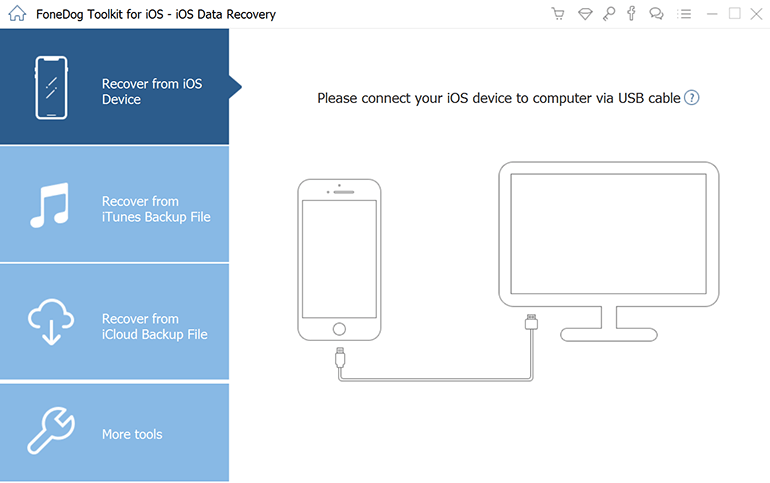
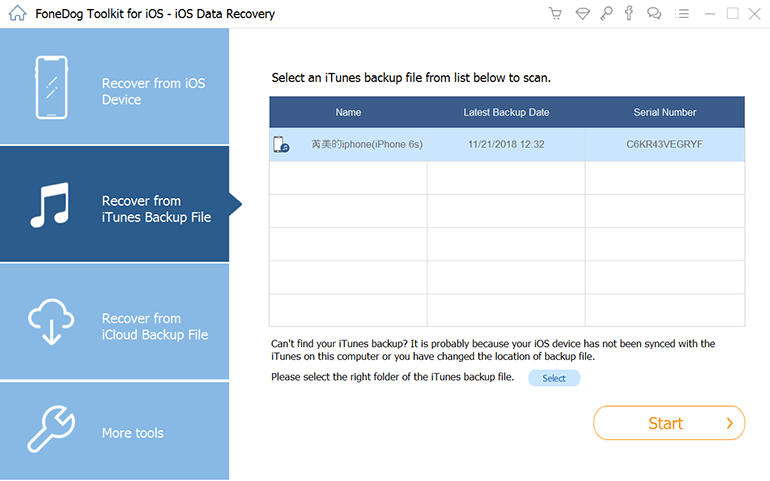
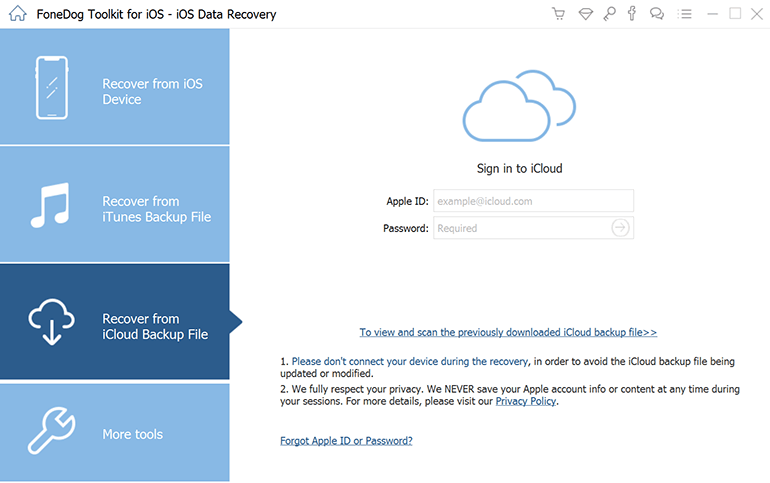
The iOS Data Recovery tool by FoneDog is the solution if you want to recover deleted messages on your Facebook Messenger app. Aside from recovering your Facebook Messenger messages, this messenger recovery app can retrieve all types of data from your iOS device such as call logs, contacts, text messages, photos, videos, voice mails and more.
Generally, this tool by FoneDog is safe to use since it will not overwrite any data on your iOS device. When recovering your deleted messages, the tool utilizes your iTunes backup file and iCloud backup file. You can even recover data directly from your iOS device even if you do not have a backup.
Once you are ready to retrieve all your deleted messages, simply download and install the tool on your Mac and depending on the method that you will use, follow the simple steps.
With the simple steps on how to recover your deleted Facebook Messenger messages, you can easily recover them all with this messenger recovery app by FoneDog. The tool will surely come in handy in case you accidentally deleted some of your important Facebook messages.
Leave a Comment
Comment

Technical/Creative Writer
Kitchen, my safe space; black, my favorite color
Was a Technical Specialist for a while, troubleshooting Smartphone and Software-related issues until a writing stint caught my attention.
Hot Articles
 /
/
INTERESTINGDULL
/
SIMPLEDIFFICULT
Thank you! Here' re your choices:
Excellent
Rating: 0 / 5 (based on 0 ratings)
