FoneDog Screen Recorder
FoneDog Screen Recorder
Special Offer
Special Offer


By Vernon Roderick, Last updated: November 24, 2020
Are you tired of facing all kinds of errors on your iTunes? If so, then know that you’re not the only one. There are many people who are fed up with the errors and issues that keep on occurring on their iTunes, both on Mac and Windows.
However, the difference between them and you is that you’ll finally be able to learn how to avoid those errors again, and that is by resetting iTunes. While it may not sound easy at first, you’ll find that it’s actually fairly simple, and most importantly, it’s the best way to avoid errors. After all, resetting iTunes would give you a fresh start.
This guide will teach you why you would want to reset iTunes and the different ways to do so.
iTunes is a very convenient app that gives you access to a lot of features and functions. It is connected to many apps on your device, be it on Mac or on Windows. It serves as a media player on top of being a file management system. And since that’s the case, your PC can also malfunction once iTunes malfunctions.
Here’s a look at some of the problems you’ll face when iTunes isn’t working properly:
For that reason, it’s crucial to know how you can maintain the app, and one of the best ways to do that is by resetting iTunes. However, it won’t be as easy as you think. Fortunately, you can fulfill your objective of resetting iTunes with the methods that we’ll discuss today. Let’s start with the very first option, which is also the easiest method.
There are many ways to uninstall an app. One such method is by deleting the files manually. This also applies when you want to reset an app. You simply have to delete the right files so that you can be successful with resetting iTunes. Since Mac and Windows have different file paths, we’ll be discussing their steps separately. Let’s start off with Mac.
Before anything else, make sure that you haven’t done anything to delete or move any iTunes files in the past. Once you do that, you can then follow these steps:
You may also skip going to the Go tab, and directly click on the Music on the Favorites section found at the left sidebar.
With this, the two files that were deleted will be replaced with new ones with the default configurations and settings.
Although there are differences with the steps in doing this with Mac and with Windows, it does follow the same pattern. For that reason, you should find it easy to follow these steps:
At this point, you have succeeded in resetting iTunes.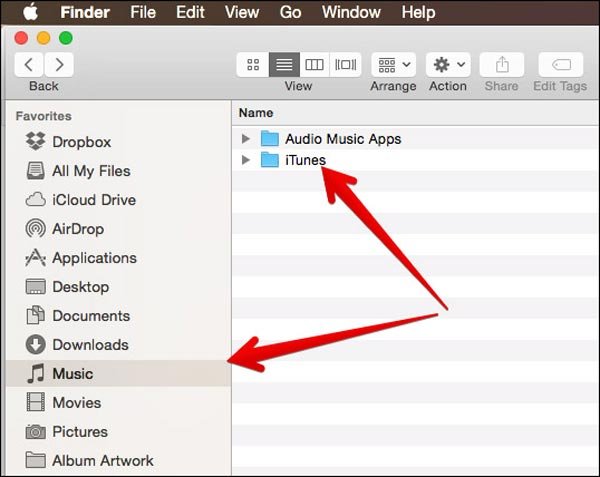
Another way of resetting iTunes is by resetting the cache instead of the app. This is because most of the time, errors on iTunes often show up because of a corrupted cache. For that reason, you have to either reset your cache or reinstall iTunes altogether.
However, this is considered a better option because reinstalling iTunes can result in a major data loss, which surely you don’t want to happen. On the other hand, resetting iTunes cache will only delete files that are not necessarily important.
Without further ado, here’s how you can reset the cache of the iTunes app:
Note: This guide will cater to both Windows and Mac users since the feature that you’ll be using is similar on both operating systems.
You may also click on the other two which are Reset Warnings and Reset Identifier, although we suggest that you do not.
After doing this, you have already finished resetting iTunes without resetting the iTunes itself. While a lot of issues are caused by a corrupted cache, it can be said that not all of them have the same root. For that reason, you should instead try reinstalling the iTunes app altogether.
It’s common knowledge that a healthy iTunes app can lead to the best user experience. That’s why there’s no wonder that having a dysfunctional iTunes app can lead to a lot of problems. And one way for an app to get corrupted is through time.
As time passes by, all sorts of files enter your iTunes app and in turn, it gets corrupted. For that reason, it is worth reinstalling your iTunes app to turn it back into its best shape, with the risk of losing data. With that said, let’s head to the steps on resetting iTunes by reinstallation. Let’s start with the guide for Mac users.
For Mac users, it’s important to be very cautious when uninstalling and reinstalling iTunes, considering that the app is connected to the system itself. Either way, here are the steps you need to follow to reinstall iTunes on Mac:
This will make sure that you are able to modify the different apps on your Mac, ensuring that there won’t be an issue when doing so.
With this, you have now completed your objective of resetting iTunes through reinstallation.
For Windows users, it would be easier since you don’t have to grant permission to uninstall apps. You just have to uninstall the program and reinstall it again. And to do this, you have to follow these steps carefully:
Here you will a list of programs installed on your app. Since you are using Windows, iTunes won’t be able to function alone.
For that reason, you should make sure you uninstall all the apps related to it. This includes iTunes, Apple Software Update, QuickTime, Apple Application Support, Bonjour, and Apple Mobile Device Support.
This will open the Program Files folder.
With this completed, you have successfully fulfilled your mission of resetting iTunes. But what if even with the latest version, you still keep on getting the same errors over and over again?
Fortunately, there’s one more solution you haven’t tried yet.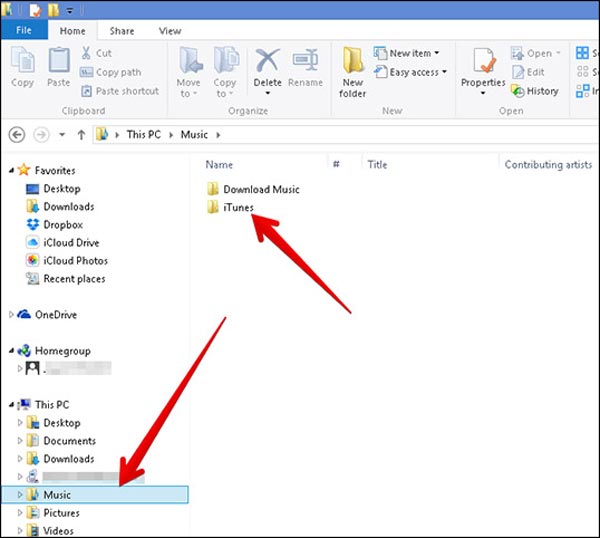
Sometimes, the problem isn’t because your iTunes app is unhealthy. You’ll find that there are actually versions of iTunes that have a lot of errors, mainly because they aren’t completely done with its development yet. Since that’s the case, you should at least make sure that you have the best version there is.
To do this, you will have to follow these steps:
Although you are downgrading your iTunes app, it will not affect any of your device that is connected to that PC. Overall, downgrading your iTunes is one way of resetting iTunes.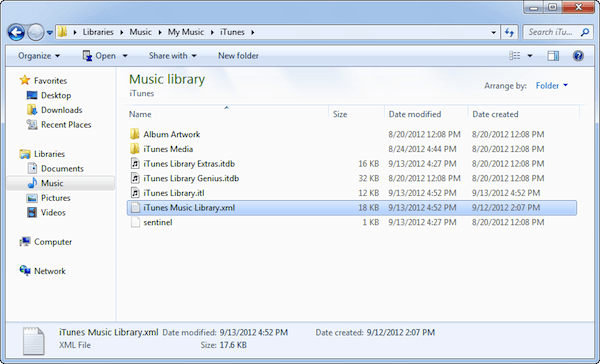
While we may have finished discussing the possible methods of resetting iTunes and solving potential bugs and issues, it can be said that prevention is better than cure. Considering that iTunes is a file management system, the issues that you’ll encounter will often involve difficulties in managing your files.
For that reason, we recommend that you use FoneDog Phone Transfer. FoneDog Phone Transfer allows you to transfer your files from one device to another, ensuring that your files are safe in one place. What’s more, you can also use the FoneDog Phone Transfer to back up your files to your computer in case you want to use any of the methods we discussed earlier for resetting iTunes.
There are many things you need to know when resetting iTunes. For one, you have to know first and foremost the reason why you should do it in the first place. You also have to know how to prepare for when you decide on resetting iTunes.
Either way, if you truly want to have peace when managing your iTunes, be it on Windows or Mac, you have to make sure you maintain its health, and one way to do that is by resetting iTunes.
Phone Transfer
Transfer files among iOS, Android and Windows PC.
Transfer and backup text messages, contacts, photos, video, music on computer easily.
Fully compatible with iOS 13 and Android 9.0.
Free Download

Leave a Comment
Comment

Technical Expertise for PC/Website Optimization
One of my passion is to develop software of my own
I write articles to share knowledge about IT technology and some experience in developing my own software, and developing my own software is one of my passions for work.
Hot Articles
 /
/
INTERESTINGDULL
/
SIMPLEDIFFICULT
Thank you! Here' re your choices:
Excellent
Rating: 4.7 / 5 (based on 65 ratings)
