FoneDog Screen Recorder
FoneDog Screen Recorder
Special Offer
Special Offer


By Nathan E. Malpass, Last updated: July 30, 2025
In this increasingly interconnected digital age, we rely on our smartphones and tablets for a myriad of daily tasks and entertainment. For Apple enthusiasts, the iPhone and iPad serve as indispensable companions in their daily lives. But what happens when you need to implement how to transfer data from iPhone to iPad? Perhaps you've just upgraded to a newer model, or you're looking to keep your essential information synced across both devices. In either case, mastering the art of transferring data from your iPhone to your iPad is crucial.
The good news is that this process has become easier than ever, thanks to Apple's dedication to creating a seamless ecosystem. In this article, we will guide you through the various methods and tools available for transferring your data effortlessly. Whether it's your cherished photos, important documents, or your favorite apps, we've got you covered. So, grab your iPhone and iPad, and let's dive into the world of hassle-free data transfer.
Part 1. Runner-Up Methods to Transfer Data from iPhone to iPadPart 2. Best Tool to Transfer Data from iPhone to iPadPart 3. Summary
AirDrop, a built-in feature on iOS devices, is a remarkably simple and quick method for transferring data between your iPhone and iPad. This wireless technology utilizes Bluetooth and Wi-Fi to send files and data seamlessly. Here's how to use AirDrop for transferring data:
Step 1: Ensure Bluetooth and Wi-Fi Are Enabled
Before you begin, ensure that both your iPhone and iPad have Bluetooth and Wi-Fi enabled. These are essential for AirDrop to work effectively.
Step 2: Activate AirDrop
Step 3: Select the Data to Share
On your iPhone, navigate to the file or data you want to transfer. It could be a photo, video, document, or even a web page. Tap the "Share" icon (usually represented by a square with an arrow pointing up).
Step 4: Share with AirDrop
Step 5: Accept the File on Your iPad
On your iPad, a notification will appear, asking if you want to accept the incoming file. Confirm the transfer, and the data will be saved on your iPad.
That's it! Using AirDrop, you can effortlessly transfer photos, videos, links, and various files between your iPhone and iPad. It's a fantastic option for quick and easy data sharing within the Apple ecosystem. But if you're looking for an alternative method or have specific data types to transfer, stay tuned as we explore more options in the upcoming sections.
iCloud, Apple's cloud storage and synchronization service, is a convenient and reliable way to transfer data between your iPhone and iPad. With iCloud, you can seamlessly sync various types of data, including photos, contacts, calendars, and more. Here's how to use iCloud Sync for data transfer:
Step 1: Ensure iCloud is Set Up on Both Devices
Before you can use iCloud to sync data between your iPhone and iPad, make sure you are signed in to the same iCloud account on both devices. To check this:
Step 2: Enable iCloud Sync for Specific Data Types
To choose which types of data you want to sync between your iPhone and iPad, follow these steps:
Step 3: Allow Time for Data Sync
Once you've enabled iCloud sync for the desired data types on both devices, the synchronization process will begin automatically. The time it takes to sync depends on the amount of data and your internet connection speed. Be patient, and let iCloud do its work.
Step 4: Verify Data on Your iPad
After the initial sync is complete, you should see your data, such as photos, contacts, and calendars, available on your iPad. Keep in mind that any changes or additions you make on one device will be reflected on the other as long as iCloud sync is active.
Using iCloud Sync is a powerful method to ensure that your data remains up-to-date across your iPhone and iPad. This method is particularly useful for keeping your photos, contacts, and other essential information in harmony between your devices. However, for users with specific data transfer needs or who prefer more control, we have more methods to explore in the upcoming sections.
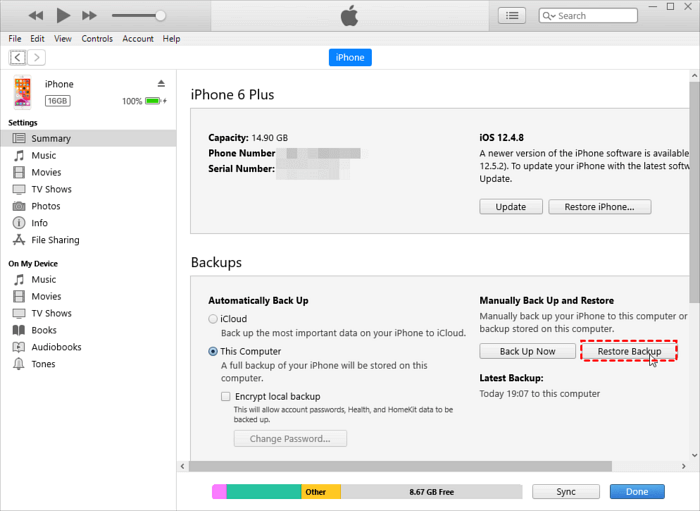
iTunes, although no longer the primary method for managing iOS devices, is still a viable option for transferring data from your iPhone to your iPad. This method allows for more extensive control and is useful for situations where you need to manage media files or create device backups. Here's how to use iTunes for data transfer:
Step 1: Ensure iTunes is Installed
Make sure you have the latest version of iTunes installed on your computer. You can download and install it from the official Apple website.
Step 2: Connect Your iPhone to Your Computer
Use a USB cable to connect your iPhone to your computer. If this is your first time connecting your iPhone, you may be prompted to trust this computer and enter your device's passcode.
Step 3: Open iTunes
Launch iTunes on your computer. It should automatically recognize your connected iPhone.
Step 4: Create a Backup (Optional)
If you want to transfer your iPhone's entire data to your iPad, it's a good idea to create a backup. In iTunes, select your iPhone, and under the "Backups" section, choose "This Computer" and click "Back Up Now." This will create a backup of your iPhone's data on your computer.
Step 5: Disconnect Your iPhone and Connect Your iPad
After the backup is complete, disconnect your iPhone and connect your iPad to the computer using the same USB cable.
Step 6: Restore Your iPad from the iPhone Backup
In iTunes, select your connected iPad. Under the "Summary" tab, click "Restore Backup." Choose the most recent iPhone backup you created and click "Restore."
Step 7: Wait for the Restore to Finish
iTunes will transfer the data from your iPhone backup to your iPad. This may take some time, depending on the amount of data.
Step 8: Set Up Your iPad
Once the restore is complete, your iPad will restart, and you'll need to follow the on-screen instructions to set up your device.
Using iTunes to transfer data from your iPhone to your iPad is a reliable method, especially if you need to move a large amount of data or restore your iPad from a previous iPhone backup. It's worth noting that iTunes has been replaced by Finder on macOS Catalina and later, but the process is quite similar. If you're looking for more options or prefer to transfer specific data types, we have additional methods to explore in the upcoming sections.
Another straightforward method to transfer specific files, such as photos, documents, or links, from your iPhone to your iPad is by using email or messaging apps. This method is particularly useful for sharing individual files or smaller sets of data. Here's how to do it:
Step 1: Open the File or Data You Want to Transfer
On your iPhone, navigate to the file or data you wish to transfer. This could be a photo, document, or a link to a webpage.
Step 2: Share via Email or Messaging App
Tap the "Share" icon within the app or interface where the file is located. This icon usually looks like a square with an arrow pointing up.
Step 3: Choose Email or Messaging App
Select your preferred email or messaging app, such as Mail, Messages, WhatsApp, or any other messaging service you use.
Step 4: Send the File
Compose a new email or message, and enter your own email address or phone number as the recipient. This effectively sends the file to yourself.
Step 5: Access the Email or Message on Your iPad
Now, switch to your iPad, open the email or messaging app you used, and access the sent message. You should find the file or data attached to the message.
Step 6: Download or Save the File
Open the message on your iPad and download or save the attached file to your device. The exact steps for saving a file may vary depending on the app you are using.
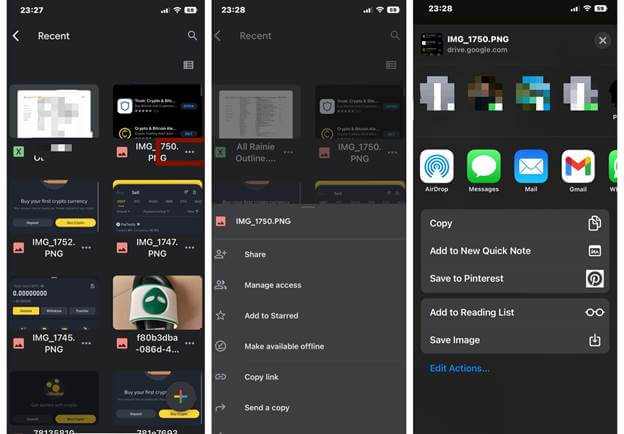
Cloud storage platforms like Google Drive, Dropbox, and OneDrive offer a convenient way to transfer various types of data from your iPhone to your iPad. These platforms allow you to store files in the cloud and access them from any device with an internet connection. Here's how to use a cloud storage platform for data transfer:
Step 1: Install the Cloud Storage App
If you haven't already, download and install the cloud storage app of your choice (e.g., Google Drive, Dropbox, OneDrive) on both your iPhone and iPad. Sign in to your account or create one if you don't have an existing account.
Step 2: Upload Files from Your iPhone
Open the cloud storage app on your iPhone. Use the app's upload feature to select and upload the files or data you want to transfer to the cloud. This can include photos, documents, videos, or any other file types.
Step 3: Wait for Upload to Complete
The time it takes to upload your files will depend on the size and number of items you're transferring, as well as your internet connection speed. Ensure that the upload is complete before proceeding.
Step 4: Access the Files on Your iPad
Open the same cloud storage app on your iPad and sign in with the same account. You should see the files you uploaded from your iPhone.
Step 5: Download or Open the Files on Your iPad
To transfer the files to your iPad, simply download or open them from the cloud storage app. The files will be available for use on your iPad as long as you have an internet connection.
Step 6: Optional - Keep Your Files in Sync
Cloud storage platforms often offer automatic synchronization, ensuring that any changes or additions made on one device are reflected on the other. Make sure that this feature is enabled if you want to keep your data in sync between your iPhone and iPad.
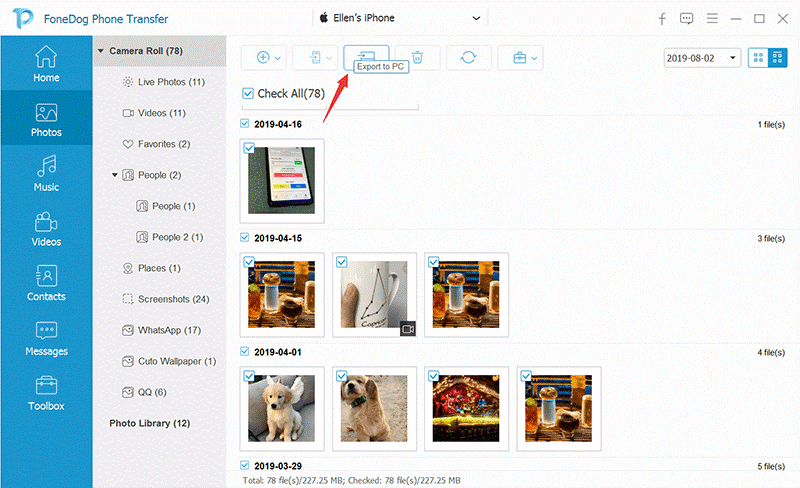
FoneDog Phone Transfer is a versatile and user-friendly iPhone 15 supported software designed to simplify the process of transferring data between iOS devices, such as from your iPhone to your iPad. Whether you're upgrading to a new device or just need a quick and efficient data transfer solution, FoneDog Phone Transfer is a powerful tool that streamlines the process. Below, we'll provide an overview of FoneDog Phone Transfer, along with the steps to transfer your data from an iPhone to an iPad using this tool.
FoneDog Phone Transfer is a comprehensive data transfer and backup tool that offers a range of features, including:
Phone Transfer
Transfer files among iOS, Android and Windows PC.
Transfer and backup text messages, contacts, photos, video, music on computer easily.
Fully compatible with the latest iOS and Android.
Free Download

Now, let's go through the steps to transfer data from your iPhone to your iPad using this best file-transferring tool:
Step 1: Download and Install FoneDog Phone Transfer
Start by downloading and installing FoneDog Phone Transfer on your computer. It's available for both Windows and Mac. Launch the software after installation.
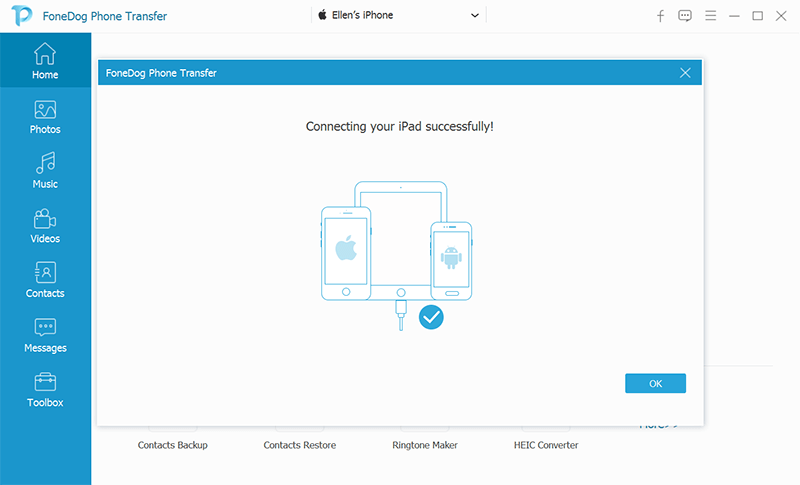
Step 2: Connect Your iPhone and iPad
Connect both your iPhone and iPad to your computer using USB cables. FoneDog Phone Transfer will detect and display them on the main interface.
Step 3: Select Data Types to Transfer
On the main interface, you'll see various data types that you can transfer. Choose the types of data you want to transfer, such as contacts, messages, photos, or any other data that you need.
Step 4: Start the Data Transfer Process
After selecting the data types, click the "Start Transfer" button. FoneDog Phone Transfer will initiate the data transfer process.
Step 5: Monitor the Transfer Progress
You can monitor the transfer progress as FoneDog Phone Transfer copies the selected data from your iPhone to your iPad.
Step 6: Complete the Transfer
Once the transfer is complete, you'll receive a confirmation message. Your data is now successfully transferred to your iPad.
Step 7: Check and Verify Your Data on Your iPad
Disconnect both your iPhone and iPad from the computer. On your iPad, check to ensure that the transferred data is available and accessible.
FoneDog Phone Transfer simplifies the data transfer process and offers a secure and efficient way to move data from your iPhone to your iPad. Whether you're upgrading to a new device or simply need to keep your data in sync, this tool provides a reliable solution.
Transferring data from your iPhone to your iPad can be a straightforward process with a variety of methods at your disposal. Whether you're upgrading to a new device, need to keep your data in sync, or want to transfer specific files, you have several options to choose from:
Each of these methods has its unique advantages, making it possible for you to choose the one that best suits your specific data transfer needs. Whether you prefer a wireless approach, cloud storage for accessibility, or a dedicated software tool like FoneDog Phone Transfer for ease and efficiency, the choice is yours.
Phone Transfer
Transfer files among iOS, Android and Windows PC.
Transfer and backup text messages, contacts, photos, video, music on computer easily.
Fully compatible with the latest iOS and Android.
Free Download
Leave a Comment
Comment

iPhone/Android Devices’ Maintenance Expert
Staying home, listening to music, writing tech articles
Many people asked me to repair their mobile phones so I have a lot of experience in mobile phone repair, and I know a lot about Android or Apple phones.
Phone Transfer
Transfer data from iPhone, Android, iOS, and Computer to Anywhere without any loss with FoneDog Phone Transfer. Such as photo, messages, contacts, music, etc.
Free DownloadHot Articles
 /
/
INTERESTINGDULL
/
SIMPLEDIFFICULT
Thank you! Here' re your choices:
Excellent
Rating: 4.7 / 5 (based on 66 ratings)