By Adela D. Louie, Last updated: March 20, 2024
Are you eager to elevate your editing game or preserve your cinematic masterpieces on a larger screen? This article serves as your go-to guide on how to transfer iMovie from iPhone to Mac, detailing the simple yet essential steps required to seamlessly transfer iMovie projects from your iPhone to your Mac.
Whether you're a budding filmmaker, a social media content creator, or simply someone who cherishes their visual stories, this guide will empower you to effortlessly sync your projects, enabling smooth editing transitions and accessibility across devices. If you're trying to transfer your videos from your iPhone to your Mac, dive in and discover how to bridge the gap between your devices, unlocking endless creative possibilities!
Part 1. Why Transfer iMovie Projects from iPhone to Mac?Part 2. How to Transfer iMovie from iPhone to MacPart 3. Best Way to Transfer iMovie Clips from iPhone to Mac - FoneDog Phone TransferPart 4. Tips and Troubleshooting for Seamless Transfers and Enhanced WorkflowConclusion
Part 1. Why Transfer iMovie Projects from iPhone to Mac?
Transferring iMovie projects from an iPhone to a Mac offers several advantages that enhance the editing process and accessibility of your creations:
- Larger Screen Editing: Editing on a Mac provides a more expansive canvas compared to the iPhone screen. The larger display allows for more precision, better overview, and easier manipulation of elements within iMovie projects.
- Enhanced Performance: Macs generally have more powerful processors and resources compared to iPhones. This additional computing power can lead to smoother editing experiences, especially for complex or lengthy projects.
- Seamless Transition Between Devices: By transferring projects to your Mac, you create a seamless editing workflow. You can start editing on your iPhone while on the go and continue refining your work on the Mac once you're back at your workstation.
- Preservation and Backup: Transferring projects to a Mac ensures a backup of your iMovie creations. It's a prudent measure to safeguard against accidental loss or damage to your iPhone.
- Improved Collaboration: If you collaborate with others or have a team involved in the editing process, having the project on a Mac can facilitate easier sharing, teamwork, and the use of advanced editing tools or software.
- Efficient Storage Management: Moving projects to a Mac can free up space on your iPhone, especially if the project files are consuming significant storage.
Part 2. How to Transfer iMovie from iPhone to Mac
Transferring iMovie projects from an iPhone to a Mac can be done through various methods, including iCloud, AirDrop, or using a USB cable. Below are the steps for each method on how to transfer iMovie from iPhone to Mac:
Method 1: Using iCloud or iCloud Drive
Ensure iCloud Sync for iMovie is Enabled:
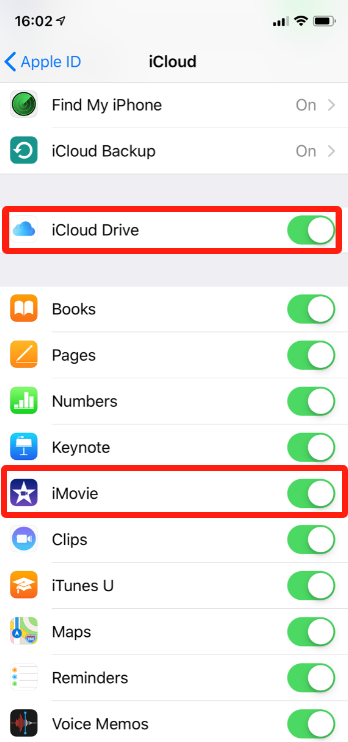
- Navigate to the settings app on your iPhone and tap on the section labeled "Your Name". Within this section, locate and select "iCloud".
- Once in the iCloud settings, find and access the option for "iCloud Drive". Upon entering the iCloud Drive settings, you'll encounter a list of applications.
- Scroll through this list until you find "iMovie" and then toggle the switch next to it to the "on" position. This action enables the synchronization function for iMovie, allowing it to sync its data with iCloud Drive.
Save iMovie Project to iCloud:
- Begin by launching the iMovie application on your iPhone, which can typically be found on your home screen or in the app library.
- Once iMovie is open, take a moment to identify and select the specific project you intend to transfer to your Mac. You can find your projects listed within the iMovie interface.
- After choosing the desired project, proceed by tapping on the "Edit" option associated with that project. This action will grant you access to the editing functions and project settings.
- While editing your project, look for and tap on the Share icon within the iMovie interface. This icon usually resembles a box with an arrow pointing upwards, located within the options or toolbar.
- Upon tapping the Share icon, a list of sharing options will appear. From this list, select the "Save to Files" option. This action will prompt iMovie to save your project as a file that can be easily transferred.
- Once you've chosen to save to files, the next step involves designating the storage location. Opt for iCloud Drive as the preferred location for storing this project file. Confirm your choice and proceed to save the project to iCloud Drive.
Access the Project on Mac:
- Firstly, confirm that iCloud Drive is activated on your Mac by accessing the System Preferences. To do so, find and press the "Apple" icon positioned in the upper-left corner of your screen. Then, choose "System Preferences" from the menu that appears.
- Within System Preferences, locate and click on "Apple ID" to access your iCloud settings. In the iCloud settings panel, ensure that the checkbox next to "iCloud Drive" is selected, indicating that it's turned on.
- Next, open the Finder application on your Mac. This can usually be found in the Dock at the bottom of your screen or by clicking on the desktop.
- Once Finder is open, look for "iCloud Drive" in the sidebar under "Locations". Click on "iCloud Drive" to explore its contents.
- Within the iCloud Drive window, navigate through the folders until you find the "iMovie" folder. This is where your iMovie projects that have been transferred from your iPhone will typically appear. Click on the "iMovie" folder to access its contents.
- Upon entering the "iMovie" folder, you should be able to view the iMovie projects that you've transferred from your iPhone. These projects will be listed here, allowing you to open, edit, or manage them on your Mac as needed.
Method 2: Using AirDrop
Enable AirDrop on Both Devices:
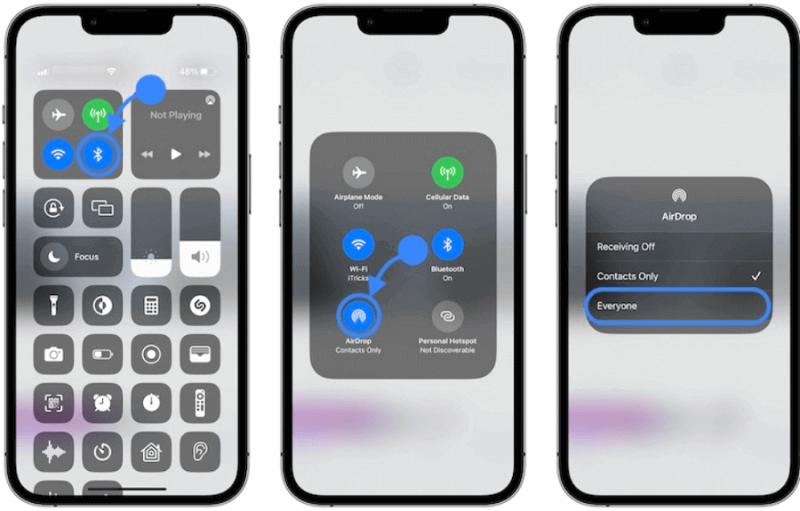
- To initiate the process on your iPhone, start by swiping your screen downward from the upper-right corner, which will reveal the Control Center.
- Locate and press on the network settings box found within the Control Center; this includes options such as Airplane Mode and Wi-Fi. Among the listed options, you'll find "AirDrop".
- Tap on this option and then select either "Contacts Only" or "Everyone" based on your preference for visibility.
- Moving to your Mac, launch Finder and navigate to the sidebar where you'll find the "AirDrop" option.
- Click on it to open the AirDrop settings. Within this interface, set the visibility to either "Everyone" or "Contacts Only," aligning it with the choice you made on your iPhone. This synchronization ensures both devices are discoverable to each other for the subsequent transfer process.
Transfer iMovie Project:
- Begin by launching the iMovie application on your iPhone, ensuring you have access to all your created projects.
- Once within the iMovie interface, identify the specific project you intend to transfer and proceed by tapping on the "Edit" option associated with that particular project.
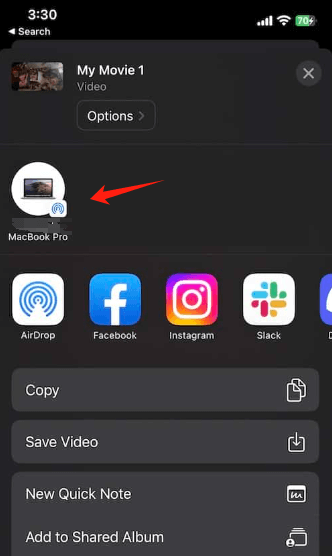
- Upon accessing the editing interface for the selected project, navigate to the top or bottom corner of your screen to locate and tap the "Share" icon, which typically resembles a box with an arrow pointing upwards.
- From the array of sharing options that appear, locate and select "AirDrop" among the available choices.
- As you initiate the AirDrop sharing process, your iPhone will scan for nearby devices. Among the list of detected devices, identify and select your Mac to establish the connection.
- Following your selection, your Mac will display a notification requesting permission to receive the transfer. Accept this prompt on your Mac to commence and finalize the transfer process of the iMovie project from your iPhone.
This also works if you want to transfer videos from your PC to your iPhone instead.
Method 3: Using a USB Cable
- Take a USB cable and connect one end to your iPhone and the other end to your Mac. This physical connection will allow the devices to communicate.
- Once the connection is established, your iPhone might display a prompt asking for permission to trust the connected Mac. If prompted, tap "Trust This Computer" on your iPhone screen and enter your iPhone passcode to grant access.
- On your Mac computer, open the Finder application. Look to the sidebar on the left-hand side of the Finder window. Under "Locations" or "Devices", you should see your iPhone listed.
- Click on your iPhone to access its files. Navigate through the folders labeled "Internal Storage" > "DCIM" > "100APPLE". These folders contain various media files stored on your iPhone.
- Look for your iMovie projects within these folders. iMovie project files usually have a file extension "
.imovie".
- Once you've located the iMovie projects you want to transfer, select them by clicking on each file while holding down the
Command key (⌘) for multiple selections.
- After selecting the desired iMovie projects, drag and drop them to a location on your Mac where you want to store them. You can choose to drop them onto your Desktop, a specific folder, or any preferred location within the Finder window.
By following these steps, you can easily know how to transfer iMovie from iPhone to Mac using iCloud, AirDrop, or a USB cable, choosing the method that best suits your preferences and circumstances.
Part 3. Best Way to Transfer iMovie Clips from iPhone to Mac - FoneDog Phone Transfer
FoneDog Phone Transfer stands as a versatile and efficient solution for seamlessly transferring iMovie clips from your iPhone to a Mac. This software simplifies the transfer process, offering a user-friendly interface and reliable functionalities.
Unlike conventional methods, FoneDog Phone Transfer streamlines the transfer of iMovie clips, ensuring a hassle-free experience for users seeking a quick and secure way to move their projects.
Free Download
To make use of FoneDog Phone Transfer for transferring iMovie clips from your iPhone to a Mac, follow these steps:
- Download and install FoneDog Phone Transfer on your Mac. The software is available from the official FoneDog website.
- Once installed, open the FoneDog Phone Transfer application on your Mac.
- Use a USB cable to connect your iPhone to the Mac. Ensure a stable connection between both devices.
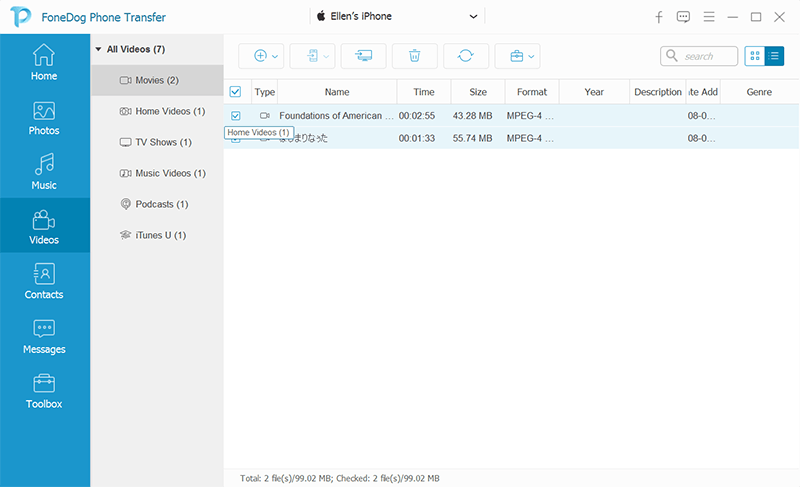
- Within FoneDog Phone Transfer, select the specific feature or option designed for transferring iMovie clips from iPhone to Mac. The software typically offers a dedicated function for media or file transfers.
- Once the transfer feature is activated, FoneDog Phone Transfer will detect your iPhone and display its content. Locate and select the iMovie clips or
- After selecting the desired iMovie clips, click on the "Transfer" or "Export" button within the FoneDog Phone Transfer interface. This action will prompt the software to begin transferring the selected iMovie clips from your iPhone to the Mac.
- Wait for the transfer process to complete. Once finished, FoneDog Phone Transfer will notify you, confirming that the iMovie clips have been successfully transferred to your Mac.
Part 4. Tips and Troubleshooting for Seamless Transfers and Enhanced Workflow
Here are some tips and troubleshooting suggestions for seamless transfers and an enhanced iMovie workflow when transferring projects from iPhone to Mac:
Tips for Seamless Transfers:
- Organize Projects Effectively: Use meaningful names or folders to organize your iMovie projects. This makes it easier to locate and manage them on both devices.
- Regularly Back-Up Projects: Create backups of your iMovie projects on your Mac or an external drive to prevent data loss.
- Optimize Storage: Clear unnecessary files or old projects from your iPhone to free up space for new projects.
- Utilize Cloud Services: Leverage iCloud or other cloud storage services to sync iMovie projects automatically across devices.
- Maintain Software Updates: Ensure that both your iPhone and Mac have the latest iMovie versions installed to avoid compatibility issues during transfers.
Troubleshooting for Enhanced Workflow:
- Addressing Syncing Issues: If iMovie projects aren't syncing correctly, ensure that both devices are connected to a stable internet connection. Restarting the devices or re-enabling iCloud syncing might help.
- Dealing with Storage Constraints: If you encounter storage limitations during transfers, consider deleting unnecessary files or using external storage options for your iMovie projects.
- Resolving Compatibility Problems: Check for software updates on both devices. Incompatible versions of iMovie can cause issues when transferring projects. Update the apps to ensure compatibility.
- Handling Transfer Failures: If transfers fail using a specific method (iCloud, AirDrop, USB), try an alternative method to transfer the iMovie projects. For instance, if AirDrop fails, attempt using iCloud or a USB cable.
- Seeking Support or Resources: If persistent issues arise, consult official support resources from Apple, browse user forums, or consider reaching out to Apple Support for guidance on resolving specific transfer problems.
- Using Alternative Transfer Methods: If one transfer method consistently fails, experiment with alternative methods (e.g., using third-party apps or software) to move your iMovie projects between devices.
By implementing these tips and addressing common troubleshooting steps, you can enhance the workflow and ensure a seamless transfer experience when moving iMovie projects from your iPhone to your Mac.
People Also ReadHow to Transfer Videos from PC to iPhone without iTunesAn Easy Guide on Transferring Android Videos to iPhone
Conclusion
Indeed, transferring iMovie projects from iPhone to Mac unlocks superior editing capabilities and seamless workflow transitions. Embrace the enhanced canvas of a Mac for precise editing. Explore the effortless possibilities with FoneDog Phone Transfer, simplifying iMovie transfers—empowering you to amplify creativity and streamline your multimedia journey.


 /
/
