FoneDog Screen Recorder
FoneDog Screen Recorder
Special Offer
Special Offer


By Nathan E. Malpass, Last updated: February 10, 2024
In today's digital age, iPads have become indispensable tools for both work and leisure. Whether you're upgrading to a newer model or sharing content with a friend or family member, knowing how to transfer data from iPad to iPad is a skill every iPad owner should have in their arsenal.
In this comprehensive guide, we will explore various methods and techniques, especially by the use of a top iOS transfer tool to help you seamlessly transfer data from your old iPad to your new one. Whether you're a tech novice or a seasoned iPad user, we've got you covered. By the end of this article, you'll have the confidence and knowledge to execute the transfer without breaking a sweat. Let's dive in!
Part #1: How to Transfer Data from iPad to iPadPart #2: Best Tool on How to Transfer Data from iPad to iPad: FoneDog Phone TransferConclusion
Transferring data between iPads has never been easier, thanks to the power of iCloud. iCloud provides a seamless way to back up your iPad and restore that backup to your new device. Here's a step-by-step guide to help you through the process:
Step #1: Prepare Your Old iPad
Before you can transfer your data using iCloud, make sure your old iPad is connected to Wi-Fi, and it's plugged into a power source to ensure a smooth backup process. Also, ensure you're signed in to your iCloud account.
Step #2: Create an iCloud Backup
Open your old iPad and go to "Settings". Scroll down and tap on "iCloud". In the iCloud settings, tap on "Backup". Toggle on the "iCloud Backup" option if it's not already enabled. Tap "Back Up Now" to initiate an immediate backup. Wait for the backup process to complete; this may take a few minutes to an hour, depending on the amount of data.
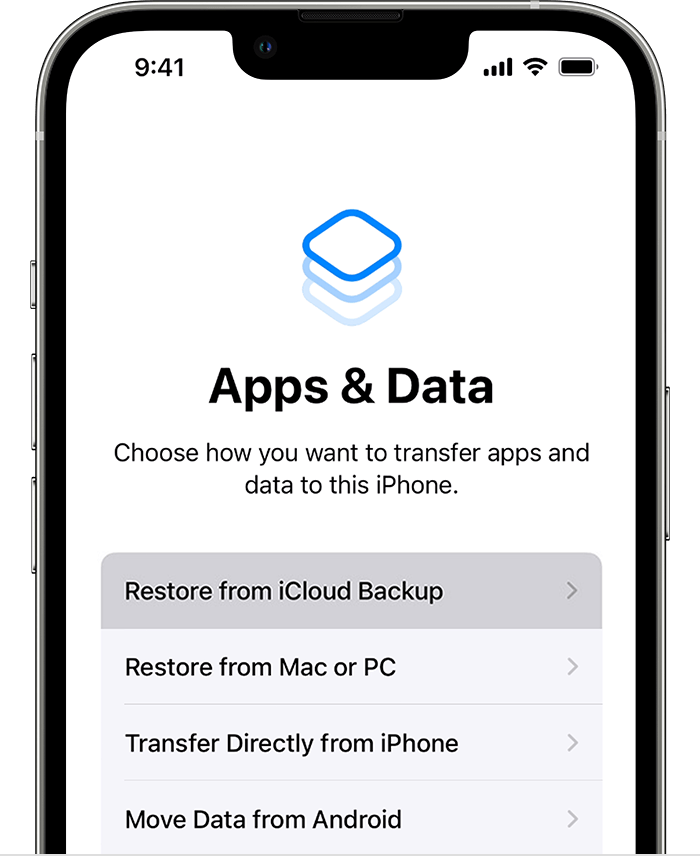
Step #3: Set Up Your New iPad
Power on your new iPad and follow the initial setup instructions until you reach the "Apps & Data" screen. Select "Restore from iCloud Backup". Sign in to your iCloud account using the same Apple ID you used for the old iPad.
Step #4: Restore from iCloud Backup
Choose the most recent backup from your old iPad that you want to restore. Wait for the restoration process to finish. This will take some time, depending on the size of the backup and your Wi-Fi connection speed. Your new iPad will restart, and when it boots up, your data, apps, settings, and more from your old iPad will be available on your new device.
Note: Ensure you have enough iCloud storage to accommodate your backup. If you exceed your free storage, you may need to purchase additional iCloud storage.
Using iCloud to transfer data is convenient and secure, as it keeps your data protected in the cloud throughout the process. However, it requires a stable Wi-Fi connection and may take some time if you have a large amount of data. If you prefer a faster method, stay tuned for Method 02, where we explore using a direct cable connection.
If you prefer a more traditional approach to transferring data from one iPad to another, using iTunes backups is a reliable option. Here's a step-by-step guide on how to transfer data from iPad to iPad using iTunes:
Step #1: Back Up Your Old iPad
Connect your old iPad to your computer using a USB cable. Launch iTunes on your computer if it doesn't open automatically. In iTunes, click on the device icon for your old iPad, located in the upper left corner of the iTunes window.
Step #2: Create a Backup
Under the "Summary" tab, you'll find the "Backups" section. Select "This computer" under the "Automatically Back Up" section. Click on "Back Up Now" to initiate a full backup of your old iPad to your computer. This process may take a while, depending on the size of your data.
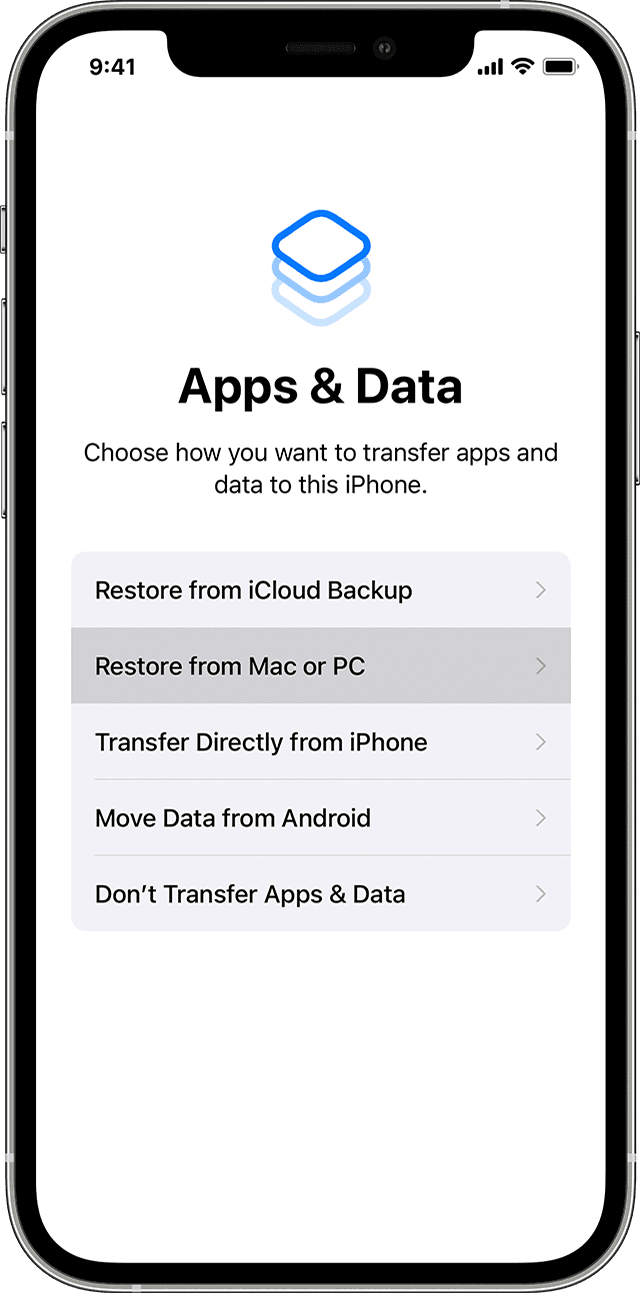
Step #3: Prepare Your New iPad
Power on your new iPad and follow the initial setup instructions until you reach the "Apps & Data" screen. Choose "Restore from Mac or PC".
Step #4: Restore from iTunes Backup
Connect your new iPad to the same computer where you created the iTunes backup. Launch iTunes if it's not already open. In iTunes, click on the device icon for your new iPad. Under the "Summary" tab, in the "Backups" section, click on "Restore Backup". Select the most recent backup of your old iPad from the list. Click "Restore" and wait for the process to complete.
Step #5: Complete the Setup
Once the restoration process is finished, your new iPad will restart. When it boots up, you'll find all your apps, data, and settings from your old iPad on your new device.
Using iTunes for data transfer is beneficial if you prefer a wired connection or if you don't have access to a stable Wi-Fi network. It's also an excellent option if you've exceeded your iCloud storage limit.
However, it requires a computer with iTunes installed and a USB cable for the connection. Now that you have successfully transferred your data using iTunes, your new iPad should feel familiar and fully equipped with your old iPad's content.
What if iTunes not available for no reason? Is there a way to transfer data to an iPad without iTunes? Well, AirDrop is a fantastic wireless technology developed by Apple, allowing you to transfer data between two Apple devices seamlessly. It's a quick and convenient method for transferring data from one iPad to another. Here's how to use AirDrop for this purpose:
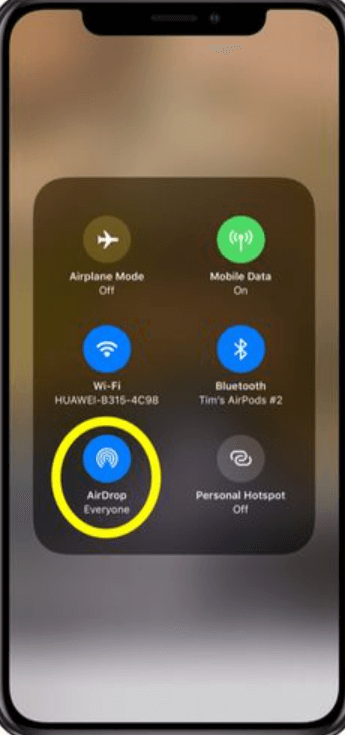
Step #1: Enable AirDrop on Both iPads
On both your old and new iPads, swipe down from the upper right corner to open the Control Center. Press and hold the "Network Settings" card in the upper left corner (it looks like a card with Wi-Fi and Bluetooth icons). This action will expand the card. In the expanded card, make sure that both Bluetooth and Wi-Fi are turned on. Below the network settings, tap on "AirDrop". Select "Everyone" to allow your devices to be discoverable by any nearby Apple devices.
Step #2: Select and Share the Data
On your old iPad, navigate to the data you want to transfer. This could be a photo, video, document, or any other file. Tap on the file to select it. Tap the share icon, which looks like a square with an arrow pointing upward. In the sharing options that appear, you'll see nearby Apple devices with AirDrop enabled, including your new iPad. Tap on your new iPad's name to initiate the transfer.
Step #3: Accept the Transfer on the New iPad
On your new iPad, a notification will appear, asking if you want to accept the AirDrop transfer from your old iPad. Tap "Accept" to start the transfer. Wait for the transfer to complete; the time will depend on the size of the file.
Step #4: Confirm the Data on Your New iPad
Once the transfer is finished, you'll find the transferred data on your new iPad in the relevant app or location. For example, photos will appear in the Photos app, documents in the Files app, and so on.
AirDrop is an excellent choice when you want to transfer specific files or small batches of data quickly between your iPads. It's wireless, easy to use, and doesn't require an internet connection. However, it's most effective for smaller files and may not be the best option for transferring large amounts of data due to the potential for slower transfer speeds.
Google Drive is a versatile cloud storage and file-sharing service that can be used to transfer data between iPads effortlessly. This method is especially useful if you want to share files or documents between your devices. Here's how to transfer data from iPad to iPad using Google Drive:
Step #1: Install Google Drive on Both iPads
On both your old and new iPads, go to the App Store. Search for "Google Drive" and install the app if you haven't already. Sign in to your Google account or create one if you don't have one.
Step #2: Upload Data from the Old iPad
Open the Google Drive app on your old iPad. Tap the "+" button to create a new folder or select an existing folder to store your data. Navigate to the files or documents you want to transfer. Tap and hold the file or folder you want to transfer, then select "Send a copy" or "Move". Choose the Google Drive folder you created or selected earlier and confirm the action.
Step #3: Download Data on the New iPad
Open the Google Drive app on your new iPad. Locate the folder where you uploaded the files from your old iPad. Tap on the file you want to download. Tap the three dots (...) or "More" option and select "Download". The file will be downloaded to your new iPad's local storage.

Step #4: Repeat for Additional Files
Repeat steps 2 and 3 for each file or document you want to transfer. Google Drive allows you to organize your files neatly and access them from any device with the app installed.
Using Google Drive is an efficient method for transferring data, especially if you need to share documents or files between your iPads. It's also useful for keeping your data backed up in the cloud, ensuring you can access it from anywhere with an internet connection. Keep in mind that your Google Drive storage may have limitations based on your Google account, so make sure you have enough space for your data.
Quick Start is an Apple feature designed to make setting up a new device and transferring data from your old device as smooth as possible. It allows you to transfer data wirelessly from your old iPad to your new one during the initial setup process. Here's how to use Quick Start to transfer data:
Step #1: Prepare Both iPads
Ensure that both your old and new iPads are charged and have sufficient battery life for the transfer process. Place the two iPads close to each other, ideally within a few inches, so they can establish a connection.
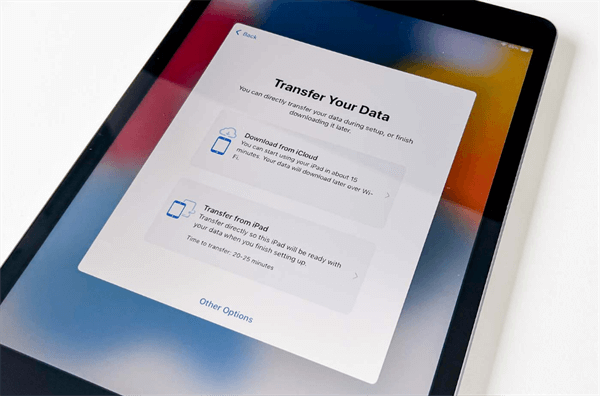
Step #2: Start the Quick Start Process on Your New iPad
Turn on your new iPad and follow the on-screen setup instructions until you reach the "Apps & Data" screen. Tap "Move Data from Android" or "Transfer Data from iPad". A Quick Response (QR) code will appear on your new iPad's screen.
Step #3: Start the Transfer on Your Old iPad
On your old iPad, you should see a message that says "Set up new iPad" with an option to "Continue". Tap on it. Use your old iPad's camera to scan the QR code displayed on your new iPad. This establishes a secure connection between the two devices.
Step #4: Choose What to Transfer
After the connection is established, your old iPad will ask you to enter your old device's passcode on the new iPad. You can then select the data and settings you want to transfer, such as your Apple ID, device settings, app data, and more. Tap "Transfer" to initiate the transfer process.
Step #5: Wait for the Transfer to Complete
The transfer process may take some time, depending on the amount of data being transferred. Your new iPad will restart once the transfer is finished.
Step #6: Complete the Setup
Follow the on-screen instructions to complete the setup of your new iPad. Your data, apps, and settings from your old iPad will be transferred and available on your new device.
Quick Start is an excellent method for transferring data because it automates much of the process, making it easy for users of all levels of technical expertise. It's especially convenient if you're setting up a new iPad for the first time or upgrading to a new model.
When it comes to transferring data from one iPad to another, you want a reliable and efficient tool to simplify the process. FoneDog Phone Transfer is one such tool that stands out for its user-friendly interface and versatility. This powerful iPhone 15-supported software allows you to transfer various types of data between iPads quickly and securely.
Phone Transfer
Transfer files among iOS, Android and Windows PC.
Transfer and backup text messages, contacts, photos, video, music on computer easily.
Fully compatible with the latest iOS and Android.
Free Download

FoneDog Phone Transfer offers a free trial version, allowing you to explore its features and functionality before making a purchase. This ensures you're satisfied with the tool's performance before committing.
Here is how to transfer data from iPad to iPad using it:
Step #1: Install and Launch FoneDog Phone Transfer
Start by downloading and installing FoneDog Phone Transfer on your computer. It's available for both Windows and Mac platforms. Once the installation is complete, launch the software.
Step #2: Connect Your iPads to the Computer
Connect both your old and new iPads to the computer using USB cables. Ensure that both devices are recognized and displayed on the FoneDog Phone Transfer interface. The old iPad should be the source device, and the new iPad should be the target device. You can click the "Switch" button to change their positions if needed.
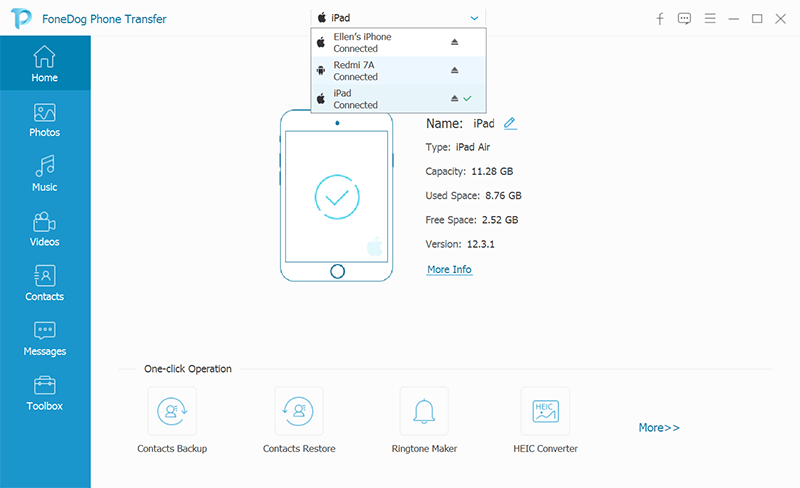
Step #3: Select Data Types to Transfer
In the middle of the FoneDog Phone Transfer interface, you'll see various data types such as Contacts, Messages, Photos, Videos, and more. Select the types of data you want to transfer from your old iPad to your new one.
Step #4: Start the Data Transfer Process
Once you've selected the data types you want to transfer, click the "Start Transfer" button. FoneDog Phone Transfer will begin copying the selected data from your old iPad to your new iPad. During this process, make sure both devices stay connected to the computer.
Step #5: Monitor the Transfer Progress
You can monitor the transfer progress on the screen. The time required for the transfer depends on the amount of data being transferred. FoneDog Phone Transfer ensures that your data is copied securely without any loss.
Step #6: Complete the Transfer
Once the transfer is complete, you'll see a "Transfer Completed" message on the screen. You can then safely disconnect both iPads from your computer.
Step #7: Verify the Data on Your New iPad
Check your new iPad to ensure that all the transferred data is present and accessible. Your new iPad should now have all the selected data from your old iPad.
When it comes to transferring data from iPad to iPad, FoneDog Phone Transfer is a reliable and efficient tool that simplifies the process while prioritizing data security and user-friendliness. With its comprehensive features and cross-platform compatibility, it's an excellent choice for anyone looking to seamlessly transfer their data between iPads.
People Also ReadEffortless Transfer: Transfer iPad Photos to PC with EaseUnlock the Groove: Steps to Transfer iPad Music to iTunes
Transferring data from one iPad to another is a common need in today's digital world. Whether you're upgrading to a new device or sharing content, you have multiple methods at your disposal. We explore how to transfer data from iPad to iPad using iCloud, iTunes, AirDrop, Google Drive, and the user-friendly FoneDog Phone Transfer tool, you can choose the method that best suits your preferences and needs.
These options ensure that your valuable data is moved securely and efficiently to your new iPad, making the transition a breeze. Explore these methods, pick the one that works best for you, and enjoy a seamless data transfer experience.
Leave a Comment
Comment

iPhone/Android Devices’ Maintenance Expert
Staying home, listening to music, writing tech articles
Many people asked me to repair their mobile phones so I have a lot of experience in mobile phone repair, and I know a lot about Android or Apple phones.
iOS Data Backup & Restore
Back up your data to PC and selectively restore iOS data from backups.
Free Download Free DownloadHot Articles
 /
/
INTERESTINGDULL
/
SIMPLEDIFFICULT
Thank you! Here' re your choices:
Excellent
Rating: 4.6 / 5 (based on 69 ratings)
