FoneDog Screen Recorder
FoneDog Screen Recorder
Special Offer
Special Offer


By Nathan E. Malpass, Last updated: November 27, 2023
Music is a companion that enriches our lives with every beat and melody. Our iPads have become more than just devices; they are vessels of our musical soul. Whether you've curated a collection of nostalgic classics or amassed a library of the latest chart-toppers, the time might come when you wish to unify your musical universe. Welcome to a guide that unravels the enigma of the process to transfer iPad music to iTunes - the hub of music organization.
While the digital realm offers convenience, it occasionally presents challenges. Many iPad users have encountered the conundrum of syncing music to iTunes without losing their minds. The process should be a harmonious symphony, but often feels more like a discordant arrangement. Fret not, for we're here to alleviate your woes and guide you through methods that will make transferring music from your iPad to iTunes a breeze.
From exploring top user-friendly iOS transfer software solutions to leveraging the power of the cloud, we'll delve into a range of techniques tailored to varying preferences and technical expertise. No more juggling between devices or fearing the loss of your cherished playlists. Let's embark on a journey to seamlessly bridge the gap between your iPad and iTunes, ensuring that your musical vibe never misses a beat.
Part #1: How to Transfer iPad Music to iTunesPart #2: Best Tool to Transfer iPad Music to iTunes on Computer: FoneDog Phone TransferConclusion
n a world where wireless connections often take the spotlight, the trusty USB lightning cable remains a steadfast bridge between our devices. When it comes to transferring your treasured iPad music to iTunes, this classic method offers reliability and simplicity. Let's dive into the steps that will have your melodies flowing smoothly from your iPad to your iTunes library.
Step #1: Prepare Your Tools
Before embarking on this musical journey, ensure you have your iPad, a USB lightning cable, and the computer where your iTunes library resides. Connecting these essential components is the first stride toward harmonious synchronization.
Step #2: Connect Your iPad
Gently insert one end of the USB lightning cable into your iPad's charging port, and plug the other end into an available USB port on your computer. Once the connection is established, your computer should recognize your iPad as a device.
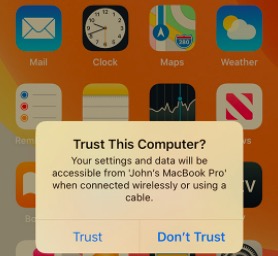
Step #3: Trust This Computer
A vital security feature in iOS may prompt you to "Trust This Computer" when connected for the first time. This ensures that data can be safely exchanged between your devices. To proceed, simply tap "Trust", and you're ready to move forward.
Step #4: Open iTunes
If iTunes doesn't launch automatically upon connecting your iPad, open it manually. Ensure you have the latest version of iTunes installed to avoid any compatibility issues.
Step #5: Select Your iPad
In the upper-left corner of the iTunes window, you'll find a device icon. Click on it to access your iPad's summary page.
Step #6: Sync Music
Navigate to the "Music" tab, where you'll find options to sync your entire music library or selected playlists, artists, albums, and genres. Choose the specific music you wish to transfer.
Step #7: Apply Changes
After selecting your desired music, click the "Apply" or "Sync" button at the bottom-right corner of the iTunes window. This action initiates the transfer process.
Step #8: Wait for Completion
Depending on the amount of music you're transferring, the process might take a few minutes. During this time, refrain from disconnecting your iPad or interrupting the sync.
Step #9: Enjoy Your Music in iTunes
Once the sync is complete, the transferred music will be available in your iTunes library. You can now enjoy your favorite tunes on your computer and easily manage them using iTunes' comprehensive features.
The USB lightning cable method not only ensures a direct and secure connection between your devices but also grants you full control over the music you transfer. It's a method that has stood the test of time, making sure your melodies find a new home in your iTunes library without missing a single note.
In an era where our data floats effortlessly in virtual clouds, leveraging cloud storage services has become a modern-day symphony. If you're seeking a wireless and versatile approach to transferring your iPad music to iTunes, the iCloud method can be your crescendo. Let's explore how to transfer iPad music to iTunes using iCloud.
Step #1: Prepare Your iCloud Account
Ensure you're signed in to the same iCloud account on both your iPad and your computer. This synchronization ensures that your music seamlessly travels between devices.
Step #2: Upload Music to iCloud
On your iPad, navigate to the Settings app and tap on your Apple ID banner. Then select "iCloud" and "iCloud Drive". Toggle on "iCloud Drive" if it's not already enabled. Next, locate your preferred music files and upload them to iCloud Drive.
Step #3: Access iCloud Drive on Computer
On your computer, open a web browser and go to the iCloud website (www.icloud.com). Log in using your iCloud credentials. Click on "iCloud Drive" to access the files you've uploaded.
Step #4: Download Music to Computer
Locate the music files you uploaded from your iPad. Select the songs you want to transfer to iTunes and download them to your computer. They will be saved in a designated folder.
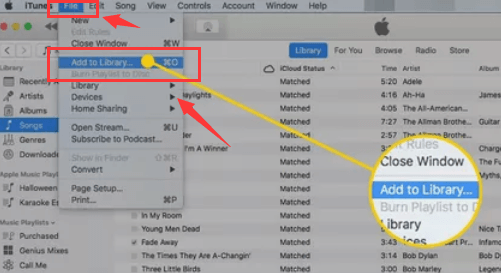
Step #5: Open iTunes and Add Music
Launch iTunes on your computer. In the upper-left corner of the iTunes window, click on "File" and select "Add File to Library" or "Add Folder to Library", depending on your preference. Navigate to the folder where you downloaded your iCloud music and select the songs. Click "Open" to add them to your iTunes library.
Step #6: Organize and Sync
Within iTunes, you can organize your newly added music into playlists, artists, or albums as desired. Once organized, connect your iOS device to your computer.
Step #7: Sync Music
Follow the same procedure as in Method 1, starting from Step 5 in Part 1. Choose the newly added music in your iTunes library for synchronization with your iPad.
Step #8: Let the Sync Begin
Click the "Apply" or "Sync" button, and iTunes will start transferring the selected music to your iPad. Ensure your iPad remains connected throughout the process.
By utilizing iCloud, you've embraced the cloud's ethereal charm to seamlessly transfer your iPad's files to your computer. This method epitomizes convenience and flexibility, reflecting the essence of files' boundless nature.
When technology meets simplicity, magic happens. Enter FoneDog Phone Transfer, a versatile, iPhone 15-supported tool designed to orchestrate the seamless movement of your cherished iPad music to your iTunes library. With FoneDog's intuitive interface and robust capabilities, the task that once seemed daunting becomes a delightful melody.
Phone Transfer
Transfer files among iOS, Android and Windows PC.
Transfer and backup text messages, contacts, photos, video, music on computer easily.
Fully compatible with the latest iOS and Android.
Free Download

Let's explore how to transfer iPad music to iTunes using this tool.
Begin by downloading and installing the FoneDog Phone Transfer software on your computer. Launch the program once the installation is complete.
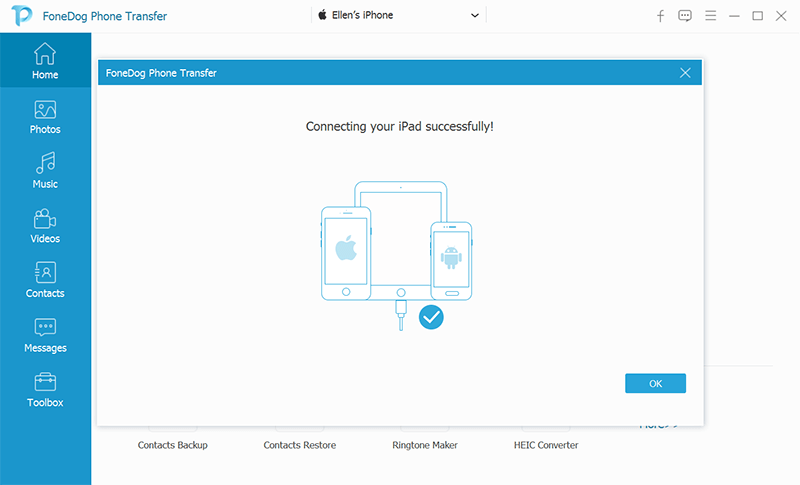
Use a USB lightning cable to connect your iPad to your computer. FoneDog Phone Transfer will automatically detect your device.
From the main interface of FoneDog Phone Transfer, choose the "Phone to PC" transfer option. This will initiate the process of transferring your music files from your iPad to your computer.
FoneDog Phone Transfer will display various categories of data that can be transferred. Select the "Music" category to specifically transfer your iPad's music files.
Click the "Start" button to commence the transfer process. FoneDog Phone Transfer will swiftly move your selected music files from your iPad to the designated location on your computer.
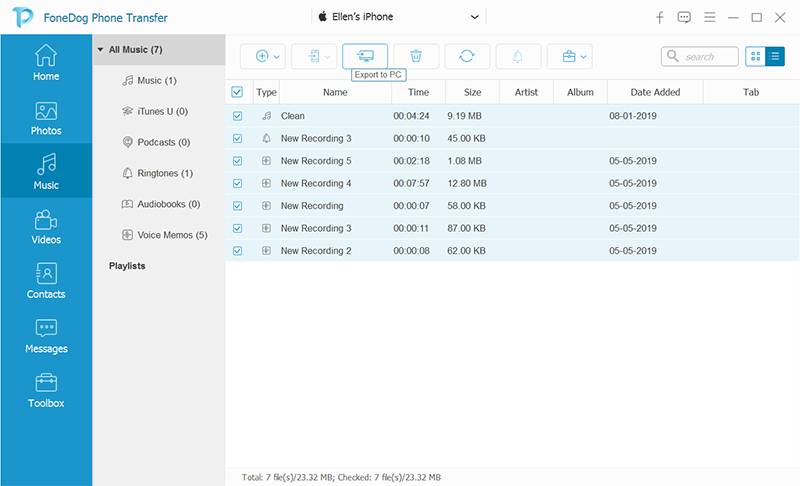
Once the transfer is complete, you can locate the transferred music files on your computer in the specified folder. Take a moment to ensure that all your desired music files have been successfully transferred.
People Also ReadSeamless Sound: How to Transfer iPad Music to Android Easily6 Ways to Easily Transfer iPad Photos to Mac for Free
In the realm of digital harmony, knowing how to transfer iPad music to iTunes is essential. Whether through the steadfast USB lightning cable, the ethereal embrace of iCloud, or the orchestrating prowess of FoneDog Phone Transfer, your musical journey is now paved with seamless melodies.
From the iPad's serenade to iTunes' grand symphony, these methods ensure your music remains in perfect harmony across devices, celebrating the union of technology and the soulful rhythm of your tunes.
Leave a Comment
Comment

iPhone/Android Devices’ Maintenance Expert
Staying home, listening to music, writing tech articles
Many people asked me to repair their mobile phones so I have a lot of experience in mobile phone repair, and I know a lot about Android or Apple phones.
Phone Transfer
Transfer data from iPhone, Android, iOS, and Computer to Anywhere without any loss with FoneDog Phone Transfer. Such as photo, messages, contacts, music, etc.
Free DownloadHot Articles
 /
/
INTERESTINGDULL
/
SIMPLEDIFFICULT
Thank you! Here' re your choices:
Excellent
Rating: 4.7 / 5 (based on 76 ratings)
