FoneDog Screen Recorder
FoneDog Screen Recorder
Special Offer
Special Offer


By Vernon Roderick, Last updated: June 21, 2020
Despite the large space allotted for iPad devices, users still tend to find themselves with no room to store their files. While some may not understand the reason for this, the most probable reason is that you have too many files, most likely photos, on your internal storage.
That is why it’s a good idea to free up some space once in a while. Now, what if you can’t exactly delete your files? How will you clear up some space then? This article will show you how to transfer iPad photos to Mac so that you can free up some space and at the same time keep your old files safe.
Part 1: Ways to Easily Transfer iPad Photos to Mac for FreePart 2: Alternative to Transfer iPad Photos to ComputerPart 3: Final Words
While the easiest method to transfer iPad photos to Mac would be to use a third-party tool, there are actually other ways. But how are you going to do that without a tool? Lucky for us, there are quite a lot of tools in Mac that allows the transfer of files. One of them happens to be iCloud Photos which specializes in images.
iCloud Photo is a platform where users can access their photos and even videos. Here, you can share files across your devices. Simply put, edits done using one device will apply to all devices. Before you begin, you have to take note of the following things:
Once you have taken care of the aforementioned things, you are now ready to transfer iPad photos to Mac. Just follow the steps below:
Now that iCloud Photos is enabled on your iPad, it is time to enable it on your Mac as well:
You have now synced the iCloud Photos on your Mac. With this, you will be notified of any changes that were made on the iCloud Photos storage such as adding, removing, or editing images. Although it’s not exactly a way to transfer iPad photos to Mac, it still serves the purpose of freeing some space on your iPad. Now that it is stored on iCloud Photos, you can now delete the photos on your iPad.
The previous section involves the use of iCloud Photos. Basically, you learned how to synchronize the photos on your iPad to your Mac. Now, what if you really want to transfer iPad photos to Macin a way where you can actually see the files on your Mac without the internet? That is what this section is all about.
AirDrop is a feature that allows users to wirelessly send all kinds of files from one device to another. It is available on your iPad, and it should be available on your Mac. In order to transfer iPad photos to Mac, you have to first take note of these following things:
Once you have made sure of the aforementioned notes, you can now continue with this method:
After doing this, you are ensuring that your Mac can be detected by your iPad using AirDrop. Now here’s how you can transfer iPad photos to Mac:
The received file will most likely end up in the Downloads folder. Either way, you now know how to transfer iPad photos to Mac using AirDrop.
Using AirDrop, you can wirelessly transfer iPad photos to Mac, but what if you want to be more direct?
Lucky for you, there is a feature available on Mac called Image Capture, and it’s a feature that allows users to transfer photos by connecting the source device directly.
Below are the steps you need to take in order to do this:
You can transfer iPad photos to Mac using this method. As you can see, it is a lot faster and easier than with AirDrop, but we still can’t deny the fact that with AirDrop, you can do it wirelessly.
Although we have discussed how to transfer iPad photos to Mac by syncing before, there is actually another way to sync your files. This time, it involves iTunes instead of iCloud Photos.
iTunes was originally a multimedia player, but it was treated more and more like a file management app. Now, it has the ability to manage files, and that involves transferring them. Since you have already turned on Photos on your iPad before, you only have to follow a few steps now:
You have now successfully learned how to transfer iPad photos to Mac by syncing it the second time. The only difference between the two ways to sync photos is that this one uses iTunes while the other uses iCloud photos. Either way, there should be no problems whatsoever in trying to migrate from iPad to Mac by now.
You may be wondering why we haven’t talked about trying to directly transfer iPad photos to Mac. That is why we will be talking about that right now. For this method, we will be importing your photos automatically. This involves using the Photos app to import the photos easily. Below are the steps that you need to take to transfer iPad photos to Mac:
This method is very similar to the method that involves the Image Capture app. The only difference is you might need to install the Image Capture app, while the Photos app is always on your Mac.
Our last method involves using Finder this time to Import your files. This is the most common method, which is also why I made this the last method. Finder is the file management app of Mac. Here, you can manage the files in any way you like. You can transfer them, delete them, copy them, and even import the photos.
With that said, here’s how you can transfer iPad photos to Mac with Finder:
That is how you can transfer iPad photos to Mac the traditional way. It may be old-school, but it’s very effective. If you can overlook its cons, you can see why it was the most commonly used method for the past few years.
Although it is most definitely possible to transfer iPad photos to computer with normal methods, you may also try out new things every once in a while. That is why I recommend trying out a tool called FoneDog Phone Transfer.
FoneDog Phone Transfer is a tool that allows users to transfer all kinds of files from one device to another. Unfortunately, it doesn’t support Mac, but it does a good job for Windows PC. So if there comes a time when you want to transfer files from or to Windows, I suggest referring to this software first before anything else.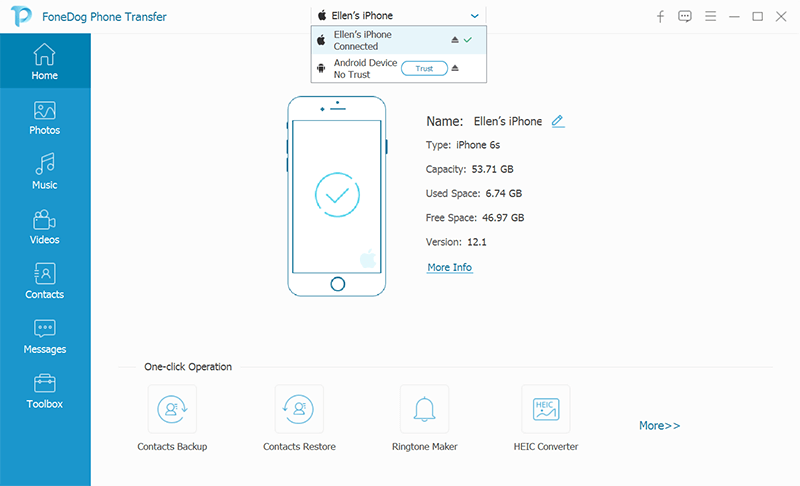
Phone Transfer
Transfer files among iOS, Android and Windows PC.
Transfer and backup text messages, contacts, photos, video, music on computer easily.
Fully compatible with iOS 13 and Android 9.0.
Free Download

iPad and Mac are compatible with each other, and that is why it is fairly easy to transfer iPad photos to Mac. However, it is normal to encounter issues when you are trying to do it improperly.
With this guide, you should be able to take the shortest route in trying to transfer iPad photos to Mac. The bottom line is that you be careful when transferring files since what you’re doing might not be the best option in terms of file security.
Leave a Comment
Comment

Technical Expertise for PC/Website Optimization
One of my passion is to develop software of my own
I write articles to share knowledge about IT technology and some experience in developing my own software, and developing my own software is one of my passions for work.
Phone Transfer
Transfer data from iPhone, Android, iOS, and Computer to Anywhere without any loss with FoneDog Phone Transfer. Such as photo, messages, contacts, music, etc.
Free DownloadHot Articles
 /
/
INTERESTINGDULL
/
SIMPLEDIFFICULT
Thank you! Here' re your choices:
Excellent
Rating: 4.8 / 5 (based on 76 ratings)
