FoneDog Screen Recorder
FoneDog Screen Recorder
Special Offer
Special Offer


By Vernon Roderick, Last updated: March 8, 2021
Before, we were so indulged with using our desktops for everything we do. This includes working, researching and even listening to music. However, now that smartphones have pretty much taken over, it’s much preferable to use them instead.
Unfortunately, files from iTunes cannot be transferred easily to Android, especially when it comes to audio files. Nonetheless, it’s not possible. This article will be talking about three of the easiest ways to transfer music from iTunes to Android. Let’s start with my top recommendation for this subject.
Part 1. Transfer Music from iTunes to Android with Specialized ToolPart 2. Transfer Music from iTunes to Android using Google Play MusicPart 3. Transfer Music from iTunes to Android using Apple MusicPart 4. Transfer Music from iTunes to Android via USB CableConclusion
No matter what problem you have, one of the easiest ways to fix it is by using a tool specialized for that issue. With that said, our first entry involves using a tool for transferring files called FoneDog Phone Transfer.
FoneDog Phone Transfer is a tool that allows users to transfer all kinds of files, be it images, messages, videos, and most importantly, music. Additionally, it supports the latest versions of Android up to Android 14 And that is why it is the best tool for the job. So without further ado, here are the steps to transfer music from iTunes to Android using this tool.
And then, if you are interested in how to transfer music from iTunes to iPhone, you can visit this article.
Launch iTunes on your computer. Now once you’re in, head to the Library from the tab at the top of the window then select Music from the dropdown menu found at the top-left corner. Next, highlight the music that you want to download. Once a music file is selected, head to the menu bar and go to File > Convert > Create New Version.

Connect your Android device to the computer using a USB cable. Make sure the FoneDog Phone Transfer software is open on the said computer. This will prompt the tool to display the basic information of your device once it is recognized. However, what you should do is click on the dropdown menu at the top of the window then select your computer’s name.
On the left side of the window, you will see a list of file types. From there, select Music. This will display the files contained in the device that you selected, in our case, it is your computer. Since you already download the music, you should find them here.
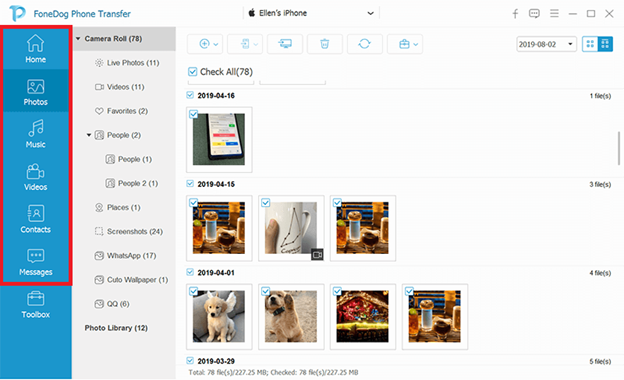
Select the files that you would want to transfer by clicking on their corresponding boxes. Once the election is over, click on the button at the top of the window. You will then get a dropdown menu, from which you should select your Android device.
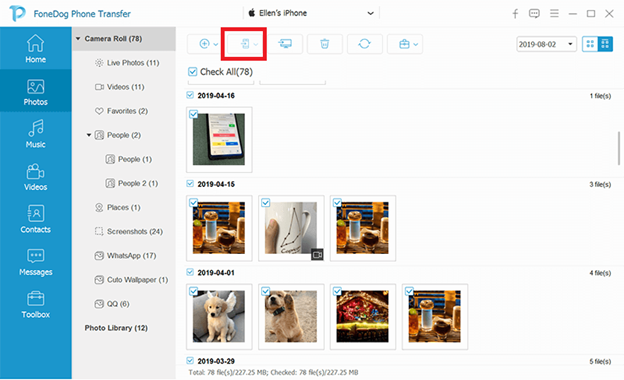
This will automatically transfer the files that you have selected to your device. With these steps, you can easily transfer music from iTunes to Android. Now if you don’t want to use a third-party tool, we might have the method for you.
People Also ReadHow to Transfer Music from iPhone to Computer FreeHow to Transfer iPhone Music to Android
You may have heard of Google Play Music a couple of times now. After all, it is one of the best apps out there for playing music. Plus, it is a default app on Android devices, so it’s impossible for you to miss it.
To begin with, Google Play Music is an app developed by Google that allows you to store audio files. Simply put, it is cloud storage for songs and it can store up to 50,000 of them. And as usual with cloud storage, you can access it across platforms. With that said, here’s how to transfer music from iTunes to Android using Google Play Music:
Note: Some versions of Google Chrome do not support this extension. If so, I suggest you look for other methods instead.
With this, you have successfully uploaded your songs into the Google Play Music cloud storage. Now all you have to do is download them in order to completely transfer music from iTunes to Android. Here are the steps to do so:
With that, you should be successful in transferring music. After all, uploading and downloading your files is one way to transfer them.
Since it’s an app developed by Google themselves, it should be more trustworthy than the first entry, though they are both great options. With that said, we have yet another app that will enable you to transfer music from iTunes to Android.
Apple Music is similar to Google Play Music in many ways. One, they were both created by giants in the software market. Two, it requires you to use your Apple account the same way Play Music requires you to use your Google Account. Third, you have to have the app on both your computer and your Android.
While there may be flaws with Apple Music, it does not change the fact that it is capable of helping you to transfer music from iTunes to Android. Follow these steps if you are ready to do what you need to do:
This will upload that song into the Apple Music library. Now all you have to do is download the said song into your Android using these steps:
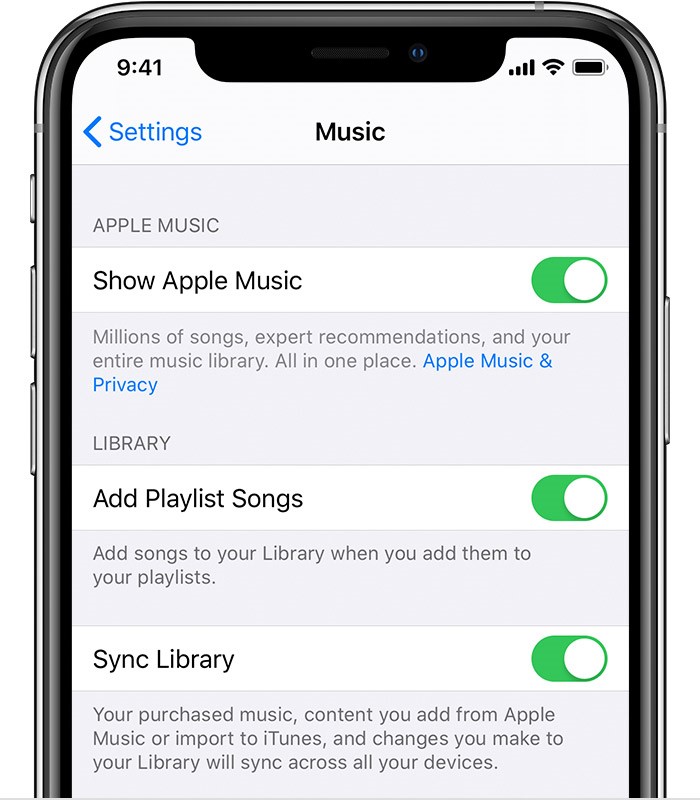
With this, you will be able to easily access your music from iTunes into your Android device. However, there’s actually a better and easier way to do this, and that would be by syncing the two devices with each other using the said app. Here’s what you need to do:
Note: This is only available in the latest versions of Mac, Android, and iOS devices, so make sure your devices are updated.
Once you follow these steps, you will be able to transfer music from iTunes to Android anytime you want, as long as it exists in your iTunes. Now you might have already realized that up until now, we’ve only been using apps, so our last entry will be a bit different.
This is perhaps the easiest method to transfer music from iTunes to Android. All you need is your Android device, your computer, and a USB cable. There is no need to install any apps whatsoever, except of course for iTunes on your computer.
Other than that, there’s nothing else. In addition to the minimal requirements, you will also only have to follow a few steps to make the transfer possible. Follow these steps if you are ready:
Note: Android devices are usually required to enable Developers options > USB debugging so that it may be recognized in computers.
Note: Downloads from iTunes are usually found in the C: drive inside Users\Music\iTunes\iTunesMedia.
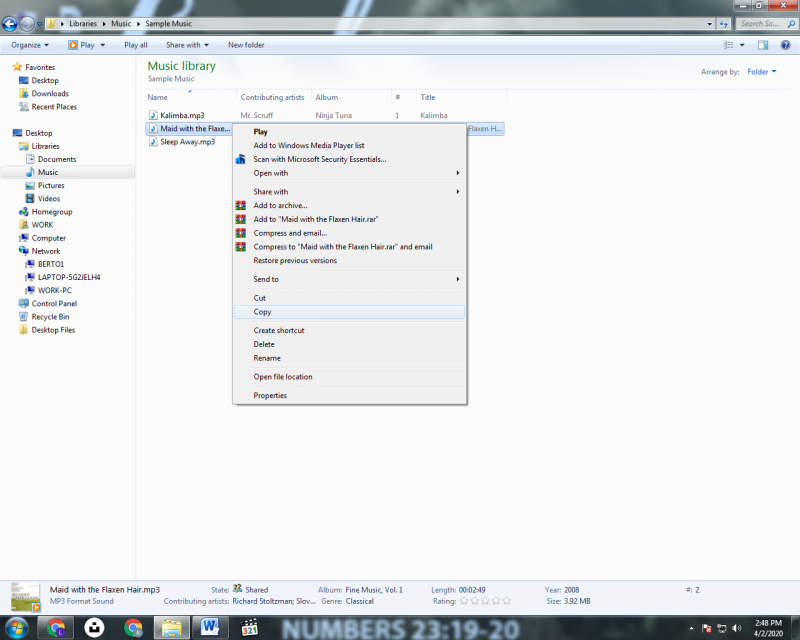
This will directly transfer music from iTunes to Android. At the end of this, you will have to eject your device. This method is not only the easiest, but it is also the most convenient and fastest. You don’t have to have an internet connection, and since that’s the case, the transfer would be much faster and not reliant on the signal.
Regardless of which method you choose, it doesn’t change your ultimate goal, which is to transfer music from iTunes to Android. With that said, I advise you to choose the method that fits your situation best, and not because you prefer one from another.
This is because if you are not careful, you may fail in transferring your files. Not only that, but you may also lose your music files. Either way, I hope this helped you with your goal to listen to music on Android.
Leave a Comment
Comment

Technical Expertise for PC/Website Optimization
One of my passion is to develop software of my own
I write articles to share knowledge about IT technology and some experience in developing my own software, and developing my own software is one of my passions for work.
Phone Transfer
Transfer data from iPhone, Android, iOS, and Computer to Anywhere without any loss with FoneDog Phone Transfer. Such as photo, messages, contacts, music, etc.
Free DownloadHot Articles
 /
/
INTERESTINGDULL
/
SIMPLEDIFFICULT
Thank you! Here' re your choices:
Excellent
Rating: 4.7 / 5 (based on 75 ratings)
