FoneDog Screen Recorder
FoneDog Screen Recorder
Special Offer
Special Offer


By Nathan E. Malpass, Last updated: November 17, 2023
In the age of digital photography, our iPads have become indispensable companions for capturing the moments that matter most. However, as our collection of digital memories grows, it becomes increasingly important to ensure they are safely backed up and organized.
One of the best ways to safeguard your precious iPad photos is by transferring them to your PC. Not only does this create a backup of your images, but it also allows for easier organization, editing, and sharing.
In this article, we'll guide you through the simple yet effective methods to transfer iPad photos to PC, especially by the use of the best transfer software for iOS devices, ensuring that your memories are always within reach, no matter where you are. Let's dive into the world of hassle-free photo transfers and take control of your digital gallery.
Part #1: Methods to Transfer iPad Photos to PCPart #2: Best Tool to Transfer iPad Photos to PC: FoneDog Phone TransferSummary
Transferring your cherished iPad photos to your PC via a Lightning or USB cable is one of the most straightforward and reliable methods. Follow these steps to get started:
Step #1: Gather Your Equipment
Before you begin, ensure you have the following items:
Step #2: Connect Your iPad to Your PC
Plug one end of the Lightning or USB cable into your iPad's charging port. Plug the other end of the cable into a USB port on your PC.
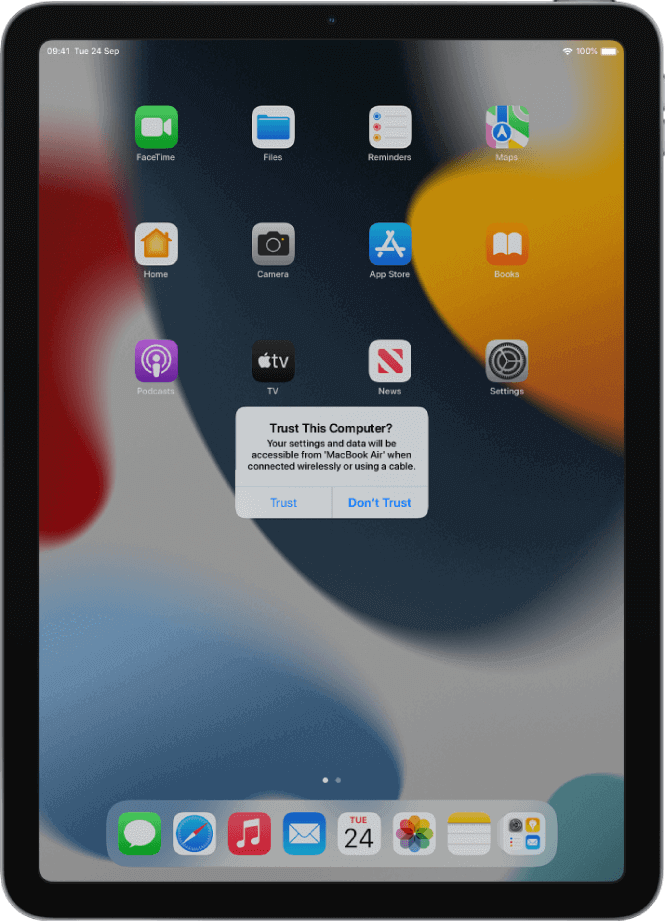
Step #3: Trust This Computer Upon connecting your iPad to your PC, you may see a prompt on your iPad asking if you trust this computer. Tap "Trust" to establish a connection.
Step #4: Open iTunes (Windows) If you're using a Windows PC, iTunes can be a helpful tool for transferring photos. Open iTunes if it doesn't launch automatically when you connect your iPad.
Step #5: Access Your iPad's Photos
In iTunes, click the device icon located near the upper-left corner of the window. Under the "Settings" section on the left sidebar, select "Photos".
Step #6: Choose the Photos You Want to Transfer
Select "Sync Photos" to enable photo synchronization. Choose the folders or albums you want to transfer. You can select specific albums or your entire photo library. Click "Apply" to start the synchronization process.
Step #7: Wait for the Transfer to Complete The time it takes to transfer photos depends on the number of pictures you're moving. Once the transfer is finished, your iPad photos will be stored on your PC in the specified folder.
Step #8: Locate Your Transferred Photos on Your PC Navigate to the folder where you chose to save your photos to access them on your PC. Congratulations! You've successfully transferred your iPad photos using a Lightning or USB cable.
This method is excellent for those who prefer a direct and secure connection between their iPad and PC. However, if you're looking for wireless alternatives or additional methods, continue reading as we explore more ways to transfer your iPad photos to your PC.
Transferring iPad photos to your PC using cloud storage services like Google Drive or Dropbox is a convenient and wireless method. Here are the general steps to transfer iPad photos to PC using a cloud service:
Step #1: Install the App
Install the Google Drive or Dropbox app on your iPad if you haven't already.
Step #2: Sign In
Open the app and sign in with your Google or Dropbox account. If you don't have an account, you can create one.
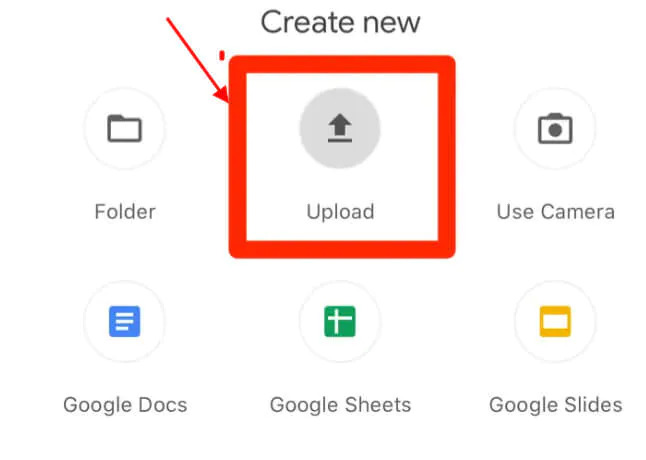
Step #3: Upload Photos
In the app, locate the option to upload files or photos. Select the photos you want to transfer from your iPad's gallery. Upload the selected photos to your Google Drive or Dropbox account.
Step #4: Access on Your PC
On your PC, open a web browser and go to the Google Drive or Dropbox website. Sign in with the same account you used on your iPad. Locate the uploaded photos in your cloud storage and download them to your PC.
This method allows you to access your iPad photos from any device with internet access. It's a great choice if you want to transfer photos wirelessly and have them readily available on your PC and other devices.
Transferring iPad photos to your PC through email or messaging apps is a straightforward method, especially for a few select images. Here are the general steps:
Step #1: Open the Photos App
On your iPad, open the Photos app.
Step #2: Select Photos
Browse through your photo library and select the photos you want to transfer to your PC. You can usually tap on photos to select them.
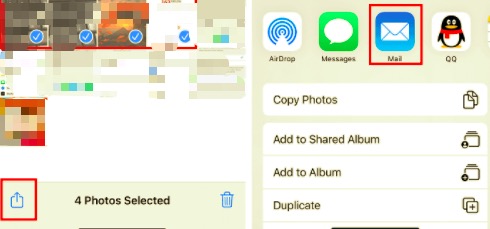
Step #3: Share Photos
Once you've selected the photos, look for the share icon (typically represented by a square with an arrow pointing up) and tap it.
Step #4: Choose Email or Messaging App
From the list of sharing options, select your preferred email or messaging app. Common options include Mail, Messages, WhatsApp, or any other messaging app you have installed.
Step #5: Compose the Message
In the email or message composition window, enter your email address (if using email) or the recipient's contact information. Add a subject and any message you'd like to include.
Step #6: Send the Message
Tap the "Send" or "Share" button to send the email or message with the attached photos to yourself.
Step #7: Access on Your PC
On your PC, open your email client or messaging app. Locate the email or message you sent to yourself. Download the attached photos to your PC.
This method is quick and suitable for sharing a few photos at a time. However, keep in mind that if you have a large number of photos to transfer, it may be more efficient to use other methods like cloud storage or a USB cable for bulk transfers.
Transferring iPad photos to your PC via iCloud.com is an effective way to access your photos from any web browser. Here are the general steps to transfer iPad photos to PC using iCloud.com:
Step #1: Set Up iCloud on Your iPad
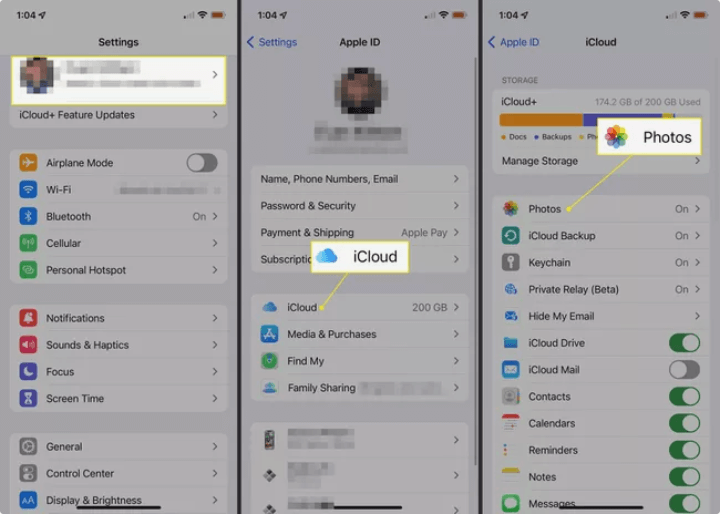
If you haven't already, ensure that iCloud is set up on your iPad by going to "Settings" > [Your Name] > "iCloud" and enabling the "Photos" option. This will automatically sync your iPad photos with iCloud.
Step #2: Access iCloud.com on Your PC
Open a web browser on your PC and go to iCloud.com.
Step #3: Sign In
Sign in with your Apple ID and password, the same one you use on your iPad.
Step #4: Open "Photos"
Once logged in, click on the "Photos" icon on the iCloud dashboard.
Step #5: Select Photos to Download
Browse through your iCloud Photos library to find the photos you want to transfer to your PC.
Step #6: Download Photos
Select the photos you wish to transfer by clicking on them. After selecting the photos, click the download button (usually represented by a cloud with an arrow pointing downward) to download them to your PC.
Step #7: Locate Your Downloaded Photos on Your PC
The downloaded photos will be saved to your PC's default download location. You can move them to a different folder if you prefer.
Using iCloud.com is a convenient method to transfer photos from your iPad to your PC, especially if you have iCloud set up for photo syncing. It allows you to access your photos from any computer with an internet connection, making it a versatile solution for photo management.
FoneDog Phone Transfer is a powerful and user-friendly software that simplifies the process of transferring iPad photos to your PC. This tool is designed to make photo migration effortless, allowing you to safeguard your memories and free up space on your iPad.
Phone Transfer
Transfer files among iOS, Android and Windows PC.
Transfer and backup text messages, contacts, photos, video, music on computer easily.
Fully compatible with the latest iOS and Android.
Free Download

Here are the features and benefits of the tool:
Below are the steps to use FoneDog Phone Transfer to transfer iPad photos to PC, an iPhone 15-supported tool, for this purpose:
Start by downloading and installing FoneDog Phone Transfer on your PC. You can find the official website of FoneDog to download the software.
After installation, launch the FoneDog Phone Transfer software on your PC.
Use a USB cable to connect your iPad to your PC. Make sure to unlock your iPad and trust the computer if prompted.
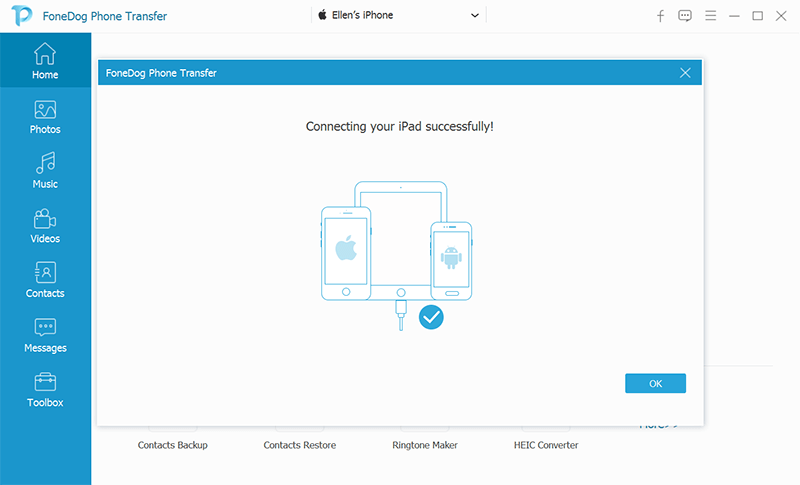
In the FoneDog Phone Transfer interface, choose the "Phone to Phone Transfer" mode.
FoneDog Phone Transfer will automatically detect and analyze your iPad. Once it's recognized, you will see both your iPad and your PC displayed on the screen.
In the source device panel (your iPad), select "Photos" or the specific photo albums you want to transfer to your PC.
After selecting the photos, click on the "Start Transfer" button to begin the transfer process.
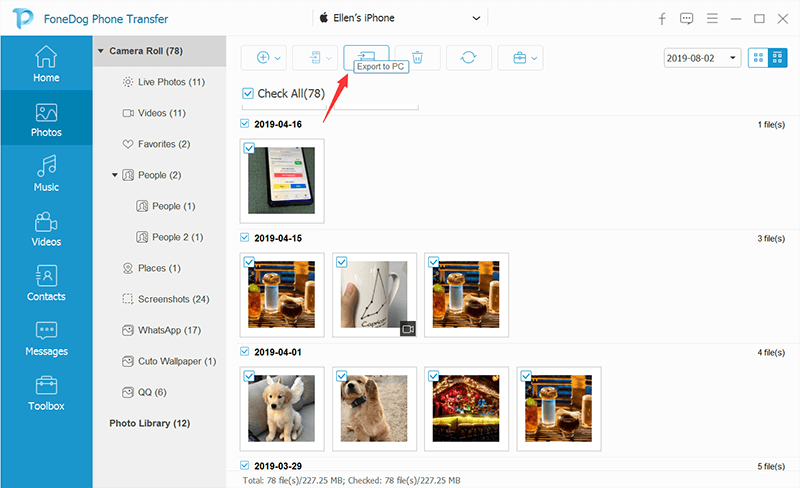
FoneDog Phone Transfer will transfer the selected photos from your iPad to your PC. The time it takes depends on the number of photos being transferred.
Once the transfer is complete, you can navigate to the destination folder on your PC to access the transferred photos.
FoneDog Phone Transfer offers a convenient and efficient way to transfer your iPad files to your PC. It's especially useful if you have a large number of photos to transfer, as it streamlines the process and ensures the safety of your valuable memories.
People Also ReadBest Updated Guide: How to Transfer iPad Music to iPhoneSeamless Sound: How to Transfer iPad Music to Android Easily
Choosing to transfer iPad photos to PC is essential for safeguarding your digital memories, creating backups, and facilitating easy access and organization. In this comprehensive guide, we've explored various methods to accomplish this task efficiently.
Choose the method that best suits your needs, whether it's a direct connection, wireless transfer, or a specialized tool like FoneDog Phone Transfer. With these options at your disposal, you can easily ensure that your treasured iPad photos are safe, accessible, and organized on your PC.
Leave a Comment
Comment

iPhone/Android Devices’ Maintenance Expert
Staying home, listening to music, writing tech articles
Many people asked me to repair their mobile phones so I have a lot of experience in mobile phone repair, and I know a lot about Android or Apple phones.
Phone Transfer
Transfer data from iPhone, Android, iOS, and Computer to Anywhere without any loss with FoneDog Phone Transfer. Such as photo, messages, contacts, music, etc.
Free DownloadHot Articles
 /
/
INTERESTINGDULL
/
SIMPLEDIFFICULT
Thank you! Here' re your choices:
Excellent
Rating: 4.7 / 5 (based on 64 ratings)
