FoneDog Screen Recorder
FoneDog Screen Recorder
Special Offer
Special Offer


By Nathan E. Malpass, Last updated: October 23, 2023
Whether it's a breathtaking sunset, a candid family portrait, or a snapshot of your favorite meal, our iPhones are always at the ready to preserve these memories. But what happens when you want to iTunes transfer photos from iPhone to PC for safekeeping, editing, or sharing with friends and family? Fear not, iTunes is here to help you seamlessly bridge the gap between your iPhone and PC.
In this comprehensive guide, we will walk you through the process of transferring photos from your iPhone to your PC using iTunes. Whether you're a seasoned Apple user or a newcomer to the world of iOS, we've got you covered. By the end of this article, you'll be able to effortlessly manage your iPhone's photo library on your PC, ensuring that your memories are always within reach.
Let's dive into the step-by-step instructions and unlock the potential of iTunes for hassle-free photo transfers.
Part #1: Using iTunes – Transfer Photos from iPhone to PCPart #2: Use FoneDog Phone Transfer without iTunes - Transfer Photos from iPhone to PCSummary
iTunes, Apple's multimedia management software, often we use iTunes to move music to our iPhone. But it's a powerful tool for managing your iPhone's photos and videos too. By following these comprehensive steps, you can easily transfer your photos from your iPhone to your PC using iTunes. Whether you're on a Windows or Mac computer, this process on iTunes transfer photos from iPhone to PC will help you organize and back up your precious memories.
If you don't have iTunes already installed on your PC, visit the official Apple website and download the latest version. Follow the installation instructions to set it up.
Use a USB cable to connect your iPhone to your PC. iTunes should automatically launch when your iPhone is detected. If it doesn't, open iTunes manually.
A dialog box will appear on your iPhone, asking if you trust this computer. Tap "Trust" to establish a connection between your iPhone and PC.
In the upper-left corner of iTunes, click on the device icon (an iPhone-shaped icon). This will take you to your iPhone's summary page.
On the left-hand side of the iTunes window, you'll see various sections. Click on "Photos" to access your iPhone's photo management settings.
You have two options here:
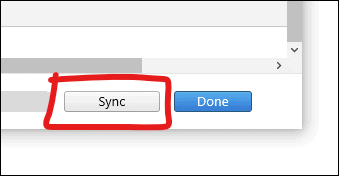
Scroll down to the "Sync Photos" section. Here, you can choose the folder on your PC where you want to save the transferred photos. Select "Choose folder" and specify the location.
Click the "Apply" or "Sync" button in the bottom-right corner of the iTunes window. iTunes will start transferring the selected photos from your iPhone to your PC.
The time it takes to transfer your photos depends on the number of photos you're moving and your computer's speed. Be patient, and let iTunes do its work.
Once the transfer is complete, you can find your photos in the folder you specified earlier. Navigate to that folder using Windows Explorer or your preferred file management software, and there you have it—your iPhone photos safely stored on your PC.
Congratulations! You've successfully transferred your photos from your iPhone to your PC using iTunes. This method ensures that your cherished memories are backed up and easily accessible on your computer whenever you need them.
If you're looking for an alternative to iTunes for transferring photos from your iPhone to your PC, FoneDog Phone Transfer is an excellent iPhone 15-supported choice. This user-friendly software allows you to bypass the complexities of iTunes and quickly move your photos from your iPhone to your PC with ease. In this section, we will explore the features and provide a step-by-step guide to using FoneDog Phone Transfer for this purpose.
Phone Transfer
Transfer files among iOS, Android and Windows PC.
Transfer and backup text messages, contacts, photos, video, music on computer easily.
Fully compatible with the latest iOS and Android.
Free Download

Features of FoneDog Phone Transfer:
Now, let's go through the steps on iTunes transfer photos from iPhone to PC using FoneDog Phone Transfer:
Begin by downloading and installing FoneDog Phone Transfer on your PC. You can find the software on the official FoneDog website. Follow the on-screen instructions to complete the installation process.
After installation, launch the FoneDog Phone Transfer software on your PC.
Use a USB cable to connect your iPhone to your PC. Ensure that you have trusted the PC on your iPhone if prompted.
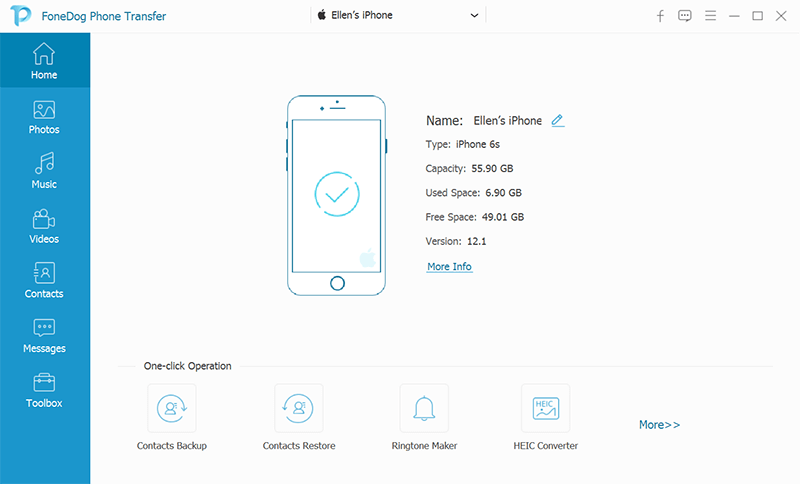
From the FoneDog Phone Transfer home screen, select the "Phone to Phone Transfer" mode.
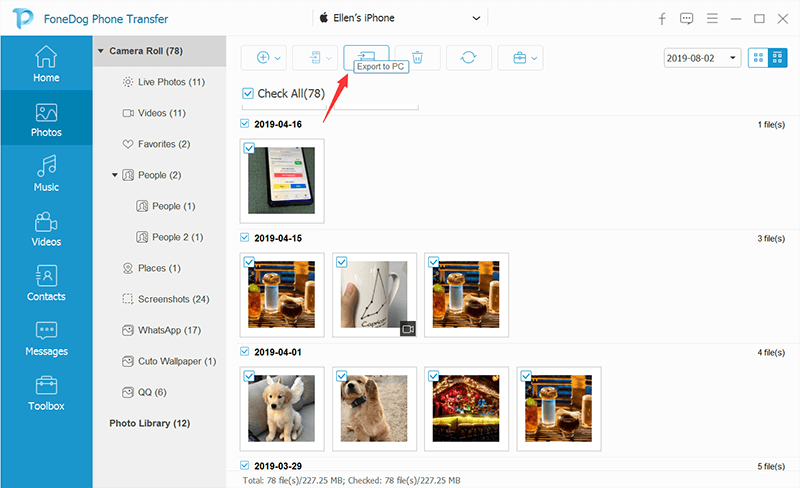
In the next window, you'll see various types of data that you can transfer. Check the box next to "Photos" to select it.
Click the "Start Transfer" button to initiate the transfer process. FoneDog Phone Transfer will begin transferring your photos from your iPhone to your PC.
The time required for the transfer depends on the number and size of the photos. Allow the process to finish.
Once the transfer is complete, you can access your photos on your PC in the location you specified during the process.
With FoneDog Phone Transfer, you can effortlessly transfer photos from your iPhone to your PC without the need for iTunes. This user-friendly tool simplifies the process and provides a reliable alternative for managing your iPhone data. Enjoy easy access to your precious memories on your PC.
People Also ReadHow Can I Add Ringtone to iPhone without iTunes Effectively & Safely?How to Transfer Files to iPad without iTunes: All Things That You Have to Learn
Whether you choose to use iTunes or opt for an alternative method like FoneDog Phone Transfer, iTunes transfer photos from iPhone to PC has never been easier. Both approaches have their unique advantages, catering to different preferences and needs.
On the other hand, FoneDog Phone Transfer offers a user-friendly alternative to iTunes, allowing you to transfer photos without the iTunes complexities. This versatile tool not only supports photos but a wide range of other data types, making it a comprehensive solution for managing your iPhone's content. It's an excellent choice for those seeking a more straightforward and efficient method.
In the end, the choice between iTunes and FoneDog Phone Transfer depends on the user’s preferences and requirements. Both methods enable you to transfer your cherished iPhone photos to your PC, ensuring that your memories are always within reach, backed up, and ready to be enjoyed. Select the method that suits you best, and enjoy seamless photo management on your PC.
Leave a Comment
Comment

iPhone/Android Devices’ Maintenance Expert
Staying home, listening to music, writing tech articles
Many people asked me to repair their mobile phones so I have a lot of experience in mobile phone repair, and I know a lot about Android or Apple phones.
Phone Transfer
Transfer data from iPhone, Android, iOS, and Computer to Anywhere without any loss with FoneDog Phone Transfer. Such as photo, messages, contacts, music, etc.
Free DownloadHot Articles
 /
/
INTERESTINGDULL
/
SIMPLEDIFFICULT
Thank you! Here' re your choices:
Excellent
Rating: 4.8 / 5 (based on 71 ratings)
