FoneDog Screen Recorder
FoneDog Screen Recorder
Special Offer
Special Offer


By Nathan E. Malpass, Last updated: September 26, 2023
iTunes has long been a cornerstone for organizing and enjoying our favorite tunes. Over the years, you've likely curated an extensive music library that's a reflection of your personal taste. But with the shift towards mobile devices as our primary music players, ensuring your iTunes music is available on your iPhone has become a necessity.
Whether you're upgrading to a new iPhone or simply want your entire music collection at your fingertips, the process to transfer iTunes music to iPhone might seem a bit daunting at first. However, it doesn't have to be. With various methods and tools available, you can seamlessly bring your cherished songs from your iTunes library to your iPhone without missing a beat.
All in all, transferring iTunes to an iPhone is considered to be easier than transferring iTunes to an Android. In this article, we'll walk you through several user-friendly methods to transfer iTunes music to your iPhone. From using Apple's official methods to third-party software options, we'll cover a range of approaches to suit your preferences.
By the end, you'll be equipped with the knowledge to ensure that your melodious playlist accompanies you wherever you go. So, let's dive into the step-by-step processes and unlock the door to a harmonious listening experience on your iPhone.
Part #1: How to Transfer iTunes Music to iPhone: Runner-Up MethodsPart #2: The Best Software to Transfer iTunes Music to iPhone: FoneDog Phone TransferSummary
One of the most traditional and reliable methods for transferring your cherished iTunes music to your iPhone is through iTunes itself. This method involves connecting your iPhone to your computer using a USB cable and syncing your music library to your device.
Here's a step-by-step guide to help you navigate through the process on how to transfer iTunes music to iPhone via iTunes sync:
Before you begin, ensure that you have the latest version of iTunes installed on your computer. This will help avoid compatibility issues and ensure a smooth transfer process.
Using a USB cable, connect your iPhone to your computer. Once connected, you might see a prompt on your iPhone asking for permission to trust the connected computer. Tap "Trust" to proceed.
Launch iTunes on your computer. In the top-left corner of the iTunes window, you'll find an icon representing your device. Click on this icon to access your iPhone's settings.
In the left sidebar of the device settings, locate the "Music" option. Check the box next to "Sync Music" to enable music syncing.
Now, you have the option to choose how you want to sync your music. You can select the entire music library, specific playlists, artists, albums, or genres. Make your selections based on your preferences.
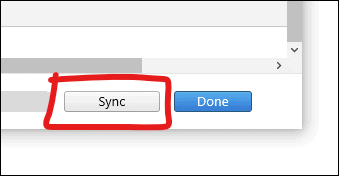
With your music selections made, click the "Apply" or "Sync" button at the bottom-right corner of the iTunes window. This will initiate the syncing process, transferring the selected music from your iTunes library to your iPhone.
The syncing process might take a while, depending on the size of your music library. Once the process is complete, you'll find your iTunes music neatly organized on your iPhone, ready for your listening pleasure.
Once the syncing is done, safely eject your iPhone from your computer by clicking the eject icon next to your device's name in iTunes. You can now disconnect the USB cable.
Using iTunes to sync your music provides a direct and effective way to transfer your iTunes library to your iPhone. However, keep in mind that this method will replace the existing music on your iPhone with the synced content. If you're looking for a more flexible approach that allows you to add music without erasing existing files, consider exploring other methods covered in this article.
Transferring your iTunes music to your iPhone doesn't always have to involve cables and direct connections. Apple's iCloud services offer a convenient way to sync your music wirelessly across devices. This method allows you to access your iTunes music from your iPhone without the need for physical connections.
Here's how to use iCloud to transfer iTunes music to iPhone using iCloud:
Ensure that you're signed in to the same Apple ID on both your computer (with iTunes) and your iPhone. On your computer, open iTunes and go to "Preferences" (on macOS) or "Edit" (on Windows), then select the "General" tab. Check the box next to "iCloud Music Library" and click "OK".
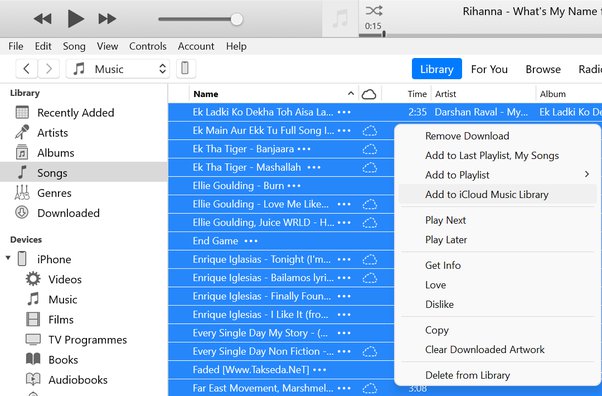
In iTunes, select the songs, playlists, or albums you want to upload to iCloud. Right-click on your selection and choose "Add to iCloud Music Library". These items will then be uploaded to your iCloud account.
On your iPhone, go to "Settings" > "Music". Toggle on "iCloud Music Library". This will enable your iPhone to access the music stored in your iCloud account.
Once iCloud Music Library is enabled on both devices, your selected iTunes music will start syncing to your iPhone. This synchronization might take some time, especially if you have a large music library.
After the synchronization is complete, open the Music app on your iPhone. You should see your iTunes music available in the app. You can play your music directly from iCloud without taking up storage space on your iPhone.
While streaming your music directly from iCloud is convenient, you might also want to have your favorite tunes available for offline listening. To do this, simply tap the cloud icon next to the song or album in the Music app. This will download the music to your iPhone, allowing you to listen without an internet connection.
Using iCloud to transfer iTunes music to your iPhone offers the advantage of wireless synchronization and access to your music library from any device connected to your Apple ID. However, keep in mind that the amount of iCloud storage available for free is limited, and you might need to purchase additional storage if your music collection exceeds the free tier.
While iTunes and iCloud are Apple's native solutions for transferring iTunes music to an iPhone, third-party software can often provide more flexibility and additional features. One such software that stands out in this regard is FoneDog Phone Transfer.
Phone Transfer
Transfer files among iOS, Android and Windows PC.
Transfer and backup text messages, contacts, photos, video, music on computer easily.
Fully compatible with the latest iOS and Android.
Free Download

This powerful iPhone 15-supported tool offers a seamless and efficient way to transfer iTunes music to your iPhone. Here's how to use FoneDog Phone Transfer to transfer iTunes music to iPhone:
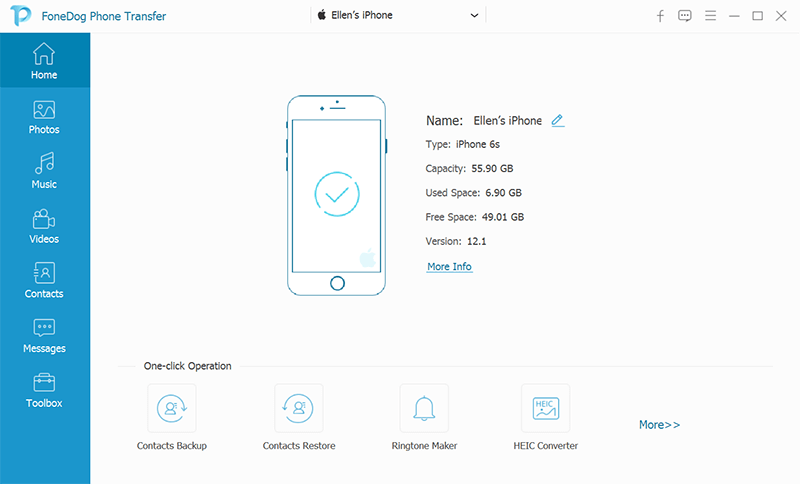
Start by downloading and installing FoneDog Phone Transfer on your computer. It's available for both Windows and macOS systems. Once installed, launch the program.
Use a USB cable to connect your iPhone to the computer. FoneDog Phone Transfer will detect your device and display it on the software interface.
In the source device section, select your iTunes library from the dropdown menu as the source. FoneDog Phone Transfer will analyze your iTunes library and display the available data categories.
Check the "Music" option to transfer your iTunes music. You can also select other data types if needed. Click the "Start Transfer" button to initiate the transfer process.
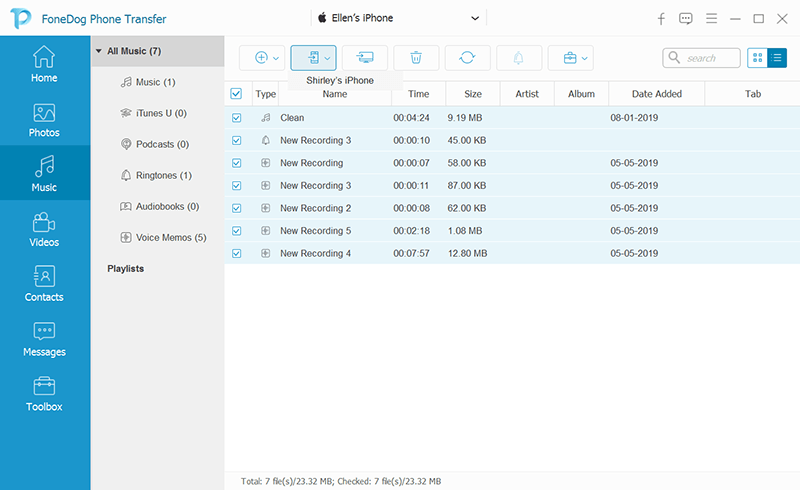
FoneDog Phone Transfer will begin transferring your selected iTunes music to your iPhone. The progress will be displayed on the screen. Once the transfer is complete, you'll receive a notification.
After the transfer is done, safely disconnect your iPhone from the computer.
FoneDog Phone Transfer provides a user-friendly interface and a straightforward process for transferring iTunes music to your iPhone. It's especially useful if you want more control over what music gets transferred and if you don't want to overwrite any existing data on your iPhone.
Additionally, this software allows you to transfer other types of data between devices, making it a versatile tool for managing your iOS data.
While Apple's native methods like iTunes syncing and iCloud services are effective, exploring third-party software like FoneDog Phone Transfer can offer additional benefits and convenience in transferring your iTunes music to your iPhone. This concludes our exploration of various methods to seamlessly enjoy your cherished tunes on your iOS device.
People Also ReadA Quick and Complete Guide on How to Transfer iTunes from PC to Mac2023 Fixed: How to Transfer Music from Computer to iPhone without iTunes?
The way to transfer iTunes music to iPhone doesn't have to be a complex task. In this comprehensive guide, we've explored various methods to achieve this, catering to different preferences and needs.
Each method offers distinct advantages. iTunes syncing is straightforward, iCloud provides wireless access, and third-party software like FoneDog Phone Transfer offers flexibility and additional features to easily transfer any iTunes backup to another PC or mobile. Choose the method that aligns with your preferences and needs.
Remember that no matter which method you choose, your cherished iTunes music will soon be harmoniously playing on your iPhone, allowing you to enjoy your favorite tunes wherever you go. Whether you're a fan of the classic approach or prefer embracing modern solutions, the joy of having your music library readily available on your iPhone is just a few steps away.
Leave a Comment
Comment

iPhone/Android Devices’ Maintenance Expert
Staying home, listening to music, writing tech articles
Many people asked me to repair their mobile phones so I have a lot of experience in mobile phone repair, and I know a lot about Android or Apple phones.
Phone Transfer
Transfer data from iPhone, Android, iOS, and Computer to Anywhere without any loss with FoneDog Phone Transfer. Such as photo, messages, contacts, music, etc.
Free DownloadHot Articles
 /
/
INTERESTINGDULL
/
SIMPLEDIFFICULT
Thank you! Here' re your choices:
Excellent
Rating: 4.6 / 5 (based on 96 ratings)
