FoneDog Screen Recorder FoneDog Screen Recorder
Special Offer Special Offer
Only Only
$4.49 $4.49
to get a ONE-month license to get a ONE-month license
Sale ends in xx days Sale ends in xx days
Buy Now
sale

How to Transfer iTunes Backup to Another Computer in 2022!

By Nathan E. Malpass, Last updated: November 8, 2022

We make iTunes backup files to ensure that we don’t lose our data from the said media playing slash management platform. However, you may want to transfer iTunes backup to another computer, especially when you’re changing devices. In this way, you don’t have to worry about losing your backup files and the data contained within them.

Fortunately, you’re in the right place. We will teach you the top methods of transferring your iTunes backup files from one device to your computer, which includes the process of transferring your playlists files from iTunes to iPhone. We will talk about how to do it with a tool called FoneDog Phone Transfer and through the iTunes platform itself. The method via USB cable will be taught as well.

Part #1: Best Way to Transfer iTunes Backup to Another Computer in 2022Part #2: How to Transfer iTunes Library to A New Computer via iTunesPart #3: How to Transfer iTunes Library to New MacPart #4: How to Transfer iTunes Backup from Mac to PC via USB CablePart #5: Conclusion

Part #1: Best Way to Transfer iTunes Backup to Another Computer in 2022

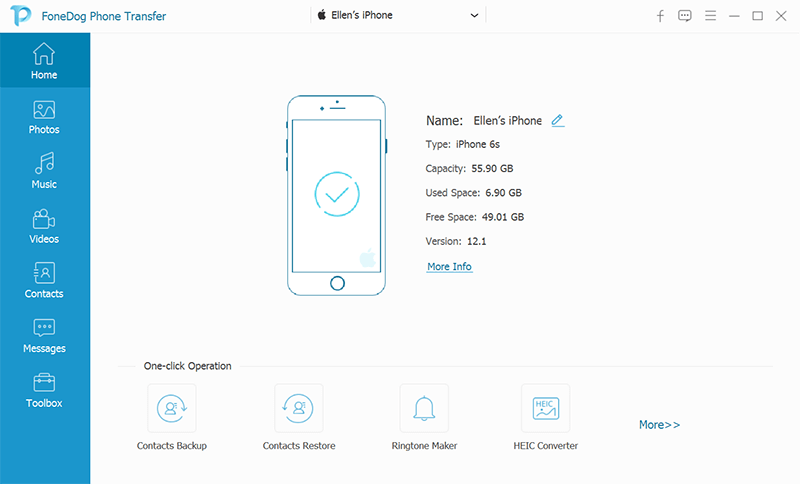
FoneDog Phone Transfer allows you to transfer data fast across Android, iOS, and PC platforms. Messages, images, contacts, movies, and music may be transferred and backed up to and from your computer without losing any data. It also includes a free Ringtone Maker and a HEIC converter.

Phone Transfer Transfer files among iOS, Android and Windows PC. Transfer and backup text messages, contacts, photos, video, music on computer easily. Fully compatible with the latest iOS and Android. Free Download FoneDog Phone Transfer

FoneDog Phone Transfer allows you to transfer files between iPhone, iPad, iPod touch, and Android devices without losing any data. You may also use it to transfer files from iOS or Android devices to a Windows PC, as well as from your computer to your iOS or Android mobile.

Some of the features and benefits of the tool include, but are not limited to, the following:

  • Your text messages and iMessages will be sent to other devices or computers in HTML/CSV/TXT.
  • Data may be transferred from iPhone to Android and from Android to iPhone.
  • You may move files or folders from your computer to your iPhone or Android smartphone.
  • With a single click, all compatible phone files may be transferred to the computer.
  • You can easily back up and restore iPhone and Android contacts within any device.
  • It is possible to scan and manage your contacts. You may remove any numbers or names that display on your devices repeatedly.
  • You can make a ringtone and then upload it to your iPhone, iPad, iPod, or Android device with a few clicks.

This top iOS data-transferring tool enables size reduction without losing quality when you convert HEIC photos to JPEG/PNG. In addition, it can help you remove unneeded files from your devices in groups or one at a time.

Here are the steps to use the tool to transfer iTunes backup to another computer:

  1. Connect all of your devices to the computer. FoneDog Phone Transfer may be downloaded, installed, and used for free. Connect your phone to the computer via a USB cable. Phone Transfer will recognize your device and provide its information on the UI.
  2. Select a file type. Select a data type on the left, such as iTunes Backups, Messages, Contacts, Messages, Photos, Videos, or Music. You can preview and confirm the data you want to transmit. Each object may be investigated by its name, creation date, size, and other details.
  3. Data Exchange Between Devices. Select files and transfer them from one device to another. Data may be exchanged across iPhones, iPads, iPod touches, Android devices, and PCs.
  4. Wait for it to finish. Wait for the operation to complete. After that, you have finished the process of transferring data from one device to another.

Best Way to Transfer iTunes Backup to Another Computer in 2022

Part #2: How to Transfer iTunes Library to A New Computer via iTunes

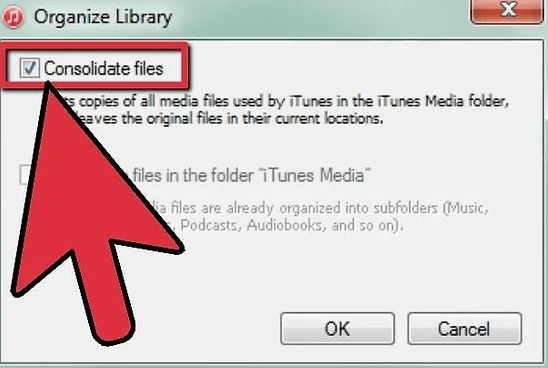
To do this, you must first back up your iTunes library and then migrate it to another system. Because the iTunes collection may take up a lot of storage space, we usually transfer our files using an external drive.

Follow these simple steps to discover how to transfer iTunes backup to another computer:

  1. To begin, you must condense your iTunes folder. To do so, run the iTunes program and navigate to File. After that, visit the Library section. Then, choose the Organize Library options.
  2. This will open a special pop-up window with organizing choices for your iTunes Library. Enable the box "Consolidate Files" option and save your settings.
  3. Wait a moment as iTunes creates a backup of the entire collection. To view the backup location, navigate toward your iTunes Menu. Within the iTunes menu, click Edit and visit Preferences. You can examine the location of the iTunes media under the tab labeled Advanced.
  4. After noting the location, launch your computer's Explorer and navigate to the directory where the iTunes backup is saved. You may manually transfer its backup content and copy it to an external disk from here.
  5. After that, remove the hard disk from the first computer and attach it to your target machine. Install your iTunes application on the new laptop or desktop.
  6. Within the new computer, navigate to Music and then select the iTunes folder.
  7. Once in that folder, copy the iTunes backup data from your external hard disk drive and paste the file(s) toward the "Music > iTunes" folder you have opened on your new computer.

Transfer iTunes Library to A New Computer via iTunes

Part #3: How to Transfer iTunes Library to New Mac

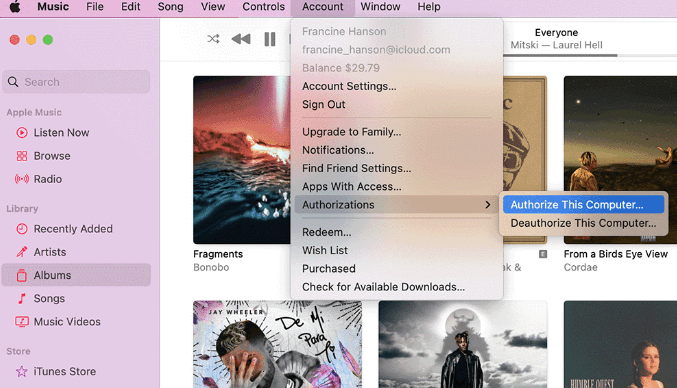
You may sync your iTunes library in addition to transfer iTunes backup to another computer. iTunes has created a feature called Home Sharing to help with this. Both computers must be connected or logged into an identical Apple ID and these two computers must be linked to the same WiFi network to use this strategy.

Please keep in mind that this function is only available within iTunes 9 or later versions. If you have an earlier version of the application iTunes installed on your computer, you should upgrade it before transferring your iTunes collection to a new computer (Windows/ Mac).

  1. To sync the iTunes collection you have, run iTunes on both computer systems and ensure that they have the same Apple ID and the same connection to one Wi-Fi network.
  2. Go to the menu of iTunes and click File. Then, choose the option called Home Sharing on your source computer. You must activate this option. You may then input your own Apple ID and begin home sharing.
  3. On your other computer, open iTunes and continue to navigate to Account. After that, click Authorizations and choose the option to "Authorize This Computer". To connect iTunes within your other computer to the old or current account, use an identical Apple ID, including its password.
  4. Go to the menu of iTunes and click File. Then, choose the option called Home Sharing on your source computer. You must enable this option. You may then input your own Apple ID and begin home sharing.
  5. On your other computer, open iTunes and continue to navigate to Account Authorizations and then select
  6. "Authorize This Computer".To connect iTunes within your other computer to the old or current account, use an identical Apple ID, including its password.
  7. Return to the older computer's iTunes application and choose the icon for Home Sharing at the top. Enable the option that says "Shared Library" from the actual list of things you may sync.
  8. Allow some time for iTunes to transfer your music and other data to the target computer. The freshly transferred data can be found within your other iTunes library afterward.

Transfer iTunes Library to New Mac

Part #4: How to Transfer iTunes Backup from Mac to PC via USB Cable

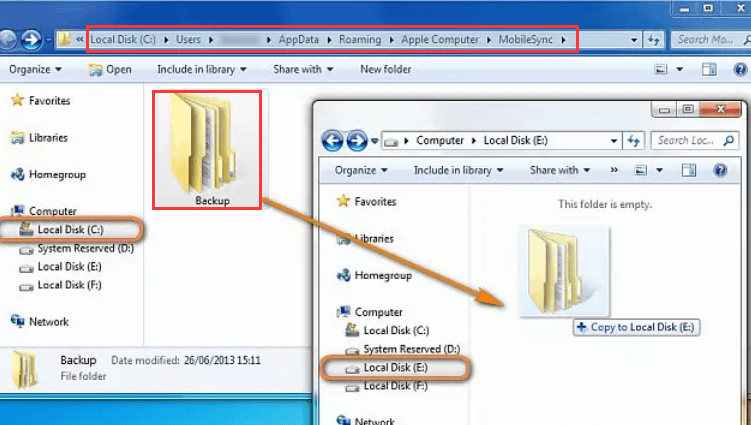
Here are the steps to transfer iTunes backup to another computer. You should follow to transfer your backup from iTunes from your macOS computer to your Windows PC through a USB cable:

  1. Find the iTunes backup files located within a particular directory on your macOS computer.
  2. Insert your flash or USB drive into your macOS computer. After that, copy the entire "Backup" folder within the iTunes directory to the directory of the connected USB drive.
  3. After that, eject the USB flash drive from your macOS computer in the proper way to avoid data loss.
  4. Insert the flash drive or USB drive ejected from your macOS computer into the USB slot of your Windows PC.
  5. If you haven't already, download the installer of iTunes. Use the installer to install the iTunes application on the Windows PC.
  6. Find your iTunes folder for backup files within your Windows machine.
  7. Copy the "Backup" folder of iTunes from your USB or flash drive to your Windows computer's location for the iTunes backup files.

Transfer iTunes Backup from Mac to PC via USB Cable

People Also ReadMethods On How to Transfer Data From iPhone to iPhoneThe Ultimate Guide to Copy iPhone Data to Pixel

Part #5: Conclusion

This guide has given you the top ways you can transfer iTunes backup to another computer. We talked about how to transfer it with FoneDog Phone Transfer, an amazing tool we have discussed above.

After that, we talked about how to transfer iTunes backup files by syncing iTunes between two computers. To implement that, you have to use the Home Sharing option within iTunes. The transfer of iTunes backup files from a Mac computer to your Windows PC was also discussed with steps you can follow easily.

Finally, we discussed and will recommend FoneDog Phone Transfer and why it is the finest solution for transferring data across iOS, Android, and PC platforms. You may use the tool to transmit various sorts of data such as messages, contacts, and more. You may get the tool right now to make sure you don't lose any data on your old smartphone.

Leave a Comment

Comment

Comment ()
author image

Nathan E. Malpass

iPhone/Android Devices’ Maintenance Expert

Staying home, listening to music, writing tech articles

Many people asked me to repair their mobile phones so I have a lot of experience in mobile phone repair, and I know a lot about Android or Apple phones.

Phone Transfer logo

Phone Transfer

Transfer data from iPhone, Android, iOS, and Computer to Anywhere without any loss with FoneDog Phone Transfer. Such as photo, messages, contacts, music, etc.

Free Download

How Do You Like This Article?

Check icon/ Check icon

INTERESTINGDULL

Check icon/ Check icon

SIMPLEDIFFICULT

Thank you! Here' re your choices:

Rate This Article: Excellent

Rating: 4.5 / 5 (based on 92 ratings)

Phone Transfer logo

Phone Transfer

Transfer data from iPhone, Android, iOS, and Computer to Anywhere without any loss with FoneDog Phone Transfer. Such as photo, messages, contacts, music, etc.

Free Download

FoneDog uses cookies to ensure you get the best experience on our website. Click here to learn more.