FoneDog Screen Recorder
FoneDog Screen Recorder
Special Offer
Special Offer


By Adela D. Louie, Last updated: September 3, 2021
Do you need to transfer files from your iTunes program from your PC to your Mac but do not know how? What to know on how to transfer iTunes from PC to Mac? If so, then this post is the one that you need.
If you are thinking that when you want to transfer iTunes from PC to Mac is that you just need to install the iTunes program alone, then you came into the right place. When there are some files or data that you want to transfer from your old PC to the new Mac that you have, then all you need to do is to go through this post and we will definitely show you how.
In addition, here is another example which is transferring iTunes to android. If you want to learn more, you could visit this post.
So, if you are interested in knowing a way to transfer iTunes from PC to Mac, then keep on reading this post because we are going to show you different ways on how you can do this. Do not worry because these are really simple and easy to follow guide that even you alone can do.
Part 1. How to Transfer iTunes from PC to Mac Using An External Hard DrivePart 2. How to Transfer iTunes from PC to Mac Using Library.xml filePart 3. How to Transfer iTunes from PC to Mac Using the Home Sharing ProcessPart 4. Conclusion
If what you are aiming for is to have those items that you bought from iTunes be transferred from your PC to Mac, then using an external hard drive is one method preferred in this scenario. This method can also allow you to transfer iTunes from PC to Mac without the need of connecting to a certain network.
Now, to know how you can transfer iTunes from PC to Mac, here are the steps that you need to follow.
On your PC, simply launch on the iTunes program and then click on the Preferences option. And from there, click on Advance for you to be able to save the iTunes music that you have on a folder on your PC.
After you have saved your iTunes to your local folder on your PC, then that is the time you can have it transferred over to your external hard drive. So from here, go ahead and connect your external hard drive to your PC and then launch it. Then simply drag and drop the iTunes files that you wish to move from your PC to Mac. And once that you are done, disconnect your external hard drive from your PC.
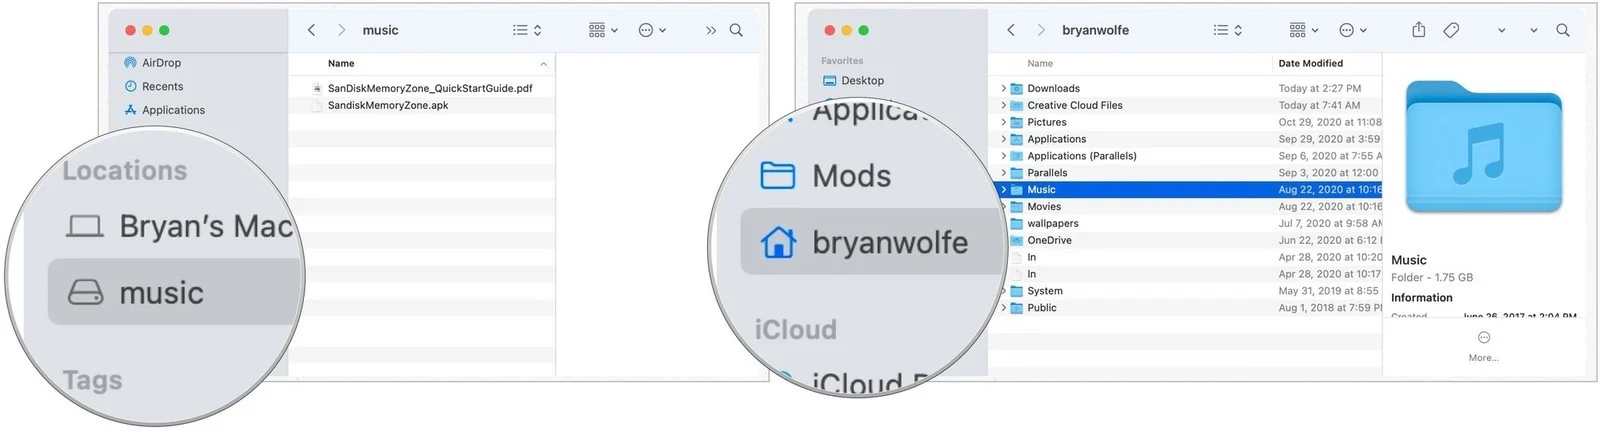
After that, connect your external hard drive to your Mac. And once that your Mac recognizes your external hard drive, find your iTunes files on your Mac and then transfer the iTunes files that you have from your external hard drive.
After you are done transferring, the iTunes program on your Mac will restart and all of the media files you transferred will be loaded on your iTunes.
Another way that you can transfer iTunes from PC to Mac is by converting it to Library.xml. However, this is a little complicated to do. But if you are familiar with using iTunes then you can do this method.
This method will be able to transfer your songs, ratings, and playlist but it will not be able to transfer other files aside from those that we have mentioned. This includes the Play Count and as well as the Last Played, and others.
So, in order for you to do this method, here are the steps that you need to follow.
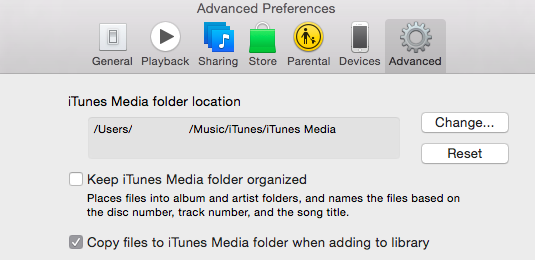
Step 1: You have to make sure that both your Mac and your PC have the same structure on folders. And in order for you to do that, just tap on the iTunes Preferences and then click on Advance. And after that, go ahead and click on the vKeep folder organized and also the option where it says that you copy your files to the iTunes Music folder when you are trying to add to your library.
Step 2: After that, simply click on the Export Library option from the menu and then save the Library.xml file on a specific folder on your PC.
Step 3: After that, make a new library for your iTunes on your Mac and then choose the options “Keep iTunes folder organized” and also the option “Copy files to iTunes Music folder when adding to Library. After that, close the iTunes program on your Mac.
Step 4: After that, turn on the Library.xml file on your Mac system. And in order for you to do this, just go to the Library.xml file located on the text editor and then replace the text XML for the location on your Mac with its format.
Step 5: And then lastly, open the iTunes program on your Mac and then choose the Import option from the File tab and then import the Library.xml file. Then your iTunes will be able to load and track the songs, ratings, and playlist as well. And once that is done, your iTunes program will then reboot.
If you have been using your iTunes program for the longest time you can remember, then by now, you are so much familiar with using the iTunes program. And with that, you are now also familiar with the iTunes Home Sharing feature.
The iTunes Home Sharing feature is known to be the easiest way for you to transfer iTunes from PC to Mac. And with the use of this feature, you can also have your playbacks extended to some other Apple devices using your Wi-Fi connection.
So, in order for you to take advantage of this feature and use it to transfer iTunes from PC to Mac, here is what you need to follow.
Step 1: You have to ensure that your PC and your Mac are both connected to the same Wi-Fi connection. And from there, log in your iTunes account on both your PC and Mac. Make sure that you are also using the same account for both devices.
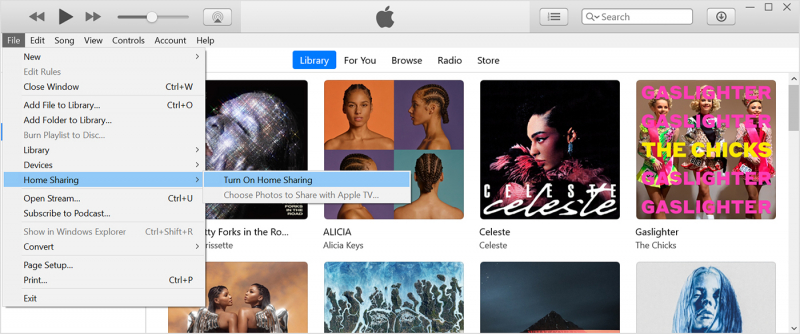
Step 2: Then from your PC, open the Home Sharing feature by clicking on the icon located at the upper left menu of your iTunes program. And from there, you can now go ahead and key in your Apple ID and your password for you to make a Home Sharing button.
Step 3: After that, click on the option Authorize Computer from the Store Menu. This way, you will be able to let your PC transfer your iTunes to Mac. And if in case you have reached the limit for transfer, then all you need to do is to de-authorize from your iTunes and then authorize this computer again.
Step 4: Then, choose all of the iTunes files from your Library in your Home Sharing tab located on the right side of your screen. And then, click on the Import option for you to begin the process of transferring from PC to Mac.
People Also ReadHow to Transfer Videos from PC to iPhone without iTunesPhotos Synced from iTunes will be Removed
All of the methods that we have shown you above are the easiest and effective way on how you can transfer iTunes from PC to Mac. Following all of the steps above will help you to do this job easily. You just have to choose the method that you think can accommodate how you want to do the transfer.
Leave a Comment
Comment

Tech Website Writing /Content Optimization
Singing, smiling, surprising every day!
So as a technical writer, it is my duty to gather effective and reliable solutions to answer questions on how to deal with the issues they are having with their devices.
Phone Transfer
Transfer data from iPhone, Android, iOS, and Computer to Anywhere without any loss with FoneDog Phone Transfer. Such as photo, messages, contacts, music, etc.
Free DownloadHot Articles
 /
/
INTERESTINGDULL
/
SIMPLEDIFFICULT
Thank you! Here' re your choices:
Excellent
Rating: 4.6 / 5 (based on 93 ratings)
