FoneDog Screen Recorder
FoneDog Screen Recorder
Special Offer
Special Offer


By Vernon Roderick, Last updated: February 20, 2020
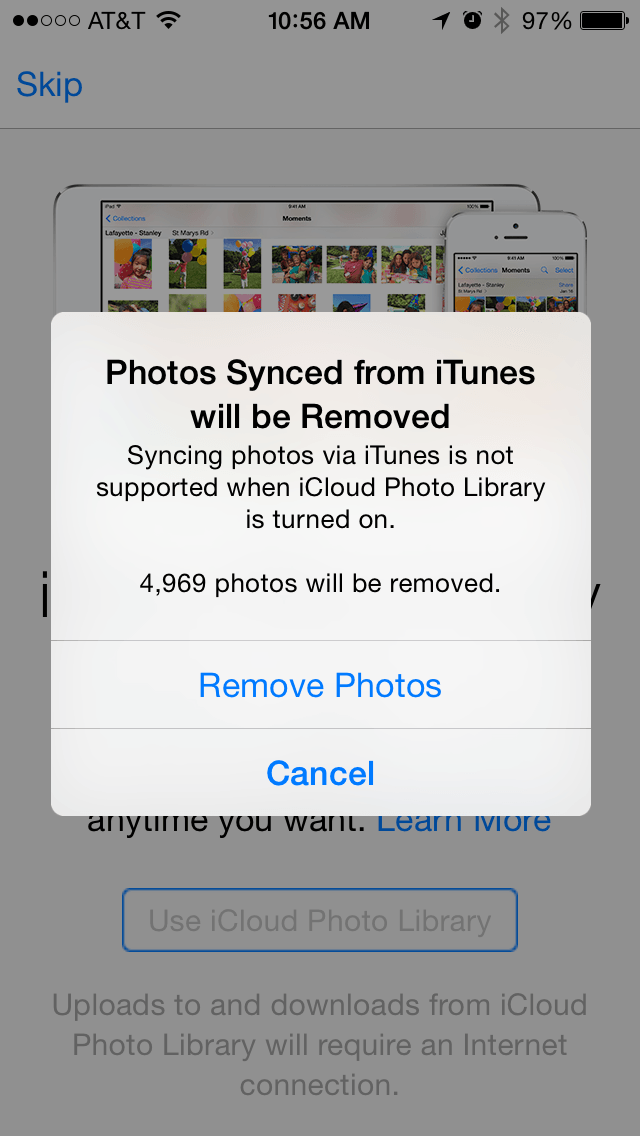
Using a mobile device is such a convenience for everyone. It helps us to work on tasks faster and in a more efficient way regardless of location. You can bring it anywhere and whenever you need to. iOS mobile devices such as iPhone, iPad and iPod serve this purpose however there are some issues that users can experience and one of this is a warning message that will suddenly pop up from your iOS device which is the photos synced from iTunes will be removed error.
Many users have encountered this problem which can be worrisome. But what does it mean when it says "photos synced from iTunes will be removed"? It means, that if you turn on iCloud Photo Library, the photos that you have synced via iTunes will be deleted from your phone, which indicates that iTunes photos and iCloud photos can not be used on the same phone.
In this article, there are ways that are provided here to teach you on how to handle the said issue. Backing up your important files is highly recommended. A reliable and safe program that you can use to transfer your files is introduced which is called FoneDog Phone Transfer.
Solution 1: To Fix Sync Error by Transferring Photos with Phone TransferSolution 2: Manually Fix Error: Photos Synced From iTunes Will Be RemovedSolution 3: How to Enable iCloud Photo Library on iOS Device to Fix the ErrorSolution 4: How Do I Stop My iPhone Photos from Syncing in iTunes?Solution 5: How to Transfer Photos Using iTunes?In Summary
Should you need to transfer photos, videos and other files to your mobile device, FoneDog Phone Transfer is a reliable and safe program to use. Your data will remain secure and safe without any data loss when using this tool. With an easy and convenient to use interface wizard, you can transfer and manage files across devices such as iOS, Android, computer, digital cameras, and others in just one click. You can do file transfer in multiple mobile devices in various operating versions. Examples of these devices are iPhone, LG, HTC, Samsung, Google and a lot more. The tool also supports all types of file such as photos, videos, movies, audios, contacts, messages, documents, and many more.
FoneDog Phone Transfer has an available free trial version downloadable on its website. It also offers 30-day money back guarantee when you purchase the software.
With FoneDog Phone Transfer, it is possible to perform file transfer in the following situations:
Phone Transfer
Transfer files among iOS, Android and Windows PC.
Transfer and backup text messages, contacts, photos, video, music on computer easily.
Fully compatible with iOS 13 and Android 9.0.
Free Download

Let's proceed how to fix "Photos Synced From iTunes Will Be Removed" error with FoneDog Phone Transfer. Check the steps on how to transfer photos from iPhonr to PC without using iTunes:
Open and start the FoneDog Phone Transfer program on your computer when you are done downloading and installing the application. This is available in both Mac and Windows OS. You can open the app via the programs on Start menu, shortcut icon on the desktop, or a pinned icon on the taskbar.
Next step is to connect your iOS device to the computer using a USB cable connection. Make sure that your device and your computer are connected to a stable power source to avoid disruptions.
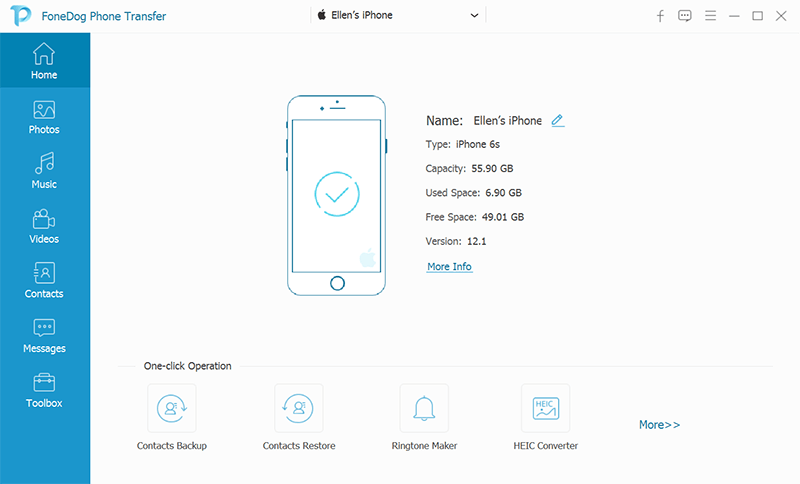
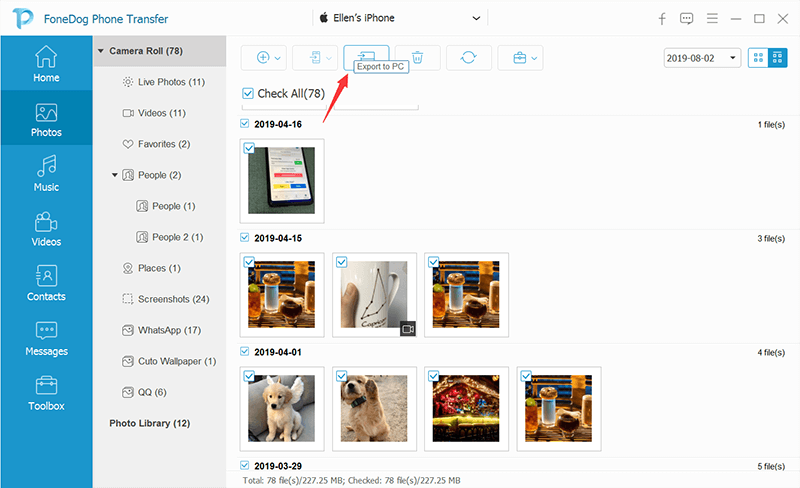
On the left corner of the screen, select the file types that you want to transfer such as Photos or Videos and then select the location or category of the files. Before you start the file transfer, you can choose to preview and check the files.
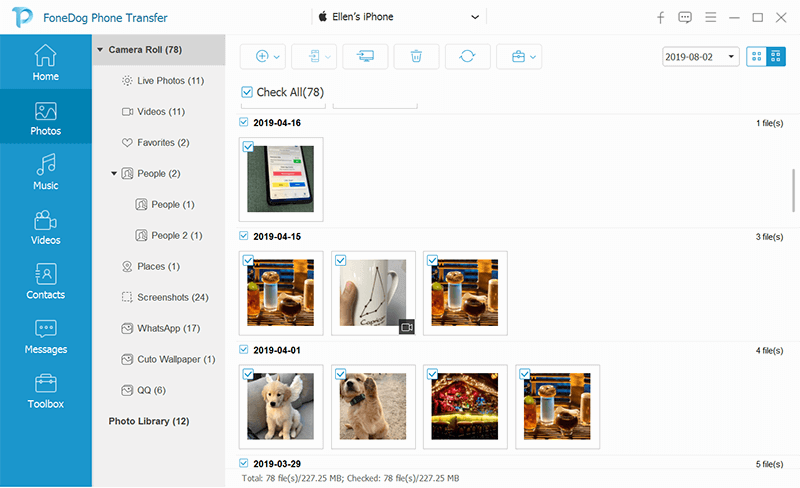
File transfer is possible between Android, iOS and computer devices. When you are done choosing the files that you want to transfer, click on the Export to Device button to start the file transfer. Be patient as the file transfer process is in progress avoiding any disruption to the transfer. The time duration to transfer will depend on the size and number of files being transferred.
This section will teach you on how to fix the error on photos synced from iTunes will be removed. You need to perform a backup first of your important files and keep your files safe using the iCloud Photo Library feature in your iPhone device. There is an available utility program on Mac that lets you transfer files to your iPhone and other devices.
Image Capture is a useful built-in application program integrated into Mac that lets you transfer and upload your photos and videos to your computer from your iOS devices, cameras and other devices. Follow the step-by-step instructions below.
After doing the steps above in creating a backup, you can now proceed in enabling the iCloud Photo Library feature on your iPhone device and remove the photo files. Then restore the videos and photos you have backed up to your iPhone device. Turning on the iCloud Photo Library on your device will upload the original versions of the files to iCloud which can be accessible across all of your iOS devices.
Another method is to turn off the Syncing feature in iTunes and correspondingly your photos synced from iTunes will be removed from your iOS devices. You can turn off syncing for all photos or you can specify which photo album that you want to be removed.
This is a simple method that will guide you on how to perform a manual syncing of your photos and videos using the iTunes application on your computer.
Phone Transfer
Transfer files among iOS, Android and Windows PC.
Transfer and backup text messages, contacts, photos, video, music on computer easily.
Fully compatible with iOS 13 and Android 9.0.
Free Download
You are using your mobile device such as iPhone or iPad to capture photos and take videos and save these files on your device. Sometimes, you can get an error when you sync your files which will warn you that photos synced from iTunes will be removed. This can be disappointing if it happens especially that you have your important files stored on your iOS device. With this, it is highly recommended to perform a backup of your photos. You can follow the methods discussed on this article on how to resolve the problem as well as on how to use the FoneDog Phone Transfer program to back up your necessary files from your iOS device.
Leave a Comment
Comment

Technical Expertise for PC/Website Optimization
One of my passion is to develop software of my own
I write articles to share knowledge about IT technology and some experience in developing my own software, and developing my own software is one of my passions for work.
Phone Transfer
Transfer data from iPhone, Android, iOS, and Computer to Anywhere without any loss with FoneDog Phone Transfer. Such as photo, messages, contacts, music, etc.
Free DownloadHot Articles
 /
/
INTERESTINGDULL
/
SIMPLEDIFFICULT
Thank you! Here' re your choices:
Excellent
Rating: 4.7 / 5 (based on 67 ratings)
