FoneDog Screen Recorder FoneDog Screen Recorder
Special Offer Special Offer
Only Only
$4.49 $4.49
to get a ONE-month license to get a ONE-month license
Sale ends in xx days Sale ends in xx days
Buy Now
sale

Best Updated Guide: How to Transfer iPad Music to iPhone

By Nathan E. Malpass, Last updated: October 8, 2023

Smartphone and tablet devices have become our personal jukeboxes, holding a treasure trove of melodies that accompany us through every moment of our lives. Whether you're lounging with your iPad or on the go with your iPhone, having access to your favorite tunes is essential.

However, keeping your music collection consistent across different devices can be a challenge. If you've meticulously curated a playlist on your iPad and want to groove to the same beats on your iPhone, you're in the right place.

This article delves into the art to transfer iPad music to iPhone. We'll guide you through a variety of methods and techniques, especially under the use of a top offline iPhone music transfer software to ensure your musical journey remains uninterrupted, regardless of the device you're using. Whether you're a tech-savvy individual or someone who prefers a more straightforward approach, we've got you covered.

So, get ready to harmonize your devices and let the music flow effortlessly between your iPad and iPhone.

Part #1: How to Transfer iPad Music to iPhone: Runner-Up MethodsPart #2: Transfer iPad Music to iPhone Using FoneDog Phone TransferConclusion

Part #1: How to Transfer iPad Music to iPhone: Runner-Up Methods

Method #1: Using iCloud Sync

When it comes to transferring music between your iPad and iPhone, iCloud proves to be a handy tool for keeping your music library harmonized across devices. This method is especially beneficial if you're subscribed to Apple Music or have your music library stored in iCloud. Follow these steps to effortlessly transfer iPad music to iPhone using iCloud:

  1. Enable iCloud Music Library: On your iPad, go to "Settings" and tap on your Apple ID. Select "iCloud" and then "Music". Toggle on "iCloud Music Library".
  2. Wait for the Library to Sync: Your iPad will now begin syncing your music library to iCloud. This process might take some time, depending on the size of your collection and the speed of your internet connection. Make sure your iPad is connected to Wi-Fi and plugged in if possible.
  3. Enable iCloud Music Library on iPhone: On your iPhone, repeat the same steps as on the iPad to enable iCloud Music Library. Wait for your iPhone to sync with iCloud.
  4. Access Your Music: Open the Music app on your iPhone, and you should find your synced music from the iPad available here.
  5. Stream or Download: You can choose to stream the synced music directly from iCloud or download individual songs or albums for offline listening.

Transfer iPad Music to iPhone Using iCloud Sync

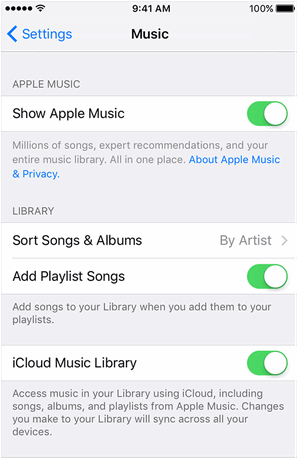
If you're subscribed to Apple Music, this method works seamlessly with your subscription. You can stream and download music from your library without worrying about storage space.

While using iCloud Sync is convenient, keep in mind that it requires an active internet connection for streaming and may use cellular data if you're not on Wi-Fi. Additionally, if you have a substantial music collection, you might consider the storage limitations of your iCloud account.

Method #2: Using AirDrop

AirDrop provides a quick and wireless method to transfer your music from your iPad to your iPhone, without the need for cables or an internet connection. This method is ideal when you want to transfer a few specific songs or albums. Here's how to do it:

  1. Activate AirDrop: On both your iPad and iPhone, ensure that AirDrop is enabled. Swipe down from the upper right corner of your device's screen to open Control Center and tap on the "AirDrop" icon. Choose "Contacts Only" or "Everyone" based on your preferences.
  2. Select Music on iPad: Open the Music app on your iPad and navigate to the songs or albums you want to transfer. Tap and hold on to the song or album's cover art. This action will bring up a contextual menu.
  3. Share via AirDrop: From the contextual menu, tap on the "Share" option, and a list of sharing methods will appear. Select the recipient device, which is your iPhone. Your iPhone should show up in the AirDrop section of the list.
  4. Accept on iPhone: A notification will pop up on your iPhone, displaying the music you're about to receive. Tap "Accept" to initiate the transfer.
  5. Find Your Music: The transferred music will be saved in the Music app on your iPhone. You can access it just like any other song in your library.

Transfer iPad Music to iPhone Using AirDrop

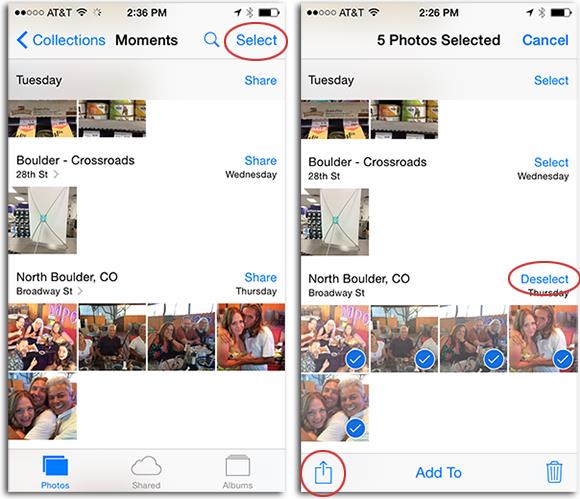
AirDrop is not only efficient but also secure, as it creates a direct peer-to-peer connection between your devices. However, keep in mind that AirDrop requires both Bluetooth and Wi-Fi to be enabled on both devices. It's recommended to ensure your devices are in close proximity for a smoother transfer.

Method #3: Using iTunes

iTunes, though not as prominent as it used to be, still offers a reliable way to transfer music from your iPad to your iPhone. This method is particularly useful if you prefer a more direct approach and want to have your music stored offline on your iPhone. Follow these steps to transfer iPad music to iPhone using iTunes:

  1. Connect Your iPad: Connect your iPad to your computer using a USB cable and open iTunes (or Finder on macOS Catalina and later).
  2. Authorize the Computer: If prompted, authorize the computer to access your device.
  3. Access Your iPad: Click on the iPad icon that appears in iTunes or Finder.
  4. Choose Music: In the left sidebar or at the top of the window (depending on your iTunes version), click on "Music" to access your iPad's music library.
  5. Select Music to Transfer: Choose the songs, albums, or playlists you want to transfer to your iPhone.
  6. Drag and Drop or Sync: You can either drag and drop the selected music directly from your iPad's library to the "Music" section under your iPhone's icon. Alternatively, you can click the "Sync" button to transfer the chosen music.
  7. Apply Changes: Once you've made your selections, click "Apply" to initiate the transfer process. iTunes will begin transferring the chosen music to your iPhone.
  8. Disconnect and Access Music: After the transfer is complete, safely disconnect your iPad. Then, open the Music app on your iPhone to find the transferred songs.

Transfer iPad Music to iPhone Using iTunes

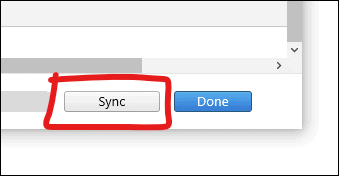
Using iTunes provides you with more control over your music transfer process and allows you to keep your music available offline on your iPhone. However, since Apple has shifted its focus away from iTunes in recent years, the software might not receive regular updates and improvements.

Method #4: Using Google Drive Or Dropbox

Cloud storage services like Dropbox and Google Drive offer a convenient way to transfer music between your iPad and iPhone. This method is especially useful when you have a sizable music collection that you want to transfer without using your device's storage. Here's how to transfer iPad music to iPhone using Dropbox or Google Drive:

Using Dropbox:

  1. Install Dropbox: If you haven't already, download and install the Dropbox app on both your iPad and iPhone from the App Store.
  2. Upload Music to Dropbox: On your iPad, open the Dropbox app and upload the music you want to transfer to a folder in your Dropbox account.
  3. Access Dropbox on iPhone: Open the Dropbox app on your iPhone and navigate to the folder where you uploaded the music.
  4. Download Music on iPhone: Tap on the music files you want to transfer and select the option to download them to your iPhone.
  5. Open Music Player: Open the Files app or your preferred music player app on your iPhone and access the downloaded music files.

Using Google Drive:

  1. Install Google Drive: Install the Google Drive app on both your iPad and iPhone from the App Store.
  2. Upload Music to Google Drive: On your iPad, open the Google Drive app and upload the music to a folder in your Google Drive account.
  3. Access Google Drive on iPhone: Open the Google Drive app on your iPhone and navigate to the folder where you uploaded the music.
  4. Download Music on iPhone: Select the music files you want to transfer and choose the option to download them to your iPhone.
  5. Access Downloaded Music: Open your preferred music player app on your iPhone and access the downloaded music files.

Using Dropbox or Google Drive for music transfer is beneficial for conserving device storage and provides an accessible way to manage your music collection across devices. However, keep in mind that you might need an internet connection to download the music files on your iPhone, and the playback experience might vary based on the music player app you use.

Part #2: Transfer iPad Music to iPhone Using FoneDog Phone Transfer

While built-in methods and cloud services offer effective ways to transfer music, specialized transfer software like FoneDog Phone Transfer (an iPhone 15-supported tool) takes the process a step further. This software offers a comprehensive and user-friendly solution for transferring music and other data between your devices.

Phone Transfer Transfer files among iOS, Android and Windows PC. Transfer and backup text messages, contacts, photos, video, music on computer easily. Fully compatible with the latest iOS and Android. Free Download FoneDog Phone Transfer

Here's how to use FoneDog Phone Transfer to transfer iPad music to iPhone:

  1. Install FoneDog Phone Transfer: Download and install the FoneDog Phone Transfer software on your computer from the official website.
  2. Launch the Software: Launch the FoneDog Phone Transfer software after installation.
  3. Connect Your Devices: Connect both your iPad and iPhone to your computer using USB cables. The software will detect the devices and display them on the screen.
  4. Choose Music Transfer: From the main interface, select the option to transfer music. The software will initiate the scan to detect the music files on your iPad.
  5. Select Music for Transfer: After the scan is complete, you'll see a list of music files available for transfer. Choose the songs or albums you want to transfer to your iPhone.
  6. Initiate the Transfer: Once you've made your selections, click the "Transfer" button to start the music transfer process.
  7. Monitor the Transfer: You can monitor the progress of the transfer on the screen. The software will notify you when the transfer is successfully completed.
  8. Access Music on iPhone: Open the Music app on your iPhone, and you should find the transferred music available for playback.

Transfer iPad Music to iPhone Using FoneDog Phone Transfer

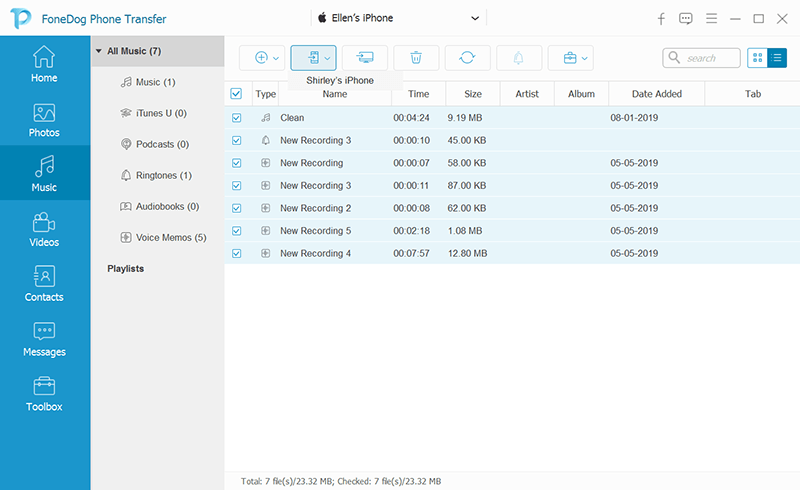
FoneDog Phone Transfer streamlines the music transfer process and ensures that your music is accurately and efficiently transferred from your iPad to your computer or phone. The software also supports transferring other types of data, making it a versatile tool for managing your device's content.

People Also Read5 Most Effective Ways to Transfer iPad Photos to iPad7 Easiest Ways to Transfer iPad Videos to PC for Free

Conclusion

As technology continues to evolve, using specialized transfer software like FoneDog Phone Transfer offers a reliable and efficient way to keep your music and other data in sync across devices.

In conclusion, whether you choose to utilize built-in methods, cloud services, or specialized software, the process to transfer iPad music to iPhone has become more accessible than ever. Select the method that aligns with your preferences and needs, and enjoy a harmonious music experience on all your devices.

Leave a Comment

Comment

Comment ()
author image

Nathan E. Malpass

iPhone/Android Devices’ Maintenance Expert

Staying home, listening to music, writing tech articles

Many people asked me to repair their mobile phones so I have a lot of experience in mobile phone repair, and I know a lot about Android or Apple phones.

Phone Transfer logo

Phone Transfer

Transfer data from iPhone, Android, iOS, and Computer to Anywhere without any loss with FoneDog Phone Transfer. Such as photo, messages, contacts, music, etc.

Free Download

How Do You Like This Article?

Check icon/ Check icon

INTERESTINGDULL

Check icon/ Check icon

SIMPLEDIFFICULT

Thank you! Here' re your choices:

Rate This Article: Excellent

Rating: 4.7 / 5 (based on 65 ratings)

Phone Transfer logo

Phone Transfer

Transfer data from iPhone, Android, iOS, and Computer to Anywhere without any loss with FoneDog Phone Transfer. Such as photo, messages, contacts, music, etc.

Free Download

FoneDog uses cookies to ensure you get the best experience on our website. Click here to learn more.