FoneDog Screen Recorder
FoneDog Screen Recorder
Special Offer
Special Offer


By Vernon Roderick, Last updated: June 16, 2021
You got a new iPad device. And you want to sync your various files from your iPhone to another iOS device such as your new iPad. Files can be movies, music, photos, documents, or apps. How can you do this process conveniently?
In this article, we will discuss the different methods on how to transfer pictures from iPhone to iPad devices such as using iCloud, iTunes, or Bluetooth. The process will depend on the number and type of files to be transferred. Moreover, the best alternative to transfer pictures is with the help of a reliable and simple but very efficient tool called FoneDog Phone Transfer which is also discussed in detail in this tutorial guide.
Part 1. Best Software to Transfer Pictures from iPhone to iPadPart 2. How to Transfer Pictures from iPhone to iPad Using iTunesPart 3. How to Transfer Pictures from iPhone to iPad Using AirDrop Part 4. How to Transfer Pictures from iPhone to iPad Using PhotoStream Part 5. How to Transfer Pictures from iPhone to iPad Using iCloud Part 6. How to Transfer Pictures from iPhone to iPad Using Bluetooth Part 7. How to Transfer Pictures from iPhone to iPad via Lightning Cable Part 8. In Summary
FoneDog Phone Transfer is a reliable and efficient tool that allows you to easily manage and transfer files between iOS, Android devices, and PC in three easy steps. It enables you to transfer different file types such as pictures, music, videos, movies, contacts, messages, documents, and many more. It supports multiple devices in various operating versions.
With FoneDog Phone Transfer you are assured that your data is safe and secured without any loss. The software is available in a free trial version. It offers a 30-day money-back guarantee for purchases. You can perform the FoneDog phone transfer in different scenarios such as:
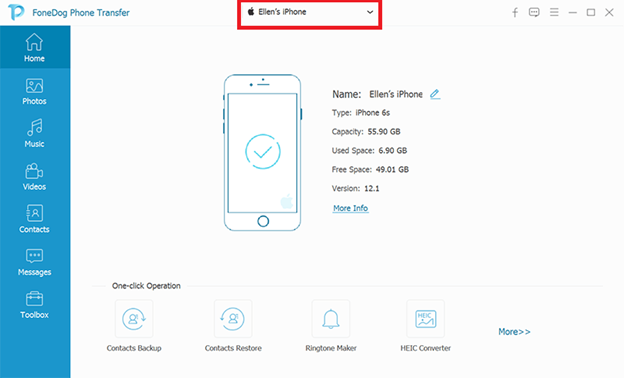
When you have downloaded and installed FoneDog Phone Transfer, launch the app on your computer. This will work on both Mac and Windows OS. Launch the tool and connect your iPhone to the computer.
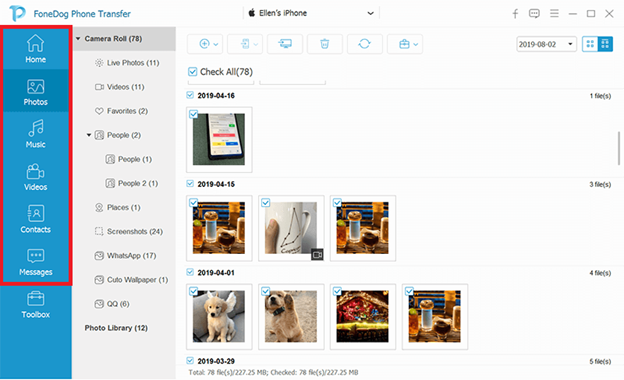
On the left pane, select the file types that you want to transfer, for example, Photos if you wish to transfer pictures from iPhone to iPad. Next, choose the location or category of the files. If you want to check the content of the files before doing the transfer, you can choose to preview each file.
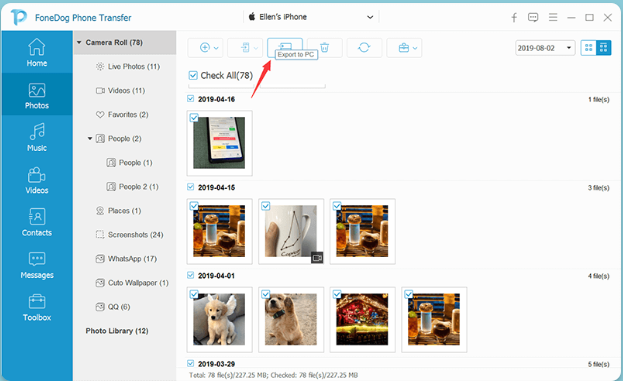
Connect your iPad device to the computer. Select all or specific pictures that you want to transfer to your iPad device. Then, click Export to Device at the top to start the file transfer. Wait until the data transfer process is finished making sure there are no disruptions while the transfer is going on.
This section provides a basic process to teach you how to transfer pictures from iPhone to iPad with the help of iTunes installed on your computer. When you sync the pictures from your iPhone using iTunes, all data on your iPad will be deleted and replaced with the ones in the iTunes library.
How to get the most recent version of iTunes:
Step 1. Open the iTunes application on your PC.
Step 2. On Mac, click the iTunes menu and choose Check for Updates.
On Windows, click the Help menu and choose Check for Updates.
Step 3. The app will check for the latest updates of iTunes. Download and install to your computer when prompted.
How to transfer pictures from iPhone to iPad:
Step 1. Plugin your iPhone device to your computer using the USB cable connection.
Step 2. Launch the iTunes application on your computer. Make sure it is on the latest version. Download the most recent updates from its website and install them on your computer.
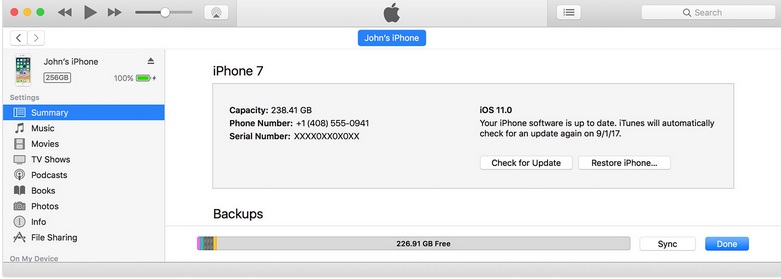
Step 3. When your iPhone device is connected and recognized successfully by iTunes, click the iPhone icon located in the upper left corner.
Step 4. Still, on the left pane, go to Summary.
Step 5. Click on Photos under Settings.
Step 6. Tick the Sync Photos box on the right.
Step 7. Select Pictures from the pop-up dialog.
Step 8. Select the option if All folders or Selected folders.
Step 9. Next, click the Apply button. Wait until the data sync process completes.
Step 10. Disconnect your iPhone from the computer.
Step 11. Next, Plug your iPad device into the computer using a USB cable.
Step 12. When your iPad device is connected and recognized successfully by iTunes, click the iPad icon located in the upper left corner.
Step 13. Still, on the left pane, go to Summary.
Step 14. Click on Photos under Settings.
Step 15. Tick the Sync Photos box on the right.
Step 16. Select Pictures from the pop-up dialog.
Step 17. Select the option if All folders or Selected folders.
Step 18. Next, click the Apply button. Wait until the data sync process completes.
Step 19. Disconnect your iPad from the computer.
AirDrop is a pre-installed program in Mac and iDevices that allows you to instantly send over a few files in a wireless connection from your Mac PC or any iOS device to an iPad device or other iOS devices that are close at hand. This method supports sharing and data transfer of pictures one by one from iPhone to iPad without the use of iCloud.
How to set up your iOS devices to use AirDrop:
Step 1. On your iPhone device, launch the Control Center.
Step 2. Tap on AirDrop.
Step 3. A pop-up menu will appear. Choose an option.
If you select Contacts Only from the menu options, it will require an internet connection when you share files and will prompt you to sign in to your iCloud account.
Selecting Everyone from the menu will not require an internet connection or an iCloud account when you share the files.
Step 4. Do the same steps with your iPad device: turn on the AirDrop feature in the Control Center.

Step 5. On your iPhone device, launch the Photos app.
Step 6. Tap on Select located at the upper right corner of the screen.
Step 7. Select the pictures that you want to copy or transfer from your iPhone to your iPad device.
Step 8. Tap on Share.
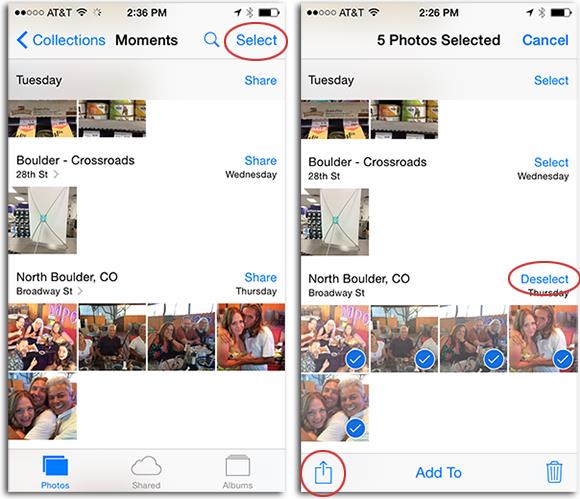
Step 9. Select the AirDrop option to share the chosen pictures.
Step 10. On your iPad, you will receive a notification message of an AirDrop request. Tap on Accept to start the file transfer and save the pictures to the Downloads folder.
Another method to transfer pictures from iPhone to iPad is with the use of PhotoStream. It uploads your pictures to iCloud which can be accessed from another iOS device provided that you are using the same Apple ID for both devices when signing in. PhotoStream limits up to 1000 pictures and uploads for the last 30 days only. Your iOS devices must be connected to a Wi-Fi connection and are in iOS 8 or later versions before doing the steps below.
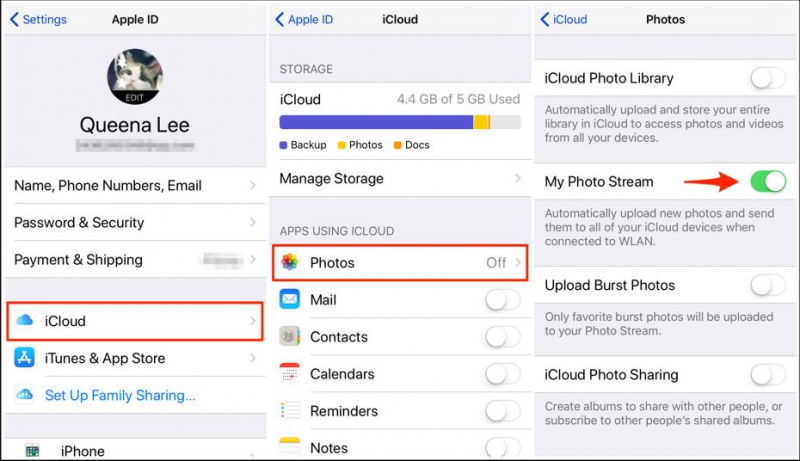
Step 1. On your iPhone device, head on to Settings.
Step 2. Tap on the profile of your Apple ID. Sign in with your Apple ID and password when prompted.
Step 3. Tap on iCloud.
Step 4. Tap on Photos under Apps Using iCloud.
Step 5. Toggle to turn on the My Photo Stream feature (must be green in color).
This will automatically upload pictures and share them to all your iCloud devices when connected to WLAN.
Step 6. Do the same steps for your iPad device using the same credentials of your Apple ID from iPhone. Wait until all the pictures are synced from your iPhone to iPad. Once done, navigate to the Photo Library on your iPad device and view the My Photo Stream album.
This process will teach you how to transfer pictures from iPhone to iPad using the iCloud feature. Both of your devices must be connected to Wi-Fi and must sign in using the same Apple ID. With this method, you need to have enough available storage in your iCloud. Your iOS devices must be in iOS 8.3 or later and the iCloud Photo Library must also be enabled.
Step 1. On your iPhone device, head on to Settings.
Step 2. Tap on the profile of your Apple ID. Enter Apple ID and password when prompted
Step 3. Tap on iCloud.
Step 4. Tap on Photos under the Apps Using iCloud section.
Step 5. Toggle to turn on the iCloud Photo Library option (must be in green color). This feature will automatically upload and store the entire library in iCloud to enable access to your pictures across your iOS devices such as iPhone and iPad.
Step 6. Tap on Download and Keep Originals. Your iPhone will start to sync the pictures to your iPad device. Wait until it finishes its run.
This basic method will guide you on how to transfer pictures from iPhone to iPad using the Bluetooth setting. Both of your devices must enable Bluetooth. Both devices must be within 30 meters of distance to connect successfully.
Step 1. On your iPhone device, head on to Settings.
Step 2. Tap on General and select Network.
Step 3. Toggle on the Bluetooth setting.
Step 4. Do the same steps to your iPad device. Turn on the Bluetooth setting.
Step 5. Start scanning for the devices in your iPhone. Use the same 6-digit code on both of your devices.
Step 6. When the iPad device is found, pair the two devices. Tap on the iPad device and connect.
Step 7. Navigate to the Photos app.
Step 8. Select the pictures and share them via Bluetooth setting.
Step 9. Accept the file-sharing when prompted on the iPad device. Wait until the data sync process completes.
This is another alternative to transfer pictures from iPhone to iPad by the use of a regular Lightning cable and a Lightning to USB camera adapter. This is a bit slower in data transfer though than the other methods but it can do the job of transferring a file.
Step 1. Connect the regular Lightning cable to your iPhone device.
Step 2. Connect the USB end of the Lightning cable to a Lightning to USB camera adapter.
Step 3. Connect the iPad device to the adapter.
Step 4. A message will prompt on your iPhone device confirming you to allow the iPad device to connect and access your files.
Step 5. Tap on Allow.
Step 6. On your iPad device, access the Photos app.
Step 7. Go to the Import tab on the iPad to access the pictures from the iPhone device.
Step 8. Select and import the pictures.
People Also ReadHow to Transfer Android Photos to iPhoneHow to Transfer iPad Photos to iPad
When you have an iPhone device with different files that you want to transfer to another iOS device such as an iPad, there are several methods that you can follow depending on the number and size of files for transfer. This article tackles various methods on how to transfer pictures from iPhone to iPad using iCloud, iTunes, AirDrop, and many others. A more efficient, faster, and more convenient tool, FoneDog Phone Transfer can also help you transfer different types of data between iOS devices, or Android and computer devices. This tool supports multiple devices, in any type and operating version.
Leave a Comment
Comment

Technical Expertise for PC/Website Optimization
One of my passion is to develop software of my own
I write articles to share knowledge about IT technology and some experience in developing my own software, and developing my own software is one of my passions for work.
Phone Transfer
Transfer data from iPhone, Android, iOS, and Computer to Anywhere without any loss with FoneDog Phone Transfer. Such as photo, messages, contacts, music, etc.
Free DownloadHot Articles
 /
/
INTERESTINGDULL
/
SIMPLEDIFFICULT
Thank you! Here' re your choices:
Excellent
Rating: 4.7 / 5 (based on 81 ratings)
