FoneDog Screen Recorder
FoneDog Screen Recorder
Special Offer
Special Offer


By Gina Barrow, Last updated: October 3, 2019
Among the tablets out in the market today, iPad is still the most popular choice. Millions of users worldwide enjoy their iPads for playing games, taking photos, reading books, and even for work. Photos are usually the most common contents we see in iPads.
Like many other tablets, one of the issues we face with the iPad is the limited storage. Often, we need to transfer photos from iPad to computer in order to save those photos and free storage space from the iPad. The last option we have is to delete these files completely.
Fortunately, there are so many options we can do in order to preserve these files and simply transfer them over to the computer. Transferring iPad photos to Mac is smoother because of iCloud and iTunes; however, if you are using a Windows computer, you might get into trouble if you are not familiar with some techniques.
Today, we will show you 3 different methods on how you can transfer photos from iPad to computer. Find out which one will work well for you.
Part 1. How to Transfer Photos from iPad to Computer without iTunesPart 2. How to Transfer Photos from iPad to Computer Using Google DrivePart 3. Transfer Photos from iPad to Computer via File Explorer with iTunesPart 4. Other Methods to Transfer Photos from iPad to ComputerPart 5. Conclusion
To transfer your iPad photos to your computer without iTunes, we need reliable software that gives us the option to keep our photos safe during transfer and maintain high-quality images.
There are many programs out there that offer this kind of transfer feature but then, you need extraordinary software that will give you more tools to use and this is why we recommend using FoneDog Phone Transfer.
FoneDog Phone Transfer highlights data transfer such as photos, contacts, videos, music, and more. You can easily transfer these contents between iOS devices and a computer and vice versa. Apart from that, you can also perform a safe transfer for iOS to Android and vice versa, Android to Android, and iOS to iOS.
This software is compatible with computers running with Windows 10, 8, 8.1, 7, Vista, and XP (32 bit or 64 bit). All iOS devices like iPhone, iPad, and iPod Touch are also supported even the recent iOS 12.
Using this program is pretty straightforward too; it does not need a lot of actions for you to perform the transfer. Check out how you can transfer photos from iPad to computer using FoneDog Phone Transfer:
The main advantage of FoneDog Phone Transfer is being able to manage and transfer these types of files conveniently to other kinds of devices such as exporting to another Smartphone or to your computer.
It also works as a backup in case you might have accidentally deleted or lost data especially your contacts.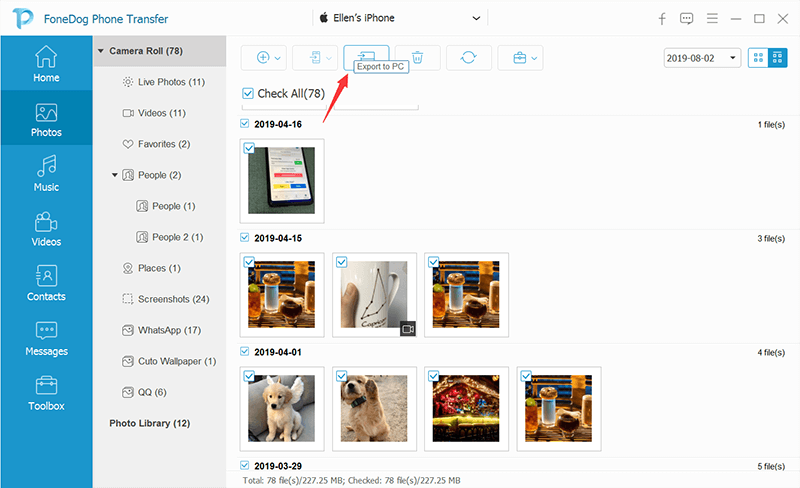
Transferring photos take time and no matter how busy you are, you really have to find time to manage your photos before you run out of space. If you prefer not using any third-party programs, you can also use other cloud services like Google Drive.
Google Drive is another popular online storage where we can save and transfer a lot of our important contents like documents, videos, photos, and more. This feature offers 15GB of free space for any file types and upgradeable when needed.
All you need to do to avail this service is to register a Google account, which is also for free and easy. You can easily access Google Drive right on your computer and your iPad.
using Google Drive, follow these:
When you have downloaded all the photos from Google Drive, you can opt to delete them so you can have more space for future use.
Perhaps the easiest method on how to transfer photos from iPad to computer is via the Windows file explorer. It does not take much time in doing this transfer process; here is how to do it:
If you are using a Windows 10 computer, you can also use the Photos app to save the images from an iPad.
You see, transferring these images is not difficult. You only have to be resourceful so you can safely and smoothly manage your photos. Apart from these 3 effective ways to transfer photos from iPad to computer, there are more ways you can take advantage with.
Here are other transfer methods you can try:
iCloud is also an easier choice for photo transfer from iPad to computer as long as you got the iCloud for Windows app installed. To learn how to use this feature, follow this step by step instruction:
After you have done this, all the photos saved on your iPad and with iCloud enabled will also be downloaded to your computer.
Traditionally, you can send the photos from your iPad to your email account and download it to the computer. Before all these programs and apps were developed, some people are already using this service to store and save their photos.
Email transfer is a wireless method and is only using the Wi-Fi network. However, the only con we see so far is that it may take a while before you can complete the transfer. This depends on the Wi-Fi connection and photo size but it is still worth a try!
After sending the photos to your email, log in to your account and download the photos from the email using your computer. Again, create a new folder to host these images and save.
All these methods we mentioned above are helpful in transferring photos from the iPad to the computer with and without iTunes. Each method we discussed is convenient depending on the given situations.
We showed you how to transfer and manage photos using a few-clicks operation by FoneDog Phone Transfer, wireless transfer via the Google Drive, and other methods including the email, and USB connection with iTunes.
Among these methods, FoneDog Phone Transfer is the most time-saving and highly secure option. Upon using this program, you save time, effort, and convenience. Apart from that, you are not only copying files but also protecting your photos from potential data loss that might be triggered during the transfer process especially when you are unfamiliar with the steps.
It’s all up to you on how you want to transfer photos from iPad to computer. Give it a try so you will experience the difference!
Leave a Comment
Comment

Technical/Creative Writer
Kitchen, my safe space; black, my favorite color
Was a Technical Specialist for a while, troubleshooting Smartphone and Software-related issues until a writing stint caught my attention.
Phone Transfer
Transfer data from iPhone, Android, iOS, and Computer to Anywhere without any loss with FoneDog Phone Transfer. Such as photo, messages, contacts, music, etc.
Free DownloadHot Articles
 /
/
INTERESTINGDULL
/
SIMPLEDIFFICULT
Thank you! Here' re your choices:
Excellent
Rating: 4.6 / 5 (based on 100 ratings)
