FoneDog Screen Recorder
FoneDog Screen Recorder
Special Offer
Special Offer


By Vernon Roderick, Last updated: May 8, 2021
An iPad is a tablet designed and developed by Apple that runs on iOS. It used device for browsing the web, playing games, watching videos or movies, listening to music, viewing photos, and many more other tasks.
You can download your favorite movie files onto the iPad device for you to access and view later. The iTunes application can help you play, download or purchase songs or videos and sync them to your iOS device.
In this tutorial guide, there are several ways that you can follow on how to transfer movies to iPad using the iTunes application on your computer, via USB or over Wi-Fi, and using other features in Mac. If you want an easier and more convenient way of file transfer, you can try FoneDog Phone Transfer which is also discussed in this article. It supports any form of data that you can transfer between devices.
Part 1. How to Transfer Movies to iPad without iTunes Part 2. How to Transfer Movies to iPad Using iTunes on USB ConnectionPart 3. How to Transfer Movies to iPad Using iTunes over Wi-Fi ConnectionPart 4. How to Transfer Movies to iPad Using AirDrop in Mac
There is another powerful alternative to your file transfer software, FoneDog Phone Transfer which enables you to easily manage and transfer files between iOS, Android devices, and computers in one click. It allows you to transfer most data types such as movies, photos, audio, videos, contacts, messages, and many more.
It can transfer movies to the iPad, import videos, or export Movies, Home Videos, TV Shows, Podcast, MV, and iTunes U to other devices. You can easily switch files between iOS and Android without any data loss. You are assured that your data is safe with FoneDog Phone Transfer. It supports multiple devices such as Samsung, Google, Huawei, LG, HTC, iPhone, iPad, iPod Touch, and many more, in different operating versions.
With FoneDog Phone Transfer, data transfer is a convenient thing to do between:
Here are two articles about the above two kinds of data transmission. If you are interested, you can click the link to view the details of the article. One is about transferring video from iPhone to the computer, and the other is about transferring video from the PC to the iPhone.
A free trial is available for you to download and a 30-day money-back guarantee should you purchase one. Follow these three easy steps:
Phone Transfer
Transfer files among iOS, Android and Windows PC.
Transfer and backup text messages, contacts, photos, video, music on computer easily.
Fully compatible with iOS 13 and Android 9.0.
Free Download

After you have downloaded and installed FoneDog Phone Transfer, launch the app on your computer. This supports both Mac and Windows OS. Access the app via the desktop shortcut icon, pinned icon on the taskbar, or via the Start menu programs. Next, connect your iPad to the computer.
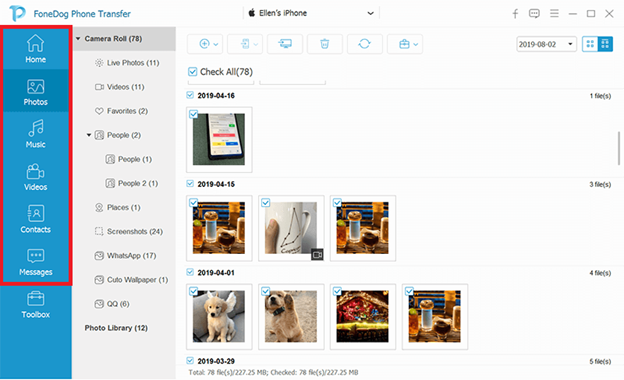
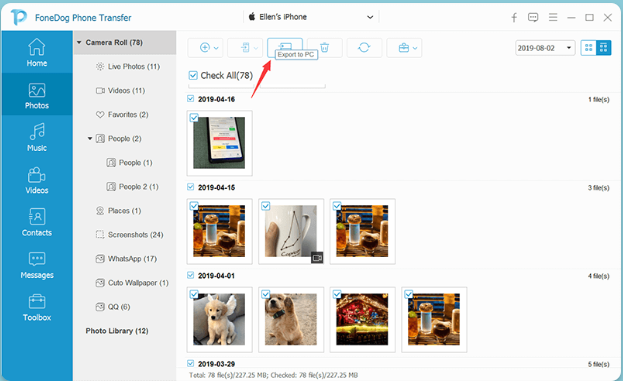
Select the files that you wish to transfer to your device. Then, click Export to Device to begin the file transfer. Wait until the file transfer process is complete. You can also do file transfer between any iOS, Android, or computer device.
This section provides a basic process to teach you how to transfer movies to an iPad using iTunes installed on your computer via a USB connection. Make sure that you have the latest version of iTunes installed. If you do not have it yet, download and install the latest updates of iTunes to your Windows or Mac computer.
How to get the latest version of the iTunes application:
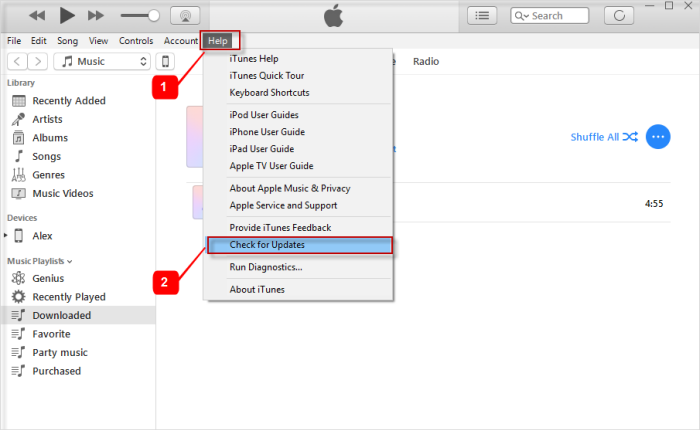
Step 01: Launch the iTunes application on your computer.
Step 02: On your Mac computer, click the iTunes menu then select Check for Updates.
On Windows, click the Help menu and select Check for Updates.
Step 03: iTunes will check for the latest updates of the software and you will be prompted to install the latest version. Follow the next steps to proceed until the installation is complete.
How to transfer movies to iPad using iTunes:
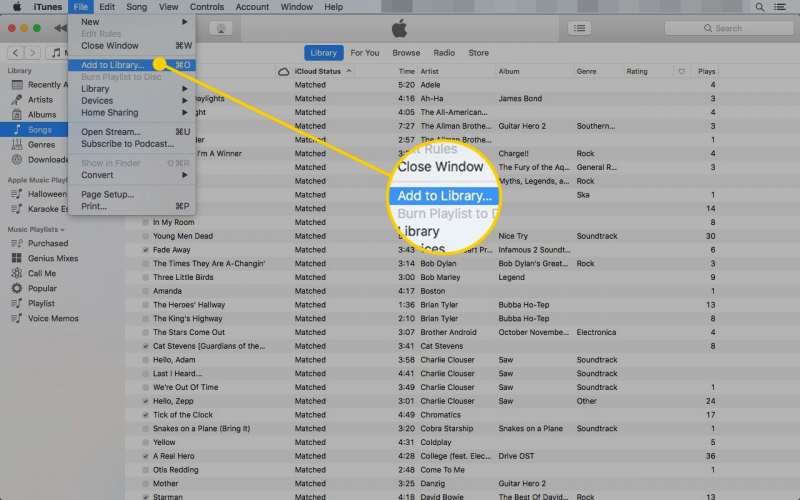
Step 01: Connect your iPad device to your computer using the USB connection cable.
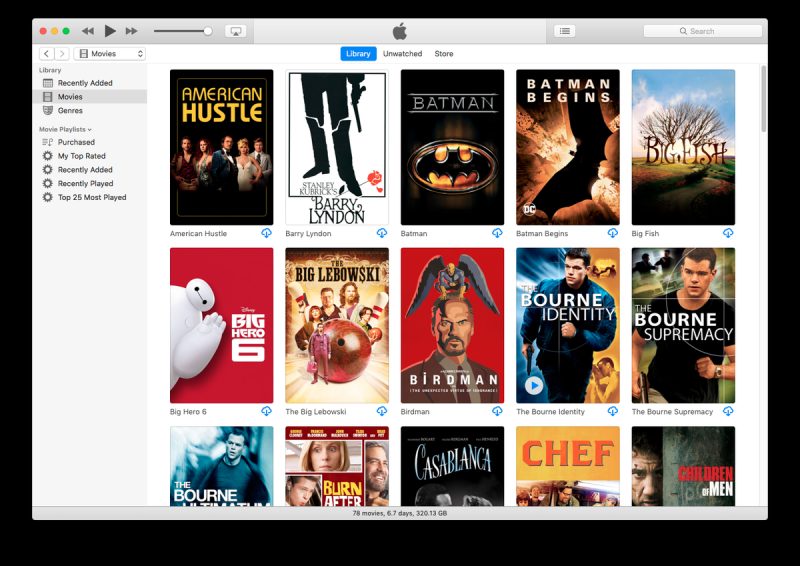
Step 02: Launch the iTunes application on your computer. Then, click the File menu and select Add to Library. This will allow you to browse the movie files that you want to transfer to your iPad and add them to the iTunes Library.
Step 03: On the left pane of your iTunes, click iPad under Devices.
To unhide the left pane or sidebar in iTunes, go to the View menu and select Show Sidebar.
Step 04: When your iPad is connected and iTunes recognizes the device, click your iPad device name located in the top left corner.
Step 05: Still on the left pane, click Movies under Settings. This will open the Movies library.
Step 06: On the right, check the Sync Movies box.
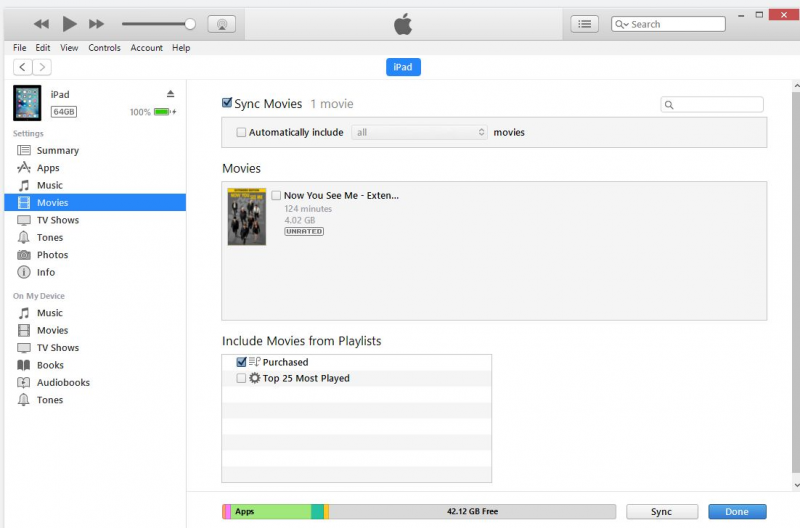
Step 07: Click the Apply button found at the bottom part of the window.
Step 08: In the File Explorer window that opens up to let you find your movie files.
Step 09: Navigate to the location where you store your movie files for transfer.
Step 10: Select the movies that you wish to transfer to your iPad.
Step 11: Then, drag and drop the files to the Movies Library in iTunes. This will now how to transfer movies to iPad.
Step 12: A progress bar will show the status of the movie file transfer to iPad. Wait until the transfer process is complete making sure that a good connection is established between your iPad and the computer.
Step 13: When the transfer process is now complete, exit from iTunes. Disconnect your iPad device from the computer and check to see if the movie files are now transferred to your iPad successfully.
This section provides a basic process to teach you how to transfer movies to iPad using iTunes installed on your computer over a Wi-Fi connection. Make sure that you have the latest version of iTunes installed. If you do not have it yet, download and install the latest updates of iTunes to your Windows or Mac computer.
How to set your iPad to connect wirelessly with your computer when doing file transfer:
Step 01: Connect your iPad device to your computer using the USB connection cable.
Step 02: Launch the iTunes application on your computer.
Step 03: On the left pane of your iTunes, click iPad under Devices.
Step 04: When your iPad is connected and iTunes recognizes the device, click your iPad device name located in the top left corner.
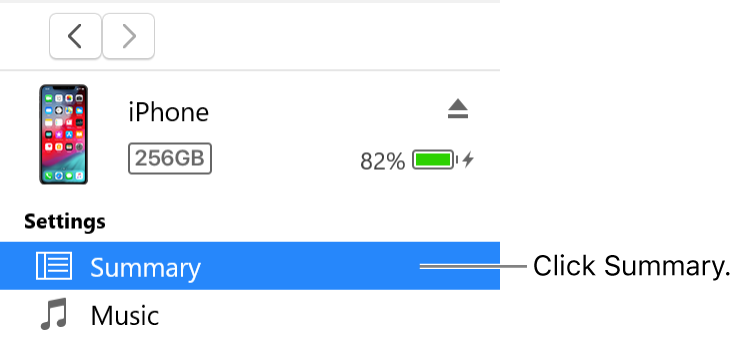
Step 05: Still on the left pane, go to the Summary tab.
Step 06: Under options, check the Sync with this iPad over the Wi-Fi box.
Step 07: Click the Apply button found at the bottom part of the window.
Step 08: Disconnect your iPad from the computer.
How to transfer movies to iPad with a wireless connection:
Step 01: Set the Wi-Fi connection of your iPad to be the same as your computer.
Step 02: Launch the iTunes application on your computer.
Step 03: On the left pane of your iTunes, click iPad under Devices.
Step 04: When your iPad is connected and iTunes recognizes the device, click your iPad device name located in the top left corner.
Step 05: Still on the left pane, go to the Summary tab.
Step 09: Navigate to the location where you store your movie files for transfer.
Step 10: Select the movies that you wish to transfer to your iPad.
Step 11: Then, drag and drop the files to the Movies Library in iTunes. This will now how to transfer movies to iPad.
Step 12: A progress bar will show the status of the movie file transfer to iPad. Wait until the transfer process is complete making sure that a good connection is established between your iPad and the computer.
Step 13: When the transfer process is now complete, exit from iTunes. Disconnect your iPad device from the computer and check to see if the movie files are now transferred to your iPad successfully.
AirDrop is a Mac feature that will let you quickly send a few files wirelessly from your Mac computer to a nearby iPad or any iOS device. It can transfer the movie files one by one. Below are the step-by-step instructions on how to do a total wireless file transfer using the AirDrop app in Mac.
How to set up your iPad to connect wirelessly and use AirDrop successfully:
How to enable the option to receive AirDrop requests:
Step 01: Go to Finder.
Step 02: Click on the Go menu and select AirDrop.
Step 03: Next, check the Allow me to be discovered by.
Step 04: Then, select the setting if you receive the request from Everyone, or your Contacts Only. If you select Contacts Only, both of the devices must be connected to iCloud.
-OR-
Step 01: Go to Finder.
Step 02: Click on the Apple menu and select System Preferences.
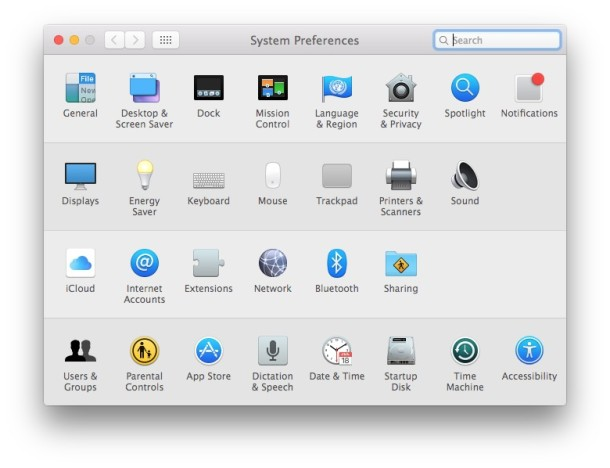
Step 03: Next, click on Security & Privacy.
Step 04: Click the Firewall tab.
Step 05: Click the Lock and when prompted, enter the Administrator password.
Step 06: Click on Firewall Options.
Step 07: Deselect the option Block all incoming connections.
How to transfer movies to iPad with a wireless connection using AirDrop:
Step 01: Go to Finder.
Step 02: On the left pane, select AirDrop. Click on the Go menu and select AirDrop.
Step 03: It will display the AirDrop users nearby. Drag and drop the movie files that you want to send to the AirDrop user, in this case, your iPad device.
Step 04: On your iPad, you will receive a notification message of an AirDrop request. Tap Accept to start the file transfer and save the movie file to the Downloads folder.
-OR-
Step 01: Open the movie file that you want to transfer.
Step 02: Click the Share button on the AirDrop app. You can also control-click on the file in the Finder and click Share on the shortcut menu.
Step 03: From the sharing options displayed in the window, select AirDrop.
Step 04: Choose your iPad as the recipient of the movie file being sent.
Step 05: On your iPad, you will receive a notification message of an AirDrop request. Tap Accept to start the file transfer and save the movie file to the Downloads folder.
People Also ReadUseful Methods of How to Transfer Android Contacts to iPhone3 Ways on How to Transfer Music from iPhone to Computer
A tablet such as an iPad running on iOS is a useful and handy device that many users have owned to accessibly browse the web, watch movies, play songs, send and receive emails, and many other tasks.
You can store your files on an iPad such as videos, music, photos, messages, contacts, and many more. When you need to transfer files to the iPad, you will need the iTunes application to transfer the files from your computer to your iPad device. Another Adhoc service in Mac called AirDrop can also be used for wireless file transfer connections. As for iTunes, you can use it to download or purchase songs and movies from Apple.
A more convenient method of transferring your files is with the help of FoneDog Phone Transfer which enables to you do the easy transfer of files between devices such as iOS, Android, and computer. You will no longer have to worry about the transfer of any file format as FoneDog Phone Transfer supports a variety of data types and devices.
Leave a Comment
Comment

Technical Expertise for PC/Website Optimization
One of my passion is to develop software of my own
I write articles to share knowledge about IT technology and some experience in developing my own software, and developing my own software is one of my passions for work.
Phone Transfer
Transfer data from iPhone, Android, iOS, and Computer to Anywhere without any loss with FoneDog Phone Transfer. Such as photo, messages, contacts, music, etc.
Free DownloadHot Articles
 /
/
INTERESTINGDULL
/
SIMPLEDIFFICULT
Thank you! Here' re your choices:
Excellent
Rating: 4.7 / 5 (based on 102 ratings)
