FoneDog Screen Recorder
FoneDog Screen Recorder
Special Offer
Special Offer


By Adela D. Louie, Last updated: March 3, 2021
In today’s technology, many mobile users love to take pictures using their devices. Through this, they can keep so many memories with the people around them. And one of the reasons as to why people prefer using their mobile devices in taking pictures is because it comes with a high-quality camera, plus it comes very convenient to carry.
But, what if you want to share your photos with other people? Or what if you have a new phone that you want to move your photos from the old one to the new one? Well, the answer to your question is right here. We are going to show you several ways on how to transfer pictures from one phone to another whether you are having both an Android device, an iOS device, or one Android and one iOS device.
Part 1. The Best Software to Transfer Pictures from One Phone to AnotherPart 2. How to Transfer Pictures from One Phone to Another ( Android to Android )Part 3. How to Transfer Pictures from One Phone to Another ( iPhone to iPhone )Part 4. Conclusion
The first method that we are going to show you include a third-party application that you can use for you to transfer those photos across any other devices, whether it is an Android to Android, iPhone to iPhone, Android to iPhone, or iPhone to Android. This is the one-stop tool that you can use to do all of that.
This third-party app that we are telling you about is the FoneDog Phone Transfer. This is one easy-to-use tool to transfer your photos instantly with the use of your computer. And aside from photos, it can also help you in transferring other data from your smartphone devices such as music, messages, videos, and your contacts. So, to know more about how to use this tool here is a quick tutorial that you can follow.
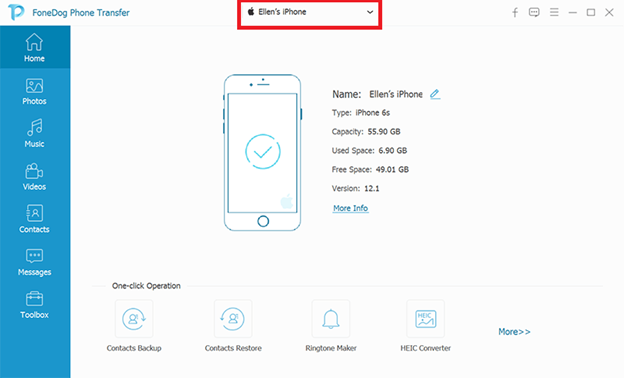
After getting the FoneDog Phone Transfer and installing it on your computer, go ahead and launch the app. Then, have your smartphone connected to your computer by using your USB cable. Then the FoneDog Phone Transfer will detect your smartphone automatically and will show you some information about your device.
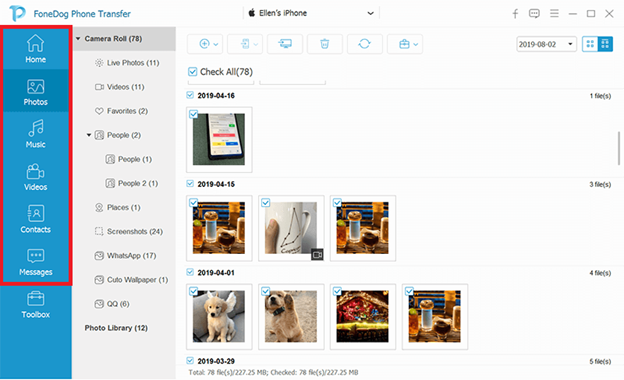
Then, on the left side of your screen, just go ahead and select Photos from the category. And then all of the photos that you have on your smartphone device will show up on your screen. You can also see details about each photo such as the time and date it was taken and its size. So on that page, simply choose the photos that you would like to transfer to the other phone that you have.
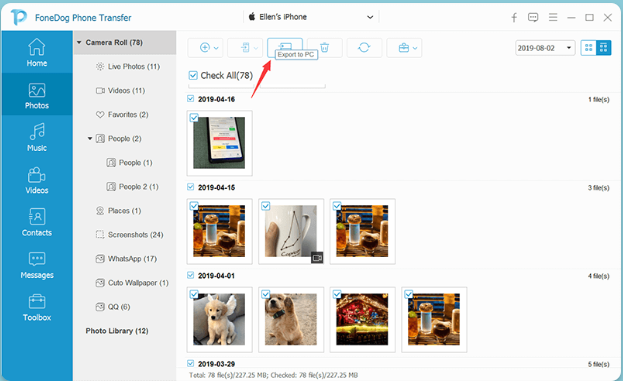
After choosing all of the photos that you wish to transfer, you can now go ahead and click on the Export to PC option from the above menu. Then the FoneDog Phone Transfer will transfer those photos immediately so all you have to do now is to wait for the process to finish.
And once that the process is complete, you can then go ahead and connect the other phone that you have on your computer using its USB cable again. And once that your other phone is detected by the program, you can have those photos transferred over to the other phone.
Now, if you want to transfer photos from one Android device to another, there are also some other ways on how you can do so without the need of using your computer. And with that, here are some options for you on how you want to make the process.
Using your Bluetooth from your Android device is one of the easiest ways on how to transfer pictures from one phone to another. It is because most Android devices, especially the new ones, have this feature on their phone. Now, to know how to use this method, here is a step-by-step process that you can follow.
Step 1: Simply turn on the Bluetooth feature on both of your Android devices.
Step 2: Once that you have turned them on, go to your Bluetooth settings on one of your Android devices and then search for the Bluetooth connection of the other Android device that you are working on. And once that you have detected it, go ahead and establish a connection between the two Android devices.
Step 3: And then go to your Gallery and then select all of the photos that you would like to transfer over.
Step 4: Once that you have chosen all of the pictures that you want to transfer, tap on the three-dot icon at the upper right-hand corner of your screen, and then choose the option Share via Bluetooth.
Step 5: And then your Android device will show you a list of Bluetooth connection available. So from here, simply choose your other Android device, and then the process of transferring your pictures will start. From here, all you have to do is to wait for the process to complete.
Nowadays, there are a lot of Android devices that come with a feature called the Android Beam. This is a tool that will let you share your pictures from one device to another. This tool is known to be ideal to use if you want to share other content such as your pictures, videos, web pages, maps, and so much more.
Now, to know to use the Android Beam to transfer your pictures from one device to another, here is a guide for you.
Step 1: Before you can transfer your pictures from one Android to another using the Android Beam, you must first make sure that both of your Android devices support this tool.
Step 2: And for you to know how you can check the NFC capability of your Android device, you need to go to your Settings, and then choose on More option.
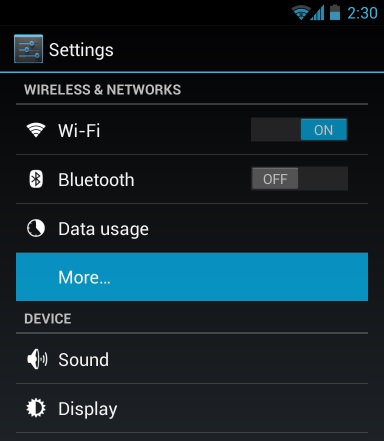
Step 3: Then, you have to make sure as well that both of your Android devices had already turned on the Android Beam feature.
Once that you have secured the NFC capability of your Android device, you can now go ahead and launch the pictures that you would like to transfer. And to know how you can launch it, here is a tip for you depending on the content that you want to transfer aside from your pictures.
Step 1: Before you go ahead and beam your photos from one Android device to another, you have to make sure that both devices have sufficient batteries and that they are both unlocked as well.
Step 2: Then, go ahead and tap on them back-to-back for you to be able to transfer your pictures from one phone to another.
For those iPhone users who would like to know how to transfer pictures from one phone to another, here are some methods that you can choose from.
One of the easy on how to transfer pictures from one phone to another for the iPhone device is by using their iCloud account. So if you have some pictures on your iCloud, then you can simply transfer them from one device to another. And to use this, here is what you need to do.
Step 1: Take the new iPhone device that you have and then log in to the same iCloud account that you have on your old iPhone.
Step 2: After that, go ahead and navigate to your Settings then tap on your name located at the upper part of your screen.
Step 3: Then go ahead and choose iCloud.
Step 4: Then choose Photos.
Step 5: After that, go ahead and have your iCloud Photos option enabled so that the photos will start to sync to your new iPhone device from the old one.
Step 6: Then after that, go ahead and tap on the Optimize iPhone Storage option for you to mark it. This is one option that will allow you to save some space on your new iPhone device.
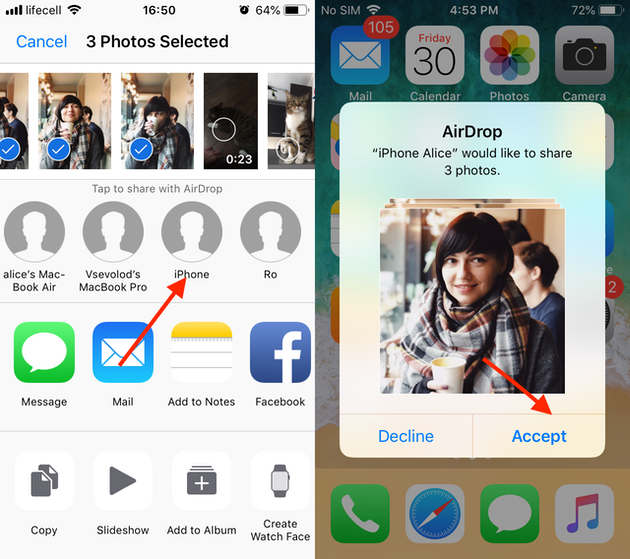
Another way that you can transfer pictures from one phone to another using both your iPhone device is by using the AirDrop feature that comes with it. The AirDrop feature works just like to Bluetooth feature on an Android device wherein it sends and receives data wirelessly. And in order for you to use this feature, you have to make sure that both your iPhone device has an iOS 7 version or higher. It should also able to use Bluetooth and Wi-Fi and that both devices are placed close to each other.
And once that you have ensured all of that, then you can proceed with transferring your pictures by following the steps below.
Step 1: Go ahead and launch the Photos app on your iPhone device and then look for the photos that you would like to transfer.
Step 2: And then tap on the Select option located at the top of your screen.
Step 3: Then, tap on the photos that you want to transfer for you to place a checkmark on them.
Step 4: Once done, go ahead and select the Share button located at the bottom of your screen for you to launch the Sharing page.
Step 5: And then, make sure that the other iPhone is near the old one so that it can receive the photos from the old iPhone using AirDrop. And then from the Sharing screen, go ahead and then send the photos that you have selected earlier.
Just like the Android device, you can also use your email to transfer pictures from one iPhone to another. In this method, you can just simply choose all of the photos that you would like to transfer from the old iPhone to the new one. Do this just like sending a regular email.
People Also ReadHow to Transfer iPad Photos to MacHow to Transfer Photos from Samsung Galaxy S7 to Computer
So as you can see, the process on how to transfer pictures from one phone to another is one easy thing to do especially that the smartphones that we have nowadays come with a lot of built-in features that you can use to do this. So just refer to the methods that we have shown you above and you will surely be able to transfer your photos in no time.
Leave a Comment
Comment

Tech Website Writing /Content Optimization
Singing, smiling, surprising every day!
So as a technical writer, it is my duty to gather effective and reliable solutions to answer questions on how to deal with the issues they are having with their devices.
Phone Transfer
Transfer data from iPhone, Android, iOS, and Computer to Anywhere without any loss with FoneDog Phone Transfer. Such as photo, messages, contacts, music, etc.
Free DownloadHot Articles
 /
/
INTERESTINGDULL
/
SIMPLEDIFFICULT
Thank you! Here' re your choices:
Excellent
Rating: 4.7 / 5 (based on 57 ratings)
