FoneDog Screen Recorder
FoneDog Screen Recorder
Special Offer
Special Offer


By Adela D. Louie, Last updated: June 17, 2021
There are really some instances wherein we will be needing to transfer files from our iPhone to Mac. And one of these reasons is because you might have almost full storage space on your iPhone. Lucky for those iPhone users because they can easily transfer their files from their iPhone to their Mac easily even without using your iTunes program to do it.
Now, when it comes to doing a transfer files from iPhone to Mac without iTunes, there are several ways on how you can do this. And with that, we are going to show you the easiest ways to do this process. To find out what these methods are, keep on reading this post.
Part 1. The Best Way to Transfer Files from iPhone to Mac Without iTunesPart 2. Other Alternative Way to Transfer Files from iPhone to Mac Without iTunesPart 3. Conclusion
The most convenient and the most recommended way for you to transfer files from iPhone to Mac without iTunes is by using a third-party application that is called the FoneDog Phone Transfer.
The FoneDog Phone Transfer will allow you to transfer over your files between your iPhone to your Mac. And not only that, but it can also do the same process between an Android device and a Windows computer. SO, here is an article that teaches you that how to transfer files from android to pc. This program will help you in transferring your files from your iPhone to Mac such as your photos, videos, contacts, messages, and music.
Tip: If you want to learn about how to transfer android files on pc, you can use FoneDog Phone Transfer to achieve it.
Through the use of this program, you can also selectively choose which of your files you would want to transfer from your iPhone to Mac. Unlike using your iTunes which will require you to transfer and backup everything from your iPhone even those that you no longer need.
This program is also very easy to use because it comes with a user-friendly interface which makes it easier for those new users and non-technical people to use this program. And to know more about how to use the FoneDog Phone Transfer here is a quick tutorial that you can refer to.
After you have downloaded and installed the FoneDog Phone Transfer on your Mac, go ahead and run it. And once that you are taken to the main page, simply connect your iPhone to your Mac using your USB cable. Then wait for the FoneDog Phone Transfer to detect your iPhone.
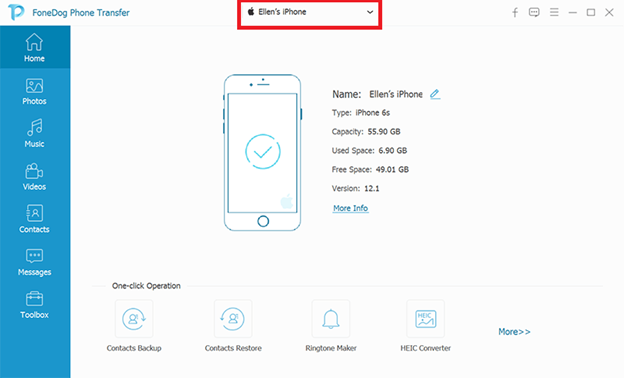
Once that your iPhone was detected by the FoneDog Phone Transfer, you will then see a list of file types that you can transfer which is located on the left side of your screen. You can choose from Music, Videos, Photos, Contacts, and Messages. And once you click on one of them, the program will show you sub-categories of your files as well.
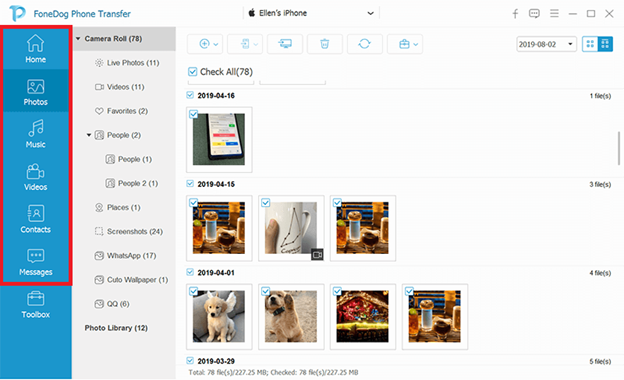
Then after that, you can now choose the items that you would want to transfer from your iPhone to your Mac. You can simply just click on them one by one. And if you do, you can also view the details of each item such as its name, the time it was created, the size of the item, and others.
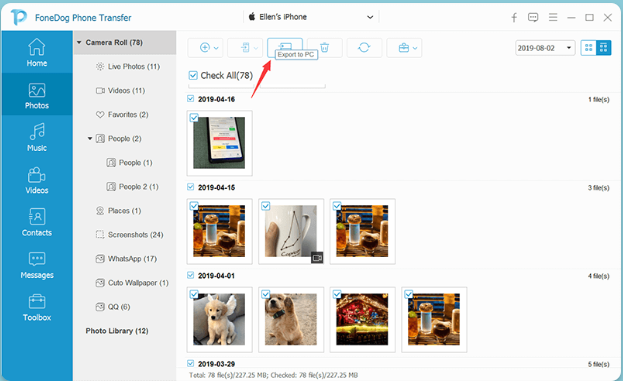
And after you are satisfied with the items that you have chosen to transfer, you can now have them transferred over to your Mac now. All you need to do is to click on the Export to PC button located at the top of your screen. This will then start the process of transferring your files from your iPhone to your Mac without using your iTunes program so all you have to do now is wait.
This is how easy the FoneDog Phone Transfer to use. It will only take you a few minutes of your time and because the process is very quick and simple to do.
Aside from using the FoneDog Phone Transfer for you to transfer files from iPhone to Mac without iTunes, there are also some other built-in programs that you can use on your Mac device. And so, we are going to show you some other methods that you can try out to complete the process you want to do.
One of the easiest ways for you to transfer files from iPhone to Mac without using iTunes is by using the AirDrop feature of both devices. The AirDrop is somewhat the same as using the Bluetooth feature on those Android and as well as Windows computers. By using AirDrop, you can easily have your files sent from your iPhone to your Mac. All you have to make sure here is that both devices are close enough to each other. And after that, follow the steps given below.
Step 1: First is you have to enable the AirDrop feature on your Mac computer. To do this, just go to your Finder and then click on Go and choose AirDrop. After that, you also have to turn on your Wi-Fi connection and as well as your Bluetooth.
Step 2: Then, get your iPhone and enable the AirDrop feature as well. You can go this by launching the Control Center and choosing AirDrop. Also, you need to enable your Wi-Fi and Bluetooth as well on your iPhone.
Step 3: Once that you have opened the AirDrop feature on both devices, go ahead and choose the files that you want to transfer from your iPhone. And once done, simply choose the Share button then wait for your iPhone to detect your Mac computer. And once that is detected, simply tap on the Mac icon for you to transfer your files from your iPhone.
Step 4: Then on your Mac, you will be able to see a pop-up message on your screen. From there, go ahead and click on the Accept button for you to begin the process of transferring your files from your iPhone to your Mac and wait for it to complete.
By using the AirDrop feature, you can transfer your photos and as well as your videos from your iPhone to your Mac. Also, you can transfer files to other Apple devices such as Mac to Mac or from iPhone to iPhone.
Another method that you can use is your iCloud. Through this, you will be able to transfer files from your iPhone device to your Mac easily as well. To know how you can do this, here are the steps that you will be needing to follow.
Step 1: The first thing that you have to make sure of is that your Mac computer comes with the latest Mac OS version.
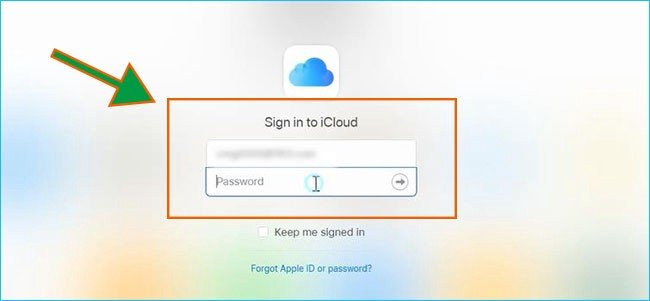
Step 2: And once that it is, go ahead and sign in to your iCloud using the Apple ID and password that you have on your iPhone and your Mac as well.
Step 3: Then, you also have to check if you were able to activate the iCloud Drive. You can do this by going to your Settings and then choose Apple ID and then choose iCloud.
Step 4: Then, check also if you have turned on the iCloud Drive on your Mac. To find this, all you need to do is to navigate to your Apple Menu.
Step 5: And once that you were able to do all of the steps above, you can now have your files saved over to your Files app on your iPhone. And from there, you now have access to the files on your iPhone using your iCloud. And for you to find them, you have to navigate to your Finder and then choose the Documents folder which can be found if you click on iCloud.
In this method, if you want to transfer your videos and your photos as well, all you need to do is to enable your iCloud Photo Library and then choose the option Upload to My Photo Stream on your iPhone. And then on your Mac, just choose the option Download and Keep Originals, and then those videos and photos will be stored in your Mac automatically.
Another way for you to transfer your files from your iPhone to your Mac is by using the Preview app on your Mac. And to do that, just follow the steps below.
Step 1: Connect your iPhone to your Mac using your USB cable. Here, make sure that you have a stable connection between the two devices.
Step 2: And then on your Mac, go to your Applications and then launch the Preview app.
Step 3: And then, head to File from the menu bar and then choose the option Import from your iPhone.
Step 4: Then the Preview app will show you all of the files that you have on your iPhone device. And for you to transfer them over, you can easily just drag and drop them to the location where you want to save them on your Mac.
This method will help you to transfer your media files from your iPhone to your Mac. This means this is more intended to use for your videos and your photos. This application is also very easy to use. And to know-how here is a step-by-step process that you can follow.
Step 1: Go ahead and plug in your iPhone to your Mac with the use of your USB cable.
Step 2: And after that, launch the iPhoto application on your Mac.
Step 3: And from there, you will be able to see all of the videos and photos that you have on your iPhone device. So from there, just simply click on the ones that you would like to transfer over. And once that you have chosen the files, click on the Import Selected button to process the transferring of your files.
The most known old-school way of transferring files from one device to another is by using your Email. If what you want is to transfer over some files that are less than 25 from your iPhone, then you can make use of this method instead. However, for the videos that you want to transfer, you might have some problem transferring them over using this method. This is because there is a limit on the size of the files that you can send. This method can be used if you have less than 50MB of files that you want to transfer from your iPhone to your Mac.
For you to access them, all you need to do is to open up the Mail application on your iPhone device and then key in the email address of the receiver of your email. And then attach the files that you want to transfer over. And once that you click on the Send button, then you can also have them accessed using your Mac. So from there, just view the files using your Mac and then save the files that are attached to your Email.
People Also ReadHow to Transfer Files from PC to iPadHow to Transfer Files from Windows PC to iPhone without iTunes
Above all of the methods that we have shown you above, the most recommended by many iPhone and Mac users is by using the FoneDog Phone Transfer. This is because this is already a tool that you can use to transfer every file that you have from your iPhone to your Mac.
Leave a Comment
Comment

Tech Website Writing /Content Optimization
Singing, smiling, surprising every day!
So as a technical writer, it is my duty to gather effective and reliable solutions to answer questions on how to deal with the issues they are having with their devices.
Phone Transfer
Transfer data from iPhone, Android, iOS, and Computer to Anywhere without any loss with FoneDog Phone Transfer. Such as photo, messages, contacts, music, etc.
Free DownloadHot Articles
 /
/
INTERESTINGDULL
/
SIMPLEDIFFICULT
Thank you! Here' re your choices:
Excellent
Rating: 4.7 / 5 (based on 85 ratings)
