FoneDog Screen Recorder
FoneDog Screen Recorder
Special Offer
Special Offer


By Gina Barrow, Last updated: September 26, 2021
“I got an iPad and has a lot of cool music in it. I thought it would be more fun to transfer them to my computer so I can sing along to my favorite tunes while working but I have a Windows computer. Can I transfer iPad music to computer?”
Listening to music helps you cope up with your daily grinds. It actually soothes your soul and keeps you inspired in a way that you can go through your day without much stress. That is why a lot of people tend to save tons of their favorite tracks on their devices just like your iPad.
But, your iPad cannot hold much storage and is not dedicated to music playing. You can opt to transfer them to another device like a computer. If you have a Windows computer, then your concern would be compatibility.
Fortunately, you can transfer iPad music to computer using four practical ways. With these methods, you can not only transfer iPad music to a computer, but also be able to transfer music from a computer to an iPhone, or any other device. There is still the option to use iTunes and iCloud, Dropbox, and a third-party tool. Check out how these methods work in this new article.
Part 1. How to Sync iPad Music with Computer via iCloudPart 2. Transfer iPad Music to the Computer with DropboxPart 3. Transfer Your iPad Music to Your Computer with iTunesPart 4. How to Transfer Music from iPad to Computer Without iTunesPart 5. Conclusion
Let’s go wireless first! If you are an iTunes subscriber, then you can practically transfer iPad music to computer with the help of your iCloud Music Library.
Your iCloud Music Library can hold up to 100,000 songs, not including those songs you purchased from the iTunes Store. Signing in with the same Apple ID empowers you to access all your music files even when not connected to the internet, as long as they have been enabled.
On your iPad, make sure that you have toggled the iCloud Music Library to on. To do this open your Settings, find and tap Music, and turn on iCloud Music Library. After you have enabled the iCloud Music Library on your iPad, you also need to enable it on the computer.
Here is a quick guide on how to turn on your iCloud Music Library on the computer:

However, iCloud has some restrictions. You cannot store files larger than 200MB and your playlists should only contain songs for you to use the iCloud Music Library on the computer.
And the worst part about syncing your iCloud Music Library is the issue of data loss. Your other music or songs that were not downloaded from iCloud will be replaced with songs from iCloud. Plus, you are unable to use iTunes for syncing your music with the iPad.
Another wireless option you can do to transfer iPad music to computer is using Dropbox. Dropbox provides a smooth and wireless upload and download of different files like your music, photos, videos, and documents.
It only takes a Google account for you to utilize its service. Dropbox provides 2GB of free storage but with upgradeable options.
To transfer iPad music to computer with Dropbox, follow these steps:
Your only concern with using Dropbox could be the limited free storage, but nevertheless, it helped you move your music from the iPad to the computer without any difficulty.
The most convenient way to transfer iPad music to computer is by using iTunes. It has been a practical way so far but it takes time and effort to perform the transfer.
Use this guide on how you can use iTunes to move your iPad music via iTunes:
\Libraries\Music\iTunes\iTunes Media\Music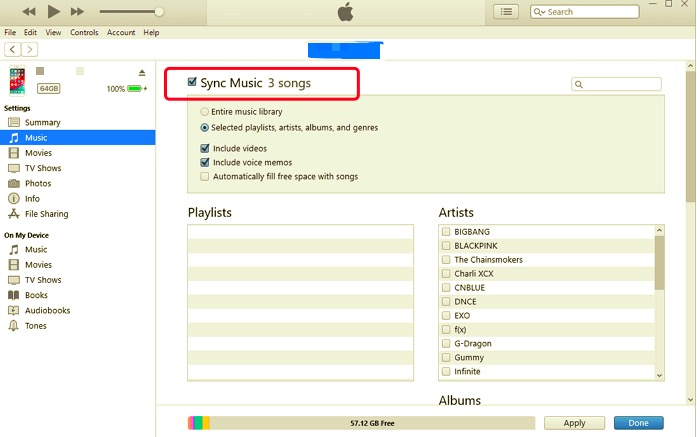
If you are unable to see the Music folder after copying this path, open File Explorer on another window and click on This PC from the left menu and search for iTunes.
For a hassle-free transfer iPad music to computer, the best option is to use a third-party tool that provides convenient, efficient, and safe transfer of files such as music, photos, videos, and many more.
There are plenty of software solutions out there that you can use for content management, however, FoneDog Phone Transfer is so far the most well-loved by users because of its efficiency, versatility, and safety.
Phone Transfer
Transfer files among iOS, Android and Windows PC.
Transfer and backup text messages, contacts, photos, video, music on computer easily.
Fully compatible with the latest iOS and Android.
Free Download

After all, we all want to move our files safely and without the fear of data loss or data overwriting. This software is compatible to use with iOS, Android, and cross-platform.
Are you interested to know how FoneDog Phone Transfer works with your iPad? Check this guide:
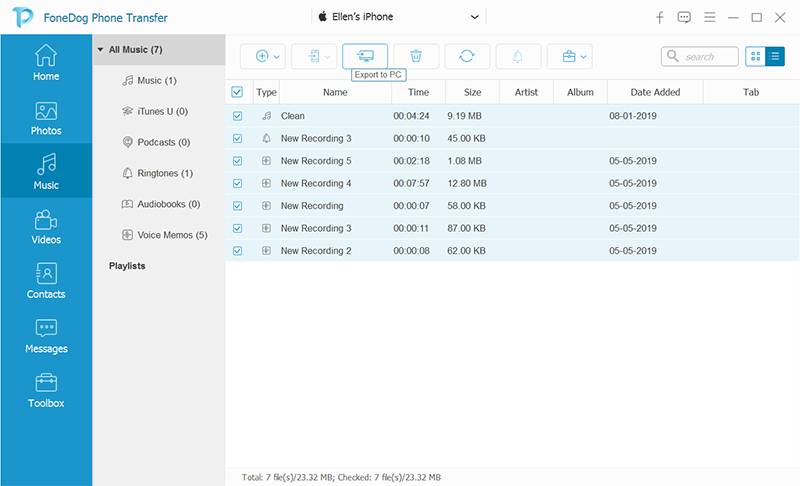
And that’s it! You can now enjoy listening to your favorite tunes on your computer.
People Also ReadHow To Transfer Music From IPod To ComputerTop Tools to Transfer Music from iPhone to Computer Without iTunes
You can only choose one method to transfer iPad music to computer. It is impossible to use your iCloud Music Library and iTunes at the same time, this will trigger further issues like data loss.
If you prefer the iCloud, all the other songs you have on the iPad will be overwritten with songs from iCloud only. Using Dropbox is promising yet it also has storage limitations. Apart from that, Dropbox is not dedicated to music only but rather to other media content like pictures, videos, and even documents.
Among the options mentioned, utilizing third-party software works best in providing simple and fast transfer. FoneDog Phone Transfer is available for download any time!
Leave a Comment
Comment

Technical/Creative Writer
Kitchen, my safe space; black, my favorite color
Was a Technical Specialist for a while, troubleshooting Smartphone and Software-related issues until a writing stint caught my attention.
Phone Transfer
Transfer data from iPhone, Android, iOS, and Computer to Anywhere without any loss with FoneDog Phone Transfer. Such as photo, messages, contacts, music, etc.
Free DownloadHot Articles
 /
/
INTERESTINGDULL
/
SIMPLEDIFFICULT
Thank you! Here' re your choices:
Excellent
Rating: 4.8 / 5 (based on 73 ratings)
