FoneDog Screen Recorder
FoneDog Screen Recorder
Special Offer
Special Offer


By Gina Barrow, Last updated: September 6, 2021
“I got a new iPhone recently and I have already started the setup except for my music which is still on my old iPhone. I need to know how to transfer iPhone music to another iPhone.”
After iPod, perhaps iPhone is the next best choice when it comes to a mobile music player. Transfer music between iPhone is easier than transfer music from a computer to an iPhone. But still, unlike pictures and videos, music is a bit confusing when it comes to transferring or moving from one device to another.
Especially with iPhone which has both free and purchased options. Thanks to your Apple ID, you can download your purchased songs from Apple Music. As to your free music, you can always Airdrop them or use iTunes.
But, can you add, delete, and manage your playlists using the free tools given by Apple? There are plenty more options out there and you will get to learn them in this article.
Let’s find out the six amazing ways on how to transfer iPhone music to another iPhone.
Part 1. How to Transfer iPhone Music to Another iPhone with DropboxPart 2. Use Airdrop to Transfer your Music in Between iPhone DevicesPart 3. How to Transfer iPhone Music to Another iPhone via Apple MusicPart 4. Transfer Music from iPhone to iPhone via iTunes StorePart 5. Transfer iPhone Music to Another iPhone with Home SharingPart 6. How to Transfer iPhone Music to Another iPhone with FoneDog Phone Transfer Part 7. Conclusion
If you don’t have a computer nearby then the first option you can use on how to transfer iPhone music to another iPhone is Dropbox. Dropbox is cloud storage that provides flexible file and folder uploads for up to 2GB free. This space is more than enough for you to move all your music between iPhones.
Dropbox provides you a wireless transfer option for your music or other files like photos and more.
To use Dropbox to transfer your music, follow these steps:
If you don’t want to download your music to the new iPhone, you can always open Dropbox and listen to your favorite songs.
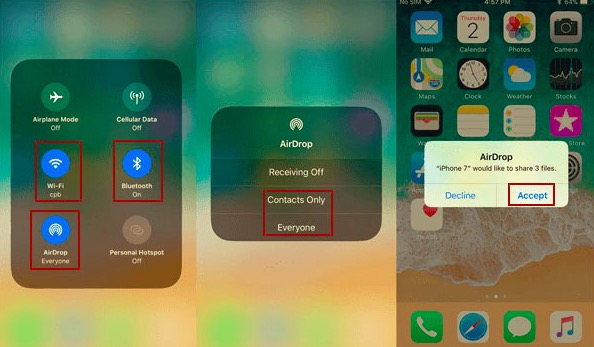
This next option for you to transfer iPhone music to another iPhone is also wireless and accessible on both iPhones, in fact, across all Apple devices. Airdrop is available on iOS 7 and later versions and Mac OS X Lion. It utilizes close-range wireless transmission of various files.
As long as both devices are within range and are connected under the same network, you can make use of Airdrop to move your music. Airdrop does not have a file size limit so you can enjoy wireless transfer.
To use Airdrop to transfer your music on both iPhones, follow this guide:
Are you an Apple Music subscriber? If yes, then you don’t have to copy or transfer your music, instead, you can simply turn on the sync library for you to access them.
Here is how to transfer iPhone music to another iPhone using Apple Music:
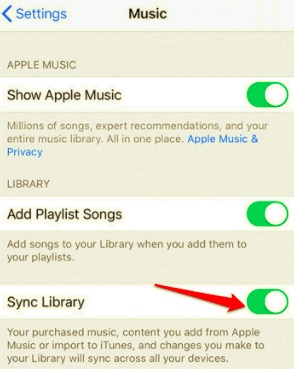
The songs you bought on Apple Music will slowly begin to sync from the old iPhone to the new one. You only have to make sure that you are using the same Apple ID.
There is another music source on iPhone apart from Apple Music, and that is iTunes Store. Like the process you did on how to sync your Apple Music, transferring songs via iTunes Store is almost similar.
If you want to know how you can transfer your songs between iPhone devices, then check these out:
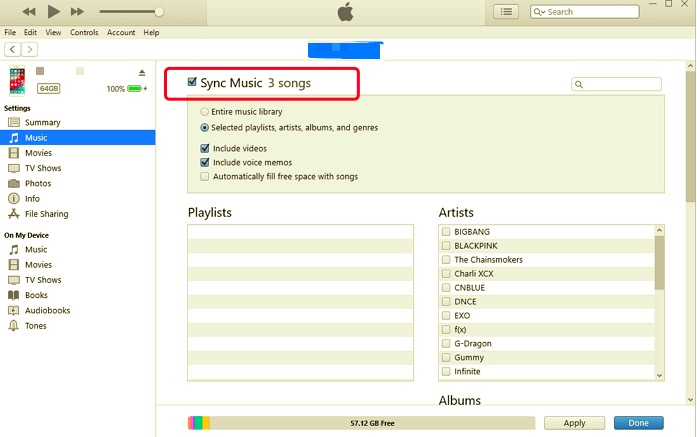
You can now enjoy listening to all your downloaded songs on the new iPhone.
Apple’s initiative to make every setting seamless, they developed an additional feature called Home Sharing. Home Sharing does not actually transfer your music or other media contents but rather lets you share them across Apple devices as long as they are under the same Wi-Fi network.
Follow these steps on how to use Home Sharing:
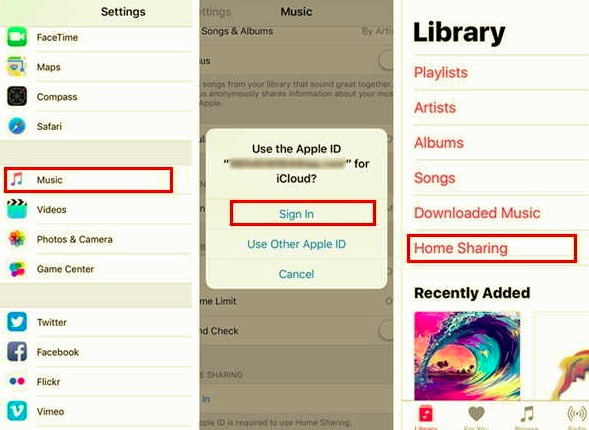
You can now listen to your music on the iPhone using the Home Sharing feature.
If you noticed, there are a lot of steps to do in order to transfer your music. The process is different for purchased songs while there is another method for free songs. Why can’t there be just one solution for this?
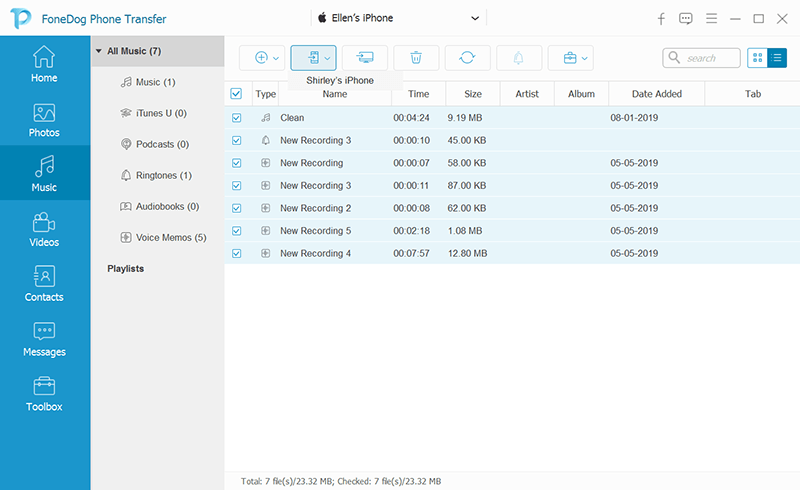
FoneDog Phone Transfer is what you need to move all your music at once, whether you bought them or not. This software solution empowers you to transfer music and even add, delete, and manage them.
Phone Transfer
Transfer files among iOS, Android and Windows PC.
Transfer and backup text messages, contacts, photos, video, music on computer easily.
Fully compatible with the latest iOS and Android.
Free Download

To know more about how to transfer iPhone music to another iPhone with FoneDog Phone Transfer, follow these:
Safely disconnect both devices from the computer.
People Also Read3 Ways on How to Transfer Music from iPhone to ComputerTop Tools to Transfer Music from iPhone to Computer Without iTunes
Getting a new iPhone is exciting and it should not shy you away from maximizing its features especially when you realize that you need to transfer a lot of information like your favorite songs.
This article highlighted six amazing methods on how to transfer iPhone Music to another iPhone starting from the simplest to the most efficient option. Doing a wireless transfer is great since you don’t have to do much but some options have limitations.
While built-in features are free and excellent, these too have restrictions. The best method so far is to use third-party tools that cater to all aspects of data transfer. FoneDog Phone Transfer is able to perform tasks such as music transfer with highly convenient steps and guaranteed safe to use.
Leave a Comment
Comment

Technical/Creative Writer
Kitchen, my safe space; black, my favorite color
Was a Technical Specialist for a while, troubleshooting Smartphone and Software-related issues until a writing stint caught my attention.
Phone Transfer
Transfer data from iPhone, Android, iOS, and Computer to Anywhere without any loss with FoneDog Phone Transfer. Such as photo, messages, contacts, music, etc.
Free DownloadHot Articles
 /
/
INTERESTINGDULL
/
SIMPLEDIFFICULT
Thank you! Here' re your choices:
Excellent
Rating: 4.7 / 5 (based on 97 ratings)
