FoneDog Screen Recorder
FoneDog Screen Recorder
Special Offer
Special Offer


By Nathan E. Malpass, Last updated: February 14, 2024
Are you looking for top-notch data transfer software to help you with the transition from an iPhone to a Google Pixel smartphone? While the change can bring a breath of fresh air and a host of new features, the thought of transferring your data may seem daunting. But fear not! In this article, we'll guide you through the process of data transfer iPhone to Pixel, ensuring that you can make the switch smoothly and without any data loss.
Part #1: How to Transfer iPhone to Pixel DataPart #2: The Best Tool to Transfer iPhone to Pixel Data: FoneDog Phone TransferSummary
One of the most crucial aspects of switching from an iPhone to a Google Pixel is transferring your cherished photos and videos. Fortunately, with Google Drive, this process becomes remarkably simple. In this section, we'll walk you through the steps to ensure that your visual memories make a smooth transition.
Step #1: Download Google Drive on Your iPhone
Before you begin, make sure you have the Google Drive app installed on your iPhone. If you don't already have it, you can download it from the App Store.
Step #2: Sign in or Create a Google Account
If you already have a Google account, sign in to the Google Drive app. If not, you can create one easily by following the on-screen instructions.
Step #3: Upload Your iPhone Photos and Videos
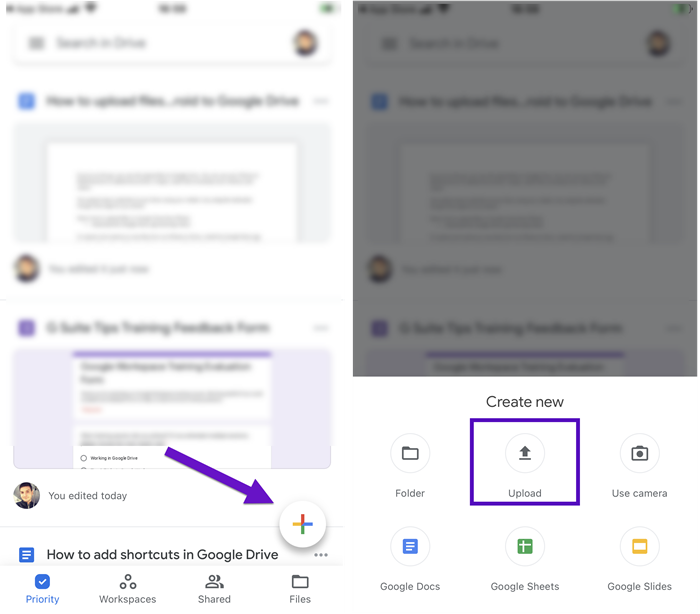
Step #4: Access Your Google Drive on the Google Pixel
Once your files are uploaded to Google Drive, it's time to access them from your new Google Pixel device.
Step #5: Download Your Files to Your Pixel
To have these files stored directly on your Google Pixel, you can download them from Google Drive.
Congratulations! Your precious images and videos are now safely on your Google Pixel. This method ensures that you don't lose a single memory during the transition from your iPhone to your new Pixel device.
Migrating your contacts from your iPhone to a Google Pixel is essential to staying connected with your network. Here's how you can effortlessly transfer iPhone to Pixel using Google Contacts.
Step #1: Sync iPhone Contacts to Google Account
Step #2: Verify Contact Sync
Step #3: Access Your Contacts on Google Pixel
After syncing your iPhone contacts to your Google account, you can easily access them on your Google Pixel device.
Your iPhone contacts will now be available on your Google Pixel. This method ensures a seamless transfer of your important contact information, enabling you to pick up right where you left off with your network when you switch to your new device.
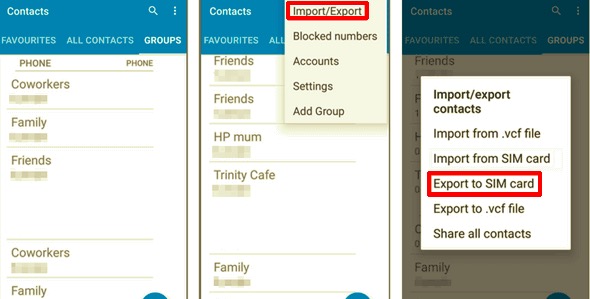
Transferring your contacts from an iPhone to a Google Pixel via a SIM card is a straightforward and effective method. Here's how you can do it:
Step #1: Export Contacts to Your SIM Card (iPhone)
Step #2: Insert SIM Card into Google Pixel
Step #3: Import Contacts from SIM Card (Google Pixel)
Your contacts are now transferred from your iPhone to your Google Pixel via the SIM card. This method is especially handy if you only need to transfer your contacts quickly and don't want to rely on cloud services or other data transfer methods.
To transfer iPhone to Pixel using the iCloud website on a browser, follow these steps:
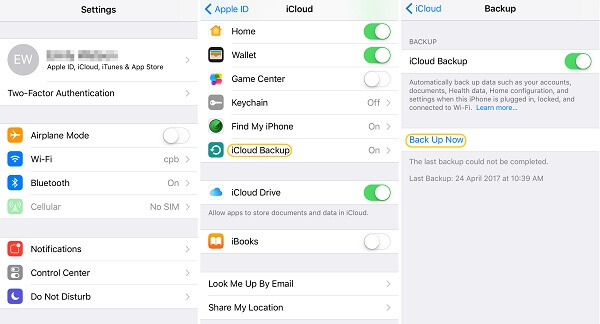
Step #1: Prepare Your iPhone
Step #2: Back Up Your iPhone Data to iCloud
Step #3: Access iCloud on a Browser (Pixel)
Step #4: Download Your Data to Your Pixel
From the iCloud website on your browser, you can access and download various types of data, such as photos, contacts, and documents. Here's how to download some common data types:
Step #5: Save Data to Your Pixel
Once you've downloaded your data from the iCloud website, save it to your Google Pixel. You can organize your data as needed, such as storing photos in your device's gallery and importing contacts into your contacts app.
This method allows you to transfer data from your iPhone to your Google Pixel using the iCloud website and a web browser on your Pixel. It's particularly useful for accessing various types of data and documents stored in your iCloud account.
Please note that the availability and functionality of iCloud on the web may change, so ensure you have an internet connection and that you are using a compatible web browser on your Pixel.
Transferring data from your iPhone to a Google Pixel using a USB or Lightning cable and a computer is a straightforward method that allows you to have direct control over the data transfer. Here's how you can do it:
Step #1: Prepare Your iPhone and Computer
Step #2: Connect Your iPhone to the Computer
Step #3: Export Data from Your iPhone
Step #4: Disconnect Your iPhone
Step #5: Connect Your Google Pixel to the Computer
Step #6: Transfer Data to Your Google Pixel
Step #7: Safely Disconnect Your Google Pixel
You've now manually transferred your data from your iPhone to your Google Pixel using a USB or Lightning cable and a computer. This method gives you full control over what data you transfer and is particularly useful for larger files, such as photos and videos.
When it comes to transferring data from your iPhone to a Google Pixel, you might encounter various challenges and limitations with standard methods. In such cases, FoneDog Phone Transfer emerges as a powerful and reliable iPhone 15-supported solution to ensure a seamless and efficient transition.
Phone Transfer
Transfer files among iOS, Android and Windows PC.
Transfer and backup text messages, contacts, photos, video, music on computer easily.
Fully compatible with the latest iOS and Android.
Free Download

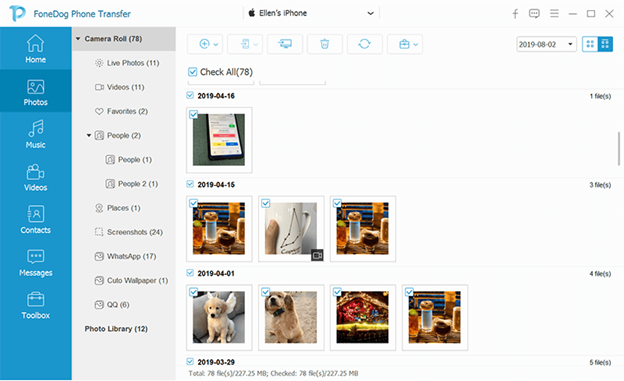
This tool is designed to transfer various data types, including contacts, messages, photos, videos, music, and more, from iPhone to Google Pixel. Also if you want to turn it around, like transferring data from Google Pixel back to iPhone, it works too. Here's an overview of FoneDog Phone Transfer, its key features, and the steps to use it for a smooth data transfer.
Key Features:
Follow these steps to transfer iPhone to Pixel using FoneDog Phone Transfer:
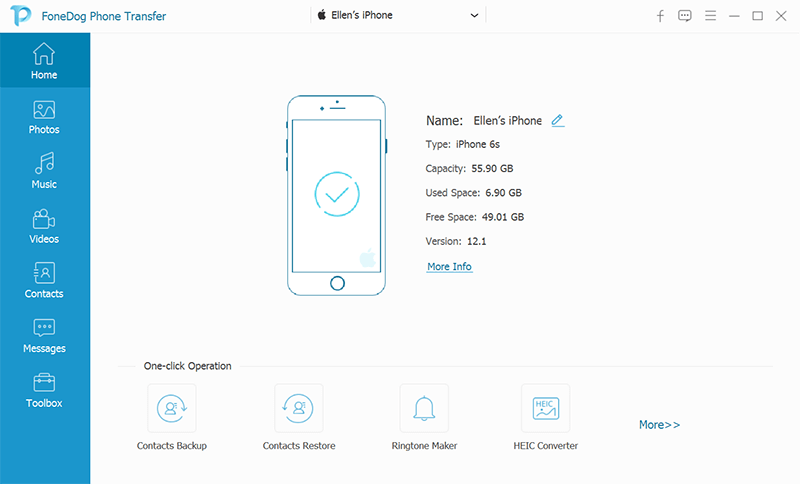
Step #1: Install and Launch FoneDog Phone Transfer
Step #2: Connect Your Devices
Step #3: Choose Data to Transfer
Step #4: Start the Transfer
Step #5: Monitor the Transfer
Step #6: Complete the Transfer
FoneDog Phone Transfer simplifies the process of transferring data from your iPhone to your Google Pixel, ensuring a hassle-free transition while maintaining data integrity. Whether you're switching to a new device or simply need to back up your data, this tool offers a reliable and user-friendly solution.
People Also ReadHow to Easily Transfer Data from Samsung to Pixel in 2023?A Complete Guide On How To Transfer Data From Pixel To Pixel The Easy Way
Choosing to transfer iPhone to Pixel can be a crucial task. Various methods are available to ensure that your data, including contacts, photos, videos, messages, and more, make a smooth transition.
Choose the method that best suits your needs and preferences to ensure a successful data transfer, making your transition from iPhone to Google Pixel seamless and stress-free.
Leave a Comment
Comment

iPhone/Android Devices’ Maintenance Expert
Staying home, listening to music, writing tech articles
Many people asked me to repair their mobile phones so I have a lot of experience in mobile phone repair, and I know a lot about Android or Apple phones.
Phone Transfer
Transfer data from iPhone, Android, iOS, and Computer to Anywhere without any loss with FoneDog Phone Transfer. Such as photo, messages, contacts, music, etc.
Free DownloadHot Articles
 /
/
INTERESTINGDULL
/
SIMPLEDIFFICULT
Thank you! Here' re your choices:
Excellent
Rating: 4.6 / 5 (based on 69 ratings)
