FoneDog Screen Recorder
FoneDog Screen Recorder
Special Offer
Special Offer


By Nathan E. Malpass, Last updated: October 11, 2023
In the era of advanced smartphone photography, our iPhones have become the go-to devices for capturing life's precious moments. Whether it's a picturesque sunset, a candid family gathering, or a delectable plate of food, our iPhones faithfully document these snapshots of our lives.
However, as our photo collections grow, so does the need to safely store and manage these memories. That's where the seamless process to transfer iPhone photos to laptop comes into play.
Whether you're shifting to a new device, freeing up space on your phone, or simply organizing your visual memoirs, knowing how to efficiently transfer files from your iPhone to your laptop is a skill that proves invaluable.
With the integration of both Mac and Windows ecosystems, the methods may differ slightly, but the goal remains the same: to effortlessly move your cherished photos to a larger storage space without compromising quality.
In this article, we'll guide you through various techniques to achieve this transfer hassle-free. From using built-in software like iTunes or the Photos app to exploring third-party applications, we'll cover the spectrum of options available to you.
By the end, you'll be equipped with the knowledge to curate your iPhone's photo library, making space for new memories while ensuring that your older ones remain secure on your laptop's storage. Let's dive into the world of seamless iPhone-to-laptop photo transfers.
Part #1: Ways to Transfer iPhone Photos to Laptop (Mac)Part #2: Methods to Transfer iPhone Photos to Laptop (Windows)Part #3: The Best Tool to Transfer iPhone Photos to Laptop: FoneDog Phone Transfer
Transferring your cherished iPhone photos to your Mac laptop can be a straightforward process, thanks to the trusty lightning cable at your disposal. This method not only provides a secure connection but also enables you to swiftly move batches of photos without compromising quality. Here's a step-by-step guide to help you master the lightning cable transfer method to transfer iPhone photos to laptop:
Ensure you have your iPhone's lightning cable and your Mac laptop on hand. Make sure your Mac is powered on and unlocked.
Plug one end of the lightning cable into your iPhone's charging port and the other end into an available USB port on your Mac.
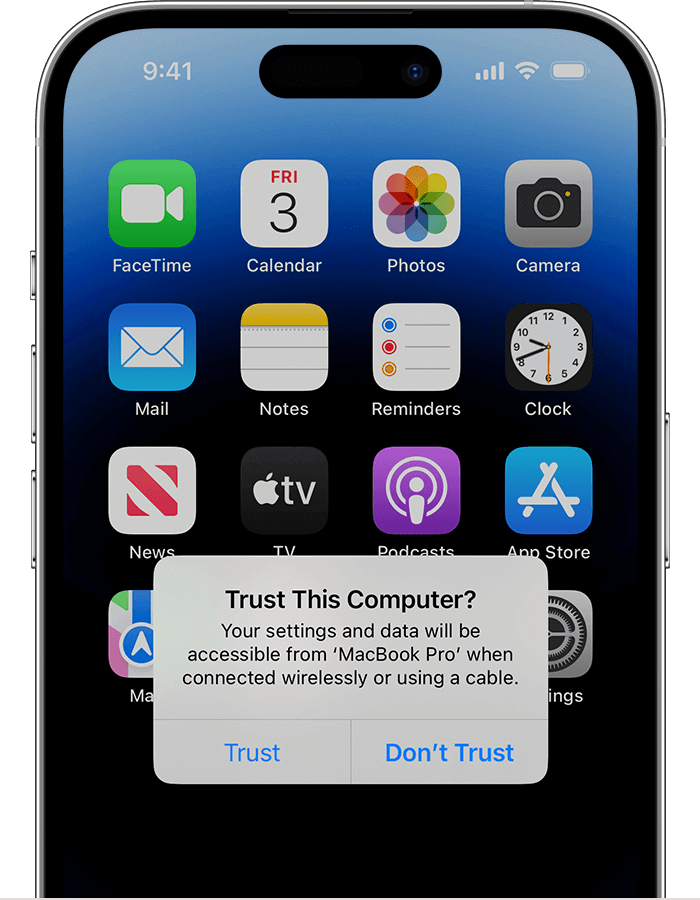
A prompt may appear on your iPhone asking if you "Trust This Computer". This is your iPhone's way of confirming the connection's validity. Tap "Trust" to proceed.
On your Mac, the Photos app should automatically launch. If it doesn't, you can manually open the Photos app.
In the Photos app, your iPhone should appear in the sidebar under the "Devices" section. Click on your iPhone's name to access its photo library.
Choose the photos you want to transfer. You can select individual photos or entire albums by holding down the Command key while clicking.
Once your desired photos are selected, click the "Import Selected" or "Import All New Items" button at the top-right corner. You can choose to import all new items since your last import or specific selections.
The Photos app will display a progress bar as it imports the selected photos from your iPhone. The time it takes depends on the number and size of the photos.
After the import is complete, you can safely eject your iPhone by clicking the "Eject" button next to its name in the sidebar. Once ejected, you can disconnect the lightning cable.
AirDrop, a seamless feature within the Apple ecosystem, provides an effortless way to transfer iPhone photos to your Mac laptop wirelessly. This method is not only convenient but also ensures a quick and reliable transfer process. Here's how to use AirDrop to transfer iPhone photos to laptop:
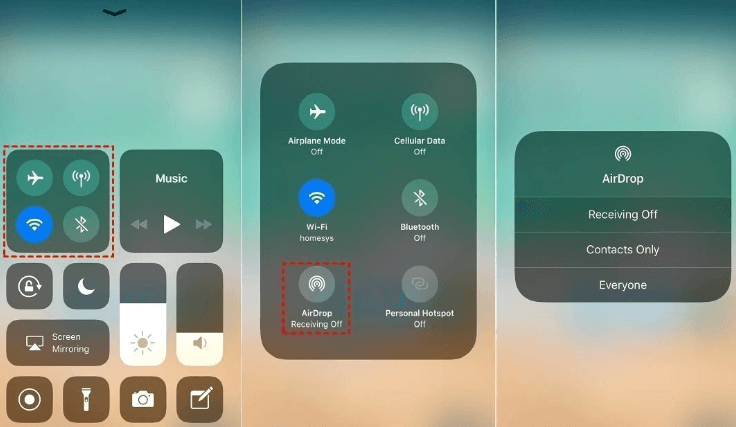
On your iPhone, swipe down from the top-right corner (iPhone X and newer) or swipe up from the bottom of the screen (iPhone 8 and older) to open the Control Center. Press and hold the "Network Connections" box to open a larger panel. Tap on "AirDrop" and select "Contacts Only" or "Everyone" based on your preferences.
On your Mac, ensure that AirDrop is enabled by clicking "Go" in the Finder menu, selecting "AirDrop", and setting your visibility to "Contacts Only" or "Everyone".
Open the "Photos" app on your iPhone and navigate to the album or collection containing the photos you want to transfer.
Tap the "Select" button in the top-right corner and choose the photos you want to transfer. Once selected, tap the "Share" button (a square with an arrow pointing upwards). In the sharing options, locate your Mac's name under the AirDrop section and tap on it.
A notification will appear on your Mac's screen, displaying the incoming AirDrop request. Click "Accept" to initiate the transfer.
Your selected photos will start transferring from your iPhone to your Mac. A progress bar will indicate the status of the transfer. Once complete, the transferred photos will be available in your Mac's "Downloads" folder by default.
Move the transferred photos to your preferred location on your Mac, whether it's the Photos app, a designated folder, or another photo management application. You can now easily organize, edit, and share these photos from your laptop.
AirDrop streamlines the process of transferring iPhone photos to your Mac, eliminating the need for cables and complex setups. It's a secure and user-friendly method that preserves the quality of your photos while enhancing your ability to manage and enjoy your visual memories on a larger screen.
Utilizing Apple's cloud-based service, iCloud is an efficient way to transfer iPhone photos to your Mac laptop. This method allows you to access your photos from any device with an internet connection, ensuring flexibility and accessibility. Here's how to use iCloud.com to transfer iPhone photos to laptop:
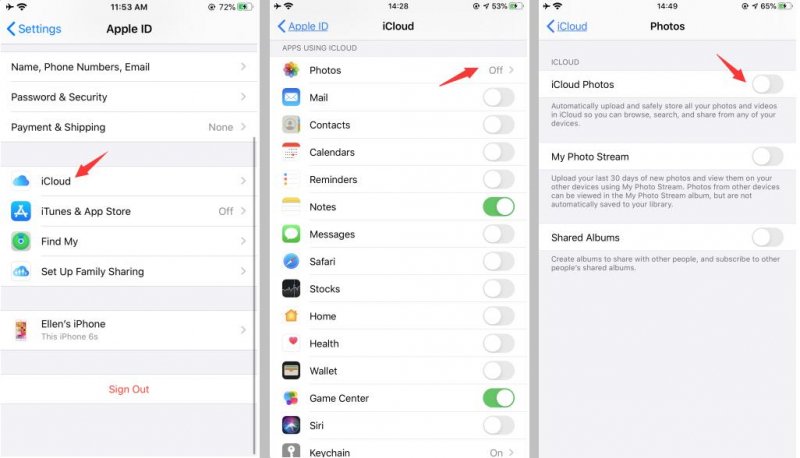
On your iPhone, go to "Settings" and tap on your name at the top. Then, select "iCloud" and "Photos". Toggle on "iCloud Photos" to sync your photos to iCloud.
Open a web browser on your Mac and navigate to iCloud.com. Sign in with your Apple ID and password.
Click on the "Photos" icon to access your iCloud Photo Library. Your entire collection will be available here, organized by date and location.
Navigate to the specific album or moment containing the photos you want to transfer. Click on the "Select Photos" button (a square with a checkmark). Choose the photos you wish to download.
Once you've made your selection, click the download icon (a cloud with an arrow pointing downward) to start downloading the chosen photos to your Mac.
Depending on your browser settings, the photos will be downloaded to your Mac's default "Downloads" folder or your chosen destination. Once downloaded, you can move them to the desired location on your laptop for organization and management.
To free up space on iCloud after the transfer, consider removing the photos you've downloaded from your iCloud Photo Library. On your iPhone, go to "Settings" > "[Your Name]" > "iCloud" > "Photos", then toggle off "iCloud Photos". Choose the option to remove the photos from iCloud.
Transferring iPhone photos to a Windows laptop can be achieved through the familiar medium of email. While this method may not be ideal for transferring a large number of photos due to file size limitations, it offers a quick solution for sharing a few select images. Here's how to use email to transfer iPhone photos to laptop:
Open the "Photos" app on your iPhone and navigate to the album containing the photos you want to transfer. Tap the "Select" button in the top-right corner and choose the specific photos you wish to transfer.
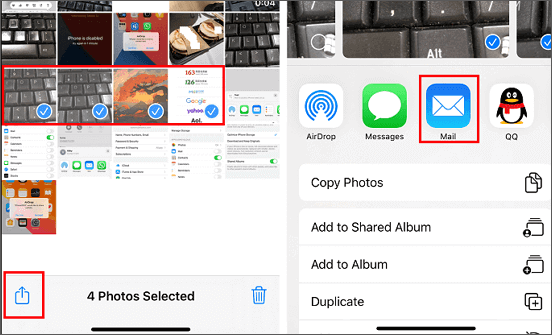
Open your preferred email app on your iPhone and compose a new email. Enter your own email address in the "To" field.
Click on the attachment icon (usually represented by a paperclip) to attach the selected photos to the email. The photos will be added as attachments to the email.
Send the email to yourself. The attached photos will be uploaded to the email server.
Open the email app or web browser on your Windows laptop and access the email you sent to yourself.
Open the email and locate the attached photos. Depending on your email service, you might need to click on each photo to view it, and then use the download option to save them to your Windows laptop.
Transferring iPhone photos to a Windows laptop can also be accomplished through messaging apps that offer file-sharing capabilities. Messaging apps provide a versatile way to send multiple photos at once, making them suitable for moderately sized photo collections. Here's how to use messaging apps to transfer iPhone photos to laptop:
Select a messaging app that you commonly use on your iPhone and is also available on your Windows laptop. Apps like WhatsApp, Telegram, and Facebook Messenger are popular choices.

Open the chosen messaging app on your iPhone and start a conversation with yourself. This is a convenient way to send files from your iPhone to your laptop.
In the conversation, look for the attachment or paperclip icon that signifies file attachment. Tap on it and select the photos you want to transfer from your iPhone's photo library.
Once you've attached the photos, send them to yourself. The messaging app will begin uploading the photos to its server.
Open the messaging app on your Windows laptop and navigate to the conversation you created.
Find the sent photos within the conversation. Depending on the app, you might need to tap on each photo to view it, and then use the download or save option to store them on your Windows laptop.
Transferring iPhone photos to a Windows laptop can be efficiently achieved through cloud storage services like Google Drive. Google Drive provides ample storage space and allows you to seamlessly access your photos on various devices. Here's how to use Google Drive to transfer iPhone photos to laptop:
Download and install the Google Drive app from the App Store on your iPhone.
Open the Google Drive app and sign in using your Google account. If you don't have an account, you can create one.
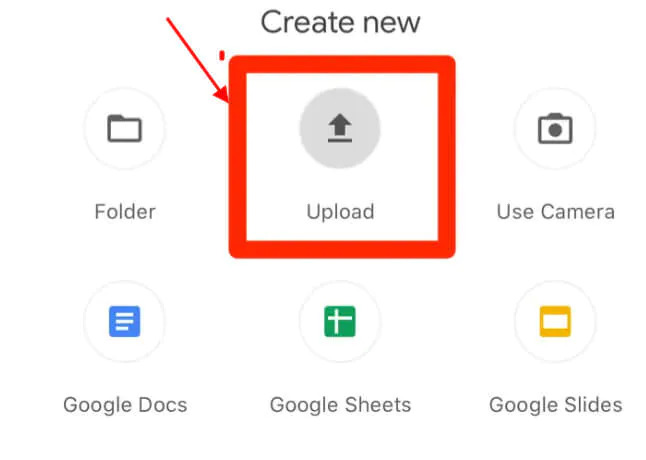
Tap the "+” icon or the "Add" button, then select "Upload". Navigate to the album containing the photos you want to transfer and select the photos. Tap "Upload" to begin the uploading process. You can also create a new folder for your photos if desired.
On your Windows laptop, open a web browser and navigate to the Google Drive website (drive.google.com). Sign in using the same Google account.
Locate the uploaded photos in Google Drive. Select the photos you want to download, right-click, and choose "Download". Google Drive will compress the selected files into a zip folder.
After downloading, locate the zip folder on your laptop and right-click on it. Choose "Extract All" to unzip the folder and access your transferred photos.
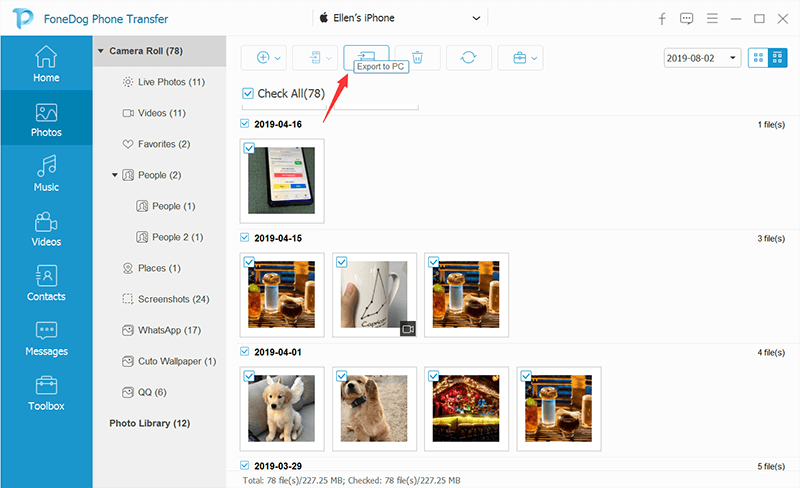
When it comes to transferring iPhone photos to your laptop, having a dedicated tool can streamline the process and ensure a seamless experience. One such tool that stands out is the FoneDog Phone Transfer. This software offers an all-in-one solution for transferring data between iOS devices and laptops, making it an excellent choice for managing your photo collection.
Phone Transfer
Transfer files among iOS, Android and Windows PC.
Transfer and backup text messages, contacts, photos, video, music on computer easily.
Fully compatible with the latest iOS and Android.
Free Download

Here's why FoneDog Phone Transfer is the best tool for the job:
Here are the steps to use the tool to transfer iPhone photos to laptop:
FoneDog Phone Transfer not only helps you transfer iPhone photos to your laptop but also helps you transfer Android photos to your laptop, providing a user-friendly and efficient solution. With its ability to handle various data types and maintain original quality, it ensures that your photo collection remains intact and well-organized on your laptop's storage.
People Also ReadLearn How to Transfer iPhone Backup to A New Computer3 Applications to Swiftly Transfer iPhone to Xiaomi in 2023!
Leave a Comment
Comment

iPhone/Android Devices’ Maintenance Expert
Staying home, listening to music, writing tech articles
Many people asked me to repair their mobile phones so I have a lot of experience in mobile phone repair, and I know a lot about Android or Apple phones.
Phone Transfer
Transfer data from iPhone, Android, iOS, and Computer to Anywhere without any loss with FoneDog Phone Transfer. Such as photo, messages, contacts, music, etc.
Free DownloadHot Articles
 /
/
INTERESTINGDULL
/
SIMPLEDIFFICULT
Thank you! Here' re your choices:
Excellent
Rating: 4.7 / 5 (based on 58 ratings)
