FoneDog Screen Recorder
FoneDog Screen Recorder
Special Offer
Special Offer


By Vernon Roderick, Last updated: January 12, 2021
Although some people say that iPhone is incompatible with other non-Apple products or whatnot, it’s especially easy to establish a connection with two Apple products. As such, trying to transfer iPhone files to Mac would be a piece of cake.
This is because there are a lot of features on Apple products that allows them to connect to their fellow Apple device, and that’s exactly what we’ll be using today.
This article will show you how you can transfer iPhone files to Mac through the built-in features of Apple. Let’s start with what I think is very popular nowadays.
1. Transfer iPhone Files to Mac with iCloud Drive2. Transfer iPhone Files to Mac with Finder3. Transfer iPhone Files to Mac with File Sharing4. Transfer iPhone Files to Mac via AirDropAlternative to Transfer iPhone Files
Since you’re here trying to learn how to transfer iPhone files to Mac, you must have an idea what cloud storage platforms are.
Cloud storage platforms are places where users can store their files so that they can access the said files even with a different device. iCloud Drive is a perfect example of cloud storage. In other words, you can transfer iPhone files to Mac.
Below are the steps to do this:
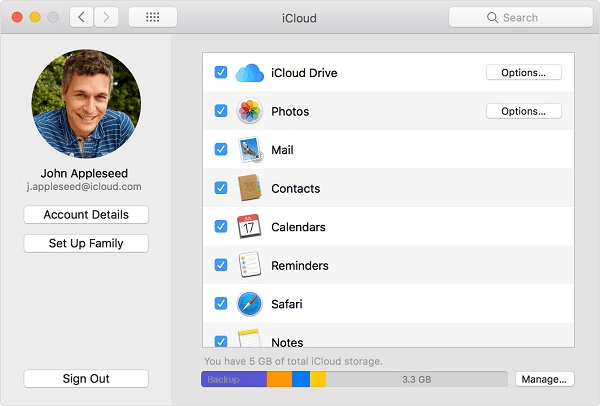
With this, you can transfer iPhone files to Mac as long as you have internet.
Since not all of us have internet, it would be best if you also have an option to transfer files without the internet, and that’s what the next section is all about.
Considering you’re a Mac user, you must know what Finder is.
Finder is the basic file manager app of Mac. If Windows has File Explorer, Mac has Finder. And since you can access your files through this app, there’s no reason for you to not be able to transfer iPhone files to Mac.
Below are the steps to transfer iPhone files to Mac:


With this, you can easily transfer iPhone files to Mac without having to worry about having the internet. This is its main advantage over the previous method.
A very similar method to Finder would be the use of the File Sharing feature available on iTunes.
File Sharing is a feature that can be used only through iTunes. It basically allows you to share your files across your devices, and that includes sharing from iPhone to Mac.
Below are the steps to transfer iPhone files to Mac:
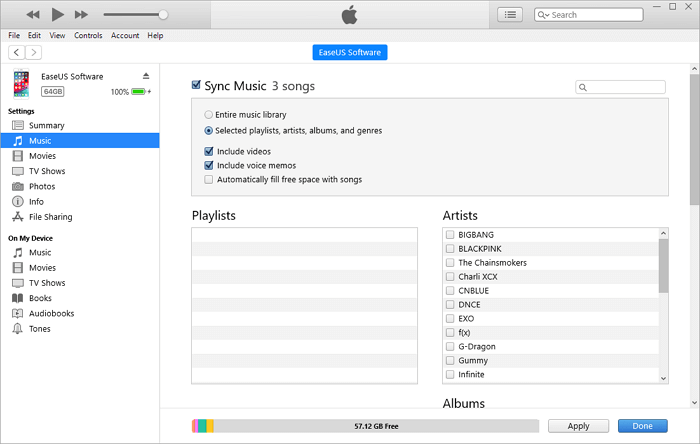
That’s pretty much how to transfer iPhone files to Mac using File Sharing, though it’s not really that different from when you used Finder.
Our last entry for the day involves the use of AirDrop.
AirDrop is another feature on Apple devices that allows you to share files through a local network. Simply put, you don’t need internet for this, either a USB cable.
Either way, here’s how to transfer iPhone files to Mac with AirDrop:
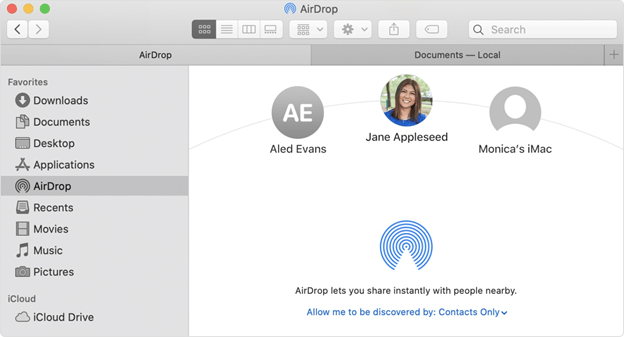
This is how you can use AirDrop to transfer iPhone files to Mac. The main advantage of this is that you don’t need an internet nor a USB cable, just AirDrop, nothing more, nothing less.
Although there are many options to transfer iPhone files to Mac, the most practical solution would be to use a specialized tool, hence why you need to know about FoneDog Phone Transfer.
FoneDog Phone Transfer is a tool designed to help users transfer files from one device to another. While it supports Windows PC, iOS, and Android, unfortunately, it doesn’t support Mac.
As such, I can only leave this software as an alternative in case you manage to get your hands on a Windows PC. Either way, if not for being incompatible with Mac, this would surely be the most ideal solution for your space problem.
Although there are quite a few options to transfer iPhone files to Mac, it goes without saying that you’re not obliged to do this. After all, there’s no immediate issue when you don’t transfer files.
However, you have to be reminded that it’s very beneficial for you. You will have a backup, save space, improve performance, and more. Either way, this guide should help you achieve what is needed.
Leave a Comment
Comment

Technical Expertise for PC/Website Optimization
One of my passion is to develop software of my own
I write articles to share knowledge about IT technology and some experience in developing my own software, and developing my own software is one of my passions for work.
Phone Transfer
Transfer data from iPhone, Android, iOS, and Computer to Anywhere without any loss with FoneDog Phone Transfer. Such as photo, messages, contacts, music, etc.
Free DownloadHot Articles
 /
/
INTERESTINGDULL
/
SIMPLEDIFFICULT
Thank you! Here' re your choices:
Excellent
Rating: 4.8 / 5 (based on 98 ratings)
