FoneDog Screen Recorder
FoneDog Screen Recorder
Special Offer
Special Offer


By Gina Barrow, Last updated: September 24, 2021
“I love music, a lot. I listen to it while taking a shower, having my coffee, and even driving to work. Recently, I got myself a Mac and I need to know if I can transfer iPhone music to Mac without much stress? Thanks”
Everyone seems to have a huge collection of songs on their iPhones that suits an everyday need for country music, mood music, pop, blues, and electronic. These songs bring comfort to everyday chaos.
And the most convenient device to store them is your iPhone, sometimes you even transfer your music from a Mac or Windows computer to your iPhone. But if you got tons of playlists, you might need more storage to cater to more songs or you can move them to another device. One of the devices you can use for transfer is your Mac computer.
But, how do you transfer iPhone music to Mac? In this article, we will give you five distinctive methods that you can use for fast, and effective transfer.
Part 1. Use iTunes to Transfer Your iPhone Music to MacPart 2. Transfer iPhone Music to Mac with Apple's Built-in Music AppPart 3. How to Transfer Your iPhone Music to Mac via Google DrivePart 4. Sync Music between Mac and iPhone with FinderPart 5. How to Transfer iPhone Music to Mac Using FoneDog Phone Transfer
The first thing that comes to mind when talking about transfer between iPhone and Mac is iTunes. iTunes will help all your purchased songs get transferred from the iPhone down to your Mac.
Here is a quick guide on how to use iTunes to transfer iPhone music to Mac:
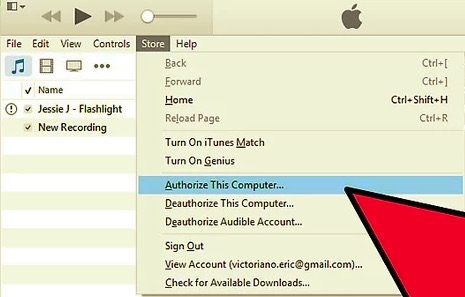
Your music will now be synced with iTunes. Safely remove your iPhone and start listening on your Mac.
Note:
If your songs are purchased from Apple's built-in music app, then you can easily sync them with your Mac. There is not much to do to sync your music in between these devices, what you need is to simply turn on the iCloud Music Library or toggle on the Sync Library option on the iPhone.
You only need an Apple ID for you to manage the wireless syncing. Here’s a quick guide:
After you have enabled the iCloud Music Library on both devices, you can stream your music at any time. However, this method is only entitled to those who subscribed from Apple's built-in music app.
One more option to transfer iPhone music to Mac is by using cloud storage services like Google Drive. Google Drive accommodates file transfer in several formats like photos, music, videos, and documents.
What’s great about this cloud storage is you get 15GB free for the first time and can be upgraded if necessary. You can sign in or register using your Google account.
Learn how you can use Google Drive as your medium to transfer iPhone music to Mac:
You can keep the songs on your Drive or you can remove them to free up some space.
Have you recently upgraded to macOS Catalina? Well, you are probably wondering where iTunes is. iTunes has been replaced with Finder. It is a built-in app that organizes your Mac.
And in terms of synchronization, Finder makes it easier. Here is the full guide on how to use it for your music transfer.
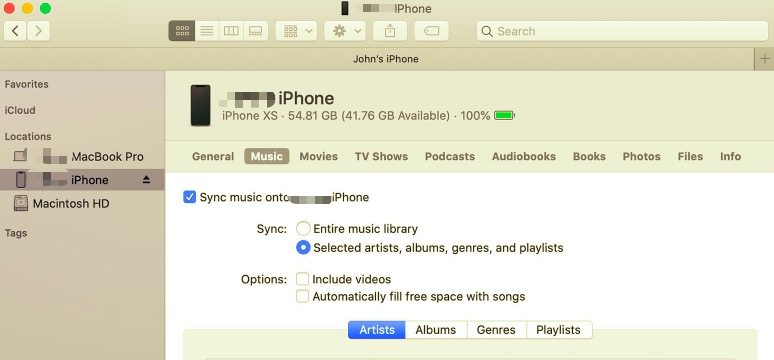
Every time you connect your iPhone to your Mac, you can sync your music or if you want, you can turn on the automatic syncing.
Once you are done, don’t forget to click the Eject button in the Finder sidebar.
Note:
If you erase an automatically synced item from your Mac, the item is also removed on your device once you synced them again.
You need a tool that offers more than just file transferring but also provides other functions. FoneDog Phone Transfer enables you to transfer your iPhone music to your Mac in just a few clicks.
Phone Transfer
Transfer files among iOS, Android and Windows PC.
Transfer and backup text messages, contacts, photos, video, music on computer easily.
Fully compatible with the latest iOS and Android.
Free Download

Apart from music, you can also transfer other files like pictures, videos, contacts, and messages. It also offers a wider transfer option like being able to transfer files from iOS to iOS, iOS to Android, vice versa, and iOS to macOS, and Windows.
Using FoneDog Phone Transfer is pretty popular among iOS users, you can also enjoy hassle-free transfer by doing these:
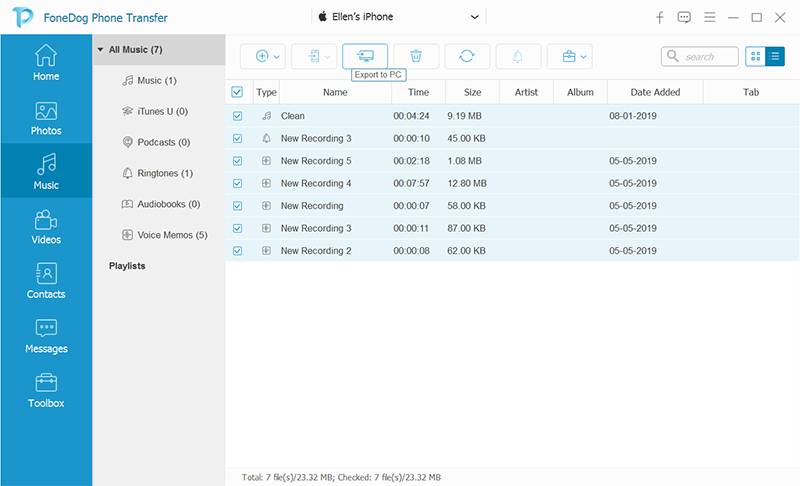
You see, there are no complicated steps in using FoneDog Phone Transfer. It only needs to be installed on your computer so you can manage your files at any time.
People Also ReadHow To Transfer Music From IPod To Computer3 Ways on How to Transfer Music from iPhone to Computer
Have you found the best method for you? These five distinctive options offer different ways to transfer iPhone music to Mac.
You can choose from using iTunes, Apple's built-in music app, Google Drive, Finder, and FoneDog Phone Transfer. Each option has its own limitations so it is better that you consider it before starting the transfer.
But of course, among these methods, having an all-in-one solution is way better than using a free one with restrictions.
Leave a Comment
Comment

Technical/Creative Writer
Kitchen, my safe space; black, my favorite color
Was a Technical Specialist for a while, troubleshooting Smartphone and Software-related issues until a writing stint caught my attention.
Phone Transfer
Transfer data from iPhone, Android, iOS, and Computer to Anywhere without any loss with FoneDog Phone Transfer. Such as photo, messages, contacts, music, etc.
Free DownloadHot Articles
 /
/
INTERESTINGDULL
/
SIMPLEDIFFICULT
Thank you! Here' re your choices:
Excellent
Rating: 4.8 / 5 (based on 104 ratings)
