FoneDog Screen Recorder
FoneDog Screen Recorder
Special Offer
Special Offer


By Vernon Roderick, Last updated: January 6, 2021
Since the rise of Apple in 2007 up until now, the iPhone series has become one of the most commonly-used smartphones around the world. After all, it’s the best smartphone product for Apple.
Unfortunately, though, it has its own world, and thus you may not be able to establish a connection between an iPhone and a smartphone of another brand.
This article will show you how you can transfer iPhone files to PC or even transfer files from PC to iPhonedespite the fact that they are incompatible with each other. Let’s start with what I think would be the most ideal thing to do in this case.
When one wants to transfer iPhone files to a PC, you will naturally have multiple options to choose from. However, most experts will agree that the best solution would be through specialized software, and that’s why I introduce FoneDog Phone Transfer.
FoneDog Phone Transfer is a tool that allows file transfer between iOS, Android, and Windows PC. It supports the latest versions up to iOS 12, Android 9.0, and Windows 10, thus the best tool for the job. Additionally, it supports most file types.
Below are the steps to transfer iPhone files to PC:
Connect your iPhone to the Windows PC with its dedicated USB cord. Ensure that FoneDog Phone Transfer is currently open on the computer. It will automatically detect the device and you can control the iPhone as you like with the software.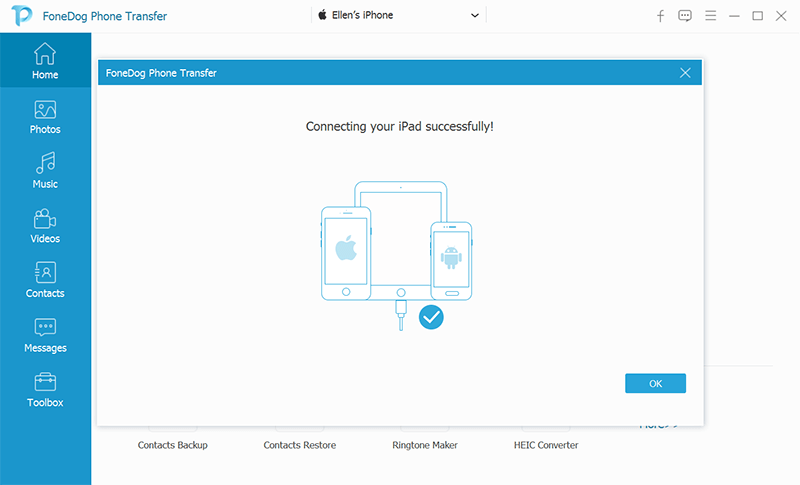
On the left side of the window, you will see a list of file types. Select the file type that you want to settle first. Once you click on either one of them, the software will take a while to scan for files belonging to that file type.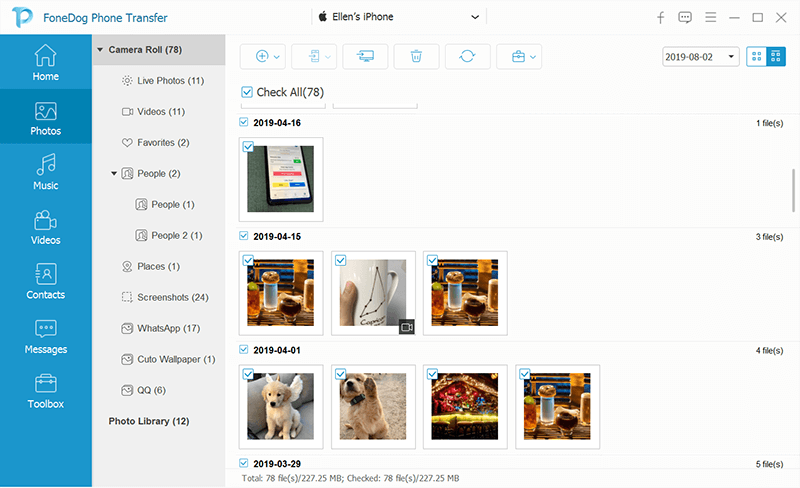
After a while, you will get a list of files from the right side of the window. Simply select a file by clicking on their corresponding boxes. Once that’s done, click on the Export to PC button at the top of the window to finalize the transfer. Do this to each file type.
FoneDog Phone Transfer offers a huge amount of freedom and control to file transfer.
However, as you can see, you can’t exactly transfer iPhone files to PC all at once. You can only do one file type at a time, although it’s not that bad. But if you want it to go faster, I’ve got a more convenient solution.
You may not know about the Plug-and-Play feature on every Windows PC, but you’ve actually most likely used it before.
Plug-and-Play is what we call the process of plugging a device into your PC and transferring files using the message that will appear through that process without the use of a tool.
Below are the steps to transfer iPhone files to PC:
This is what we call copy-paste which copies the content and pastes it wherever you like. The best thing about this is that as long as you can select all the files, you can transfer iPhone files to PC them all at once, regardless of their file type.
You may have heard of iTunes, which is a built-in app on every Mac computer. However, it can also be installed on Windows PC for the purpose of managing, or in our case, transferring files.
iTunes has a feature called File Sharing wherein you can use to transfer iPhone files to PC. Here’s what you need to use this feature:
Once you have fulfilled these prerequisites, you will then be able to transfer iPhone files to a PC. Below are the steps to do this:
![]()
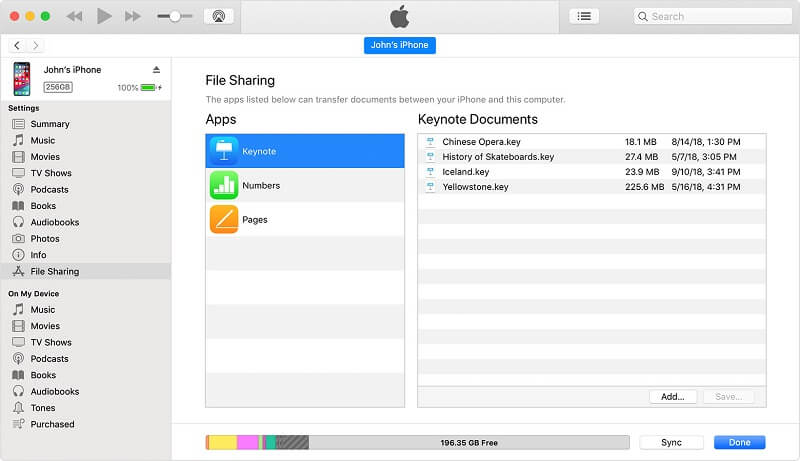
You’re not only limited to the File Manager app. You may also select another app, as long as the file that you want is managed by that app. Either way, that’s how to transfer iPhone files to PC.
Although you can transfer with iTunes manually, you can also transfer iPhone files to PC using iTunes automatically, and that would be by syncing your files.
Syncing files would mean making sure that all files located in the connected device will be the same as where it is connected to. In our case, it will ensure that the files in the iPhone will always be on your PC, but this can only be done on one file type at a time.
Below are the steps to transfer iPhone files to PC:
Considering what the previous section is, you must have already tried installing iTunes. And so you should already be aware of iCloud.
iCloud is the dedicated cloud storage of Apple. It allows Apple users to store their files in a way so that they can access these files anytime and anywhere.
These are steps on how to transfer iPhone files to PC:
Since there’s a method of accessing iCloud through a website, it’s only fair to assume that it can also be accessed through an app, and if that’s what you’re thinking, then you’re right.
Just like how there is an iTunes for Windows, there is also iCloud for Windows. Using this app, you can store your files from PC and access files from other devices, as long as it was saved in the cloud platform.
Now here are the steps to transfer iPhone files to PC:
The hardest part of this is installing and setting up iCloud. As long as you finish that properly, you can easily transfer iPhone files to PC without any real issue.
If you use your iPhone for a lot of things, you’re bound to run out of space eventually. When that time comes, you can either delete unnecessary files or send them into a different storage device so there’s no real risk.
If you choose the latter, this guide on how to transfer iPhone files to PC should be quite helpful for you. As long as you follow it correctly, you shouldn’t face any issues.
Leave a Comment
Comment

Technical Expertise for PC/Website Optimization
One of my passion is to develop software of my own
I write articles to share knowledge about IT technology and some experience in developing my own software, and developing my own software is one of my passions for work.
Phone Transfer
Transfer data from iPhone, Android, iOS, and Computer to Anywhere without any loss with FoneDog Phone Transfer. Such as photo, messages, contacts, music, etc.
Free DownloadHot Articles
 /
/
INTERESTINGDULL
/
SIMPLEDIFFICULT
Thank you! Here' re your choices:
Excellent
Rating: 4.5 / 5 (based on 93 ratings)
