FoneDog Screen Recorder
FoneDog Screen Recorder
Special Offer
Special Offer


By Nathan E. Malpass, Last updated: November 10, 2023
iPhones have become our personal jukeboxes, storing a vast collection of songs that resonate with different moments of our lives. Whether it's the upbeat track that gets you going in the morning or the soothing melody that helps you unwind after a long day, your iPhone is likely packed with music that holds special meaning. However, with limited storage space on our devices, it's essential to find ways to free up space without losing the songs we cherish.
One of the most effective strategies to achieve this is to transfer iPhone music to computer. Not only does this help you create a backup of your music library, but it also grants you the freedom to organize, edit, and enjoy your tracks on a larger screen.
In this article, we'll guide you through various user-friendly methods and tools to facilitate a seamless transfer of your beloved iPhone music to your computer. Whether you're a Mac enthusiast or a Windows devotee, we've got you covered. Let's dive into the step-by-step procedures that will ensure your music remains safe and sound.
Part #1: Methods to Transfer iPhone Music to ComputerPart #2: The Best Tool to Transfer iPhone Music to Computer: FoneDog Phone TransferConclusion
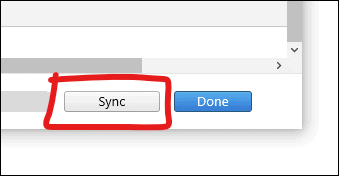
When it comes to managing and transferring music between your iPhone and computer, iTunes has long been a reliable go-to for Apple users. Follow these steps to transfer iPhone music to computer using iTunes:
Note: With the advent of macOS Catalina and later, Apple has replaced iTunes with separate apps like Apple Music, Apple TV, and Finder for device management. If you're using a newer version of macOS, the process might differ slightly. Simply use the appropriate app for music management and device syncing.
Using iTunes remains a classic and effective way to transfer music from your iPhone to your computer. However, if you're looking for alternative methods or are using a Windows computer, stay tuned for the upcoming sections where we explore other user-friendly approaches to achieve the same goal.
If your iPhone is filled with music purchased from the iTunes Store, you can easily re-download these purchases onto your computer using your Apple ID. Also, there is a way to move iPhone music to computer without iTunes when you use Windows. Here's how to do it:
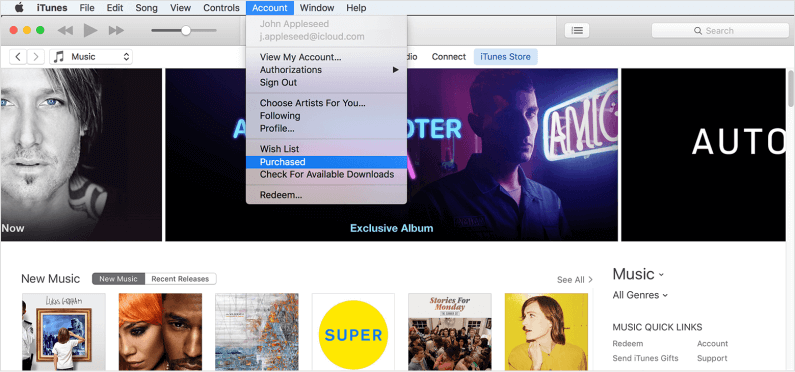
Note: This method is particularly useful for transferring purchased music, but it doesn't cover music imported from other sources or downloaded through streaming apps. Additionally, this method might not be available in regions with restricted access to the iTunes Store.
By downloading your purchased music using your Apple ID, you can quickly and conveniently transfer iPhone music to computer. However, if you're dealing with a mixture of purchased and non-purchased music, or if you're seeking a solution that's not dependent on a specific purchasing history, keep reading for more methods on transferring your iPhone music to your computer.
While traditional methods like using iTunes or re-downloading purchased music have their merits, they might not cover all scenarios, especially when dealing with music from various sources. For a more versatile and comprehensive solution, consider using specialized software like FoneDog Phone Transfer. This tool offers an all-in-one solution for transferring music and other data from your iPhone to your computer. Here's how FoneDog Phone Transfer can make the process even smoother:
Phone Transfer
Transfer files among iOS, Android and Windows PC.
Transfer and backup text messages, contacts, photos, video, music on computer easily.
Fully compatible with the latest iOS and Android.
Free Download

FoneDog Phone Transfer is an iPhone 15-supported tool and is a powerful and user-friendly software designed to help you transfer data between your iOS devices and computers effortlessly. From music and photos to contacts and messages, this tool covers a wide range of data types, ensuring a seamless transfer process regardless of your data source.
Advantages of Using FoneDog Phone Transfer:
How to use the best logged-off iPhone music transfer tool to transfer iPhone music to computer:
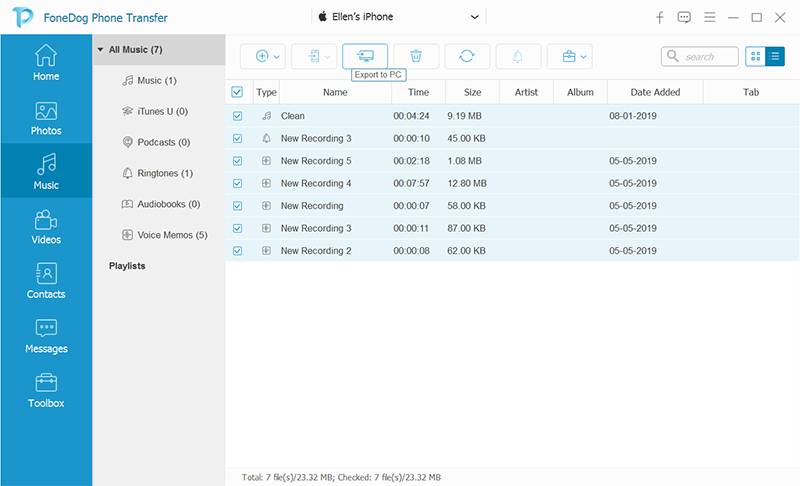
Using FoneDog Phone Transfer offers a convenient and versatile way to transfer your iPhone music to your computer, ensuring that your entire music library is securely backed up and accessible whenever you need it.
People Also ReadHow to Transfer iPhone Music to Another iPhone [6 Ways]3 Ways to Transfer iPhone Music to Android
Transferring your cherished iPhone music not only frees up space for your Mac or Windows computer but also opens up new possibilities for organization and enjoyment. Throughout this article, we've explored various methods to achieve this goal, catering to different preferences and scenarios.
FoneDog Phone Transfer stands out as the best tool to transfer iPhone music to computer. With cross-platform compatibility and user-friendly features, this software streamlines the transfer process.
As technology evolves, so do the methods for managing our digital lives. Whether you opt for a traditional approach or embrace the convenience of modern tools, the ability to transfer your iPhone music to your computer empowers you to maintain control over your music library.
Whichever method aligns with your needs, preferences, and technological landscape, the key is to ensure the safety and accessibility of your music. Choose the method that suits you best and take the necessary steps to secure your musical memories. With the right approach, you can enjoy your favorite tunes on your computer, allowing your music to be the soundtrack of both your digital and real-world experiences.
Leave a Comment
Comment

iPhone/Android Devices’ Maintenance Expert
Staying home, listening to music, writing tech articles
Many people asked me to repair their mobile phones so I have a lot of experience in mobile phone repair, and I know a lot about Android or Apple phones.
Phone Transfer
Transfer data from iPhone, Android, iOS, and Computer to Anywhere without any loss with FoneDog Phone Transfer. Such as photo, messages, contacts, music, etc.
Free DownloadHot Articles
 /
/
INTERESTINGDULL
/
SIMPLEDIFFICULT
Thank you! Here' re your choices:
Excellent
Rating: 4.6 / 5 (based on 96 ratings)
