FoneDog Screen Recorder
FoneDog Screen Recorder
Special Offer
Special Offer


By Vernon Roderick, Last updated: October 8, 2019
“I want to save the photo on my computer, how do I transfer pictures from Samsung S9 to computer?”
We all know the Samsung S9 as a more refined version of the last year’s S8. It consists of hardware that is hardly different from S8’s. However, you can still see just how the Samsung S8 was innovated to ensure that the next version, S9, will be as perfect as it can be.
As such, there’s no denying that Samsung S9 is an upgraded version of the S8. This is especially true when it comes to the camera. With Samsung’s leading camera technology, they have installed a high-quality camera light years ahead of S8’s camera. That’s why so many people are enjoying their time with the Samsung S9, taking pictures of everything they see and all.
But, we shouldn’t forget that these pictures still need editing. And we can’t do that directly in your Samsung S9. So today, for the sake of photographers and aspiring photographers, we will talk about how to transfer pictures from Samsung S9 to computer. Let’s first talk about the most effective way of doing this.
How to Transfer Pictures from Samsung S9 to Computer Using Phone TransferHow to Transfer Pictures from Samsung S9 to Computer Using File ExplorerHow to Transfer Pictures from Samsung S9 to Computer Using DropboxHow to Transfer Pictures from Samsung S9 to Computer Using USB Cable and AutoPlayConclusion
Before we go into the guide, it might be better if we first talk about what FoneDog Phone Transfer is in the first place and why we are using it to fulfill your goal.
Since you’re reading this guide, you should know all too well just how frustrating it is to use your internet whenever you want to learn how to transfer pictures from Samsung S9 to computer. The task is simply complicated at times that you can’t possibly remember everything there is to know in just one go.
So you tend to keep on searching for the answer every time you find yourself needing the knowledge once again. FoneDog Phone Transfer makes it so that you won’t be doing that again. Why?
Simple, because FoneDog Phone Transfer offers a way for you to learn how to transfer pictures from Samsung S9 to computer in just a few steps simple. Now that you have a basic idea of what FoneDog Phone Transfer is, it should be time to tell you why you should start using this software.
You might be wondering, why FoneDog Phone Transfer out of all the software out there? It’s actually pretty simple. It’s because FoneDog Phone Transfer offers a lot of benefits for you if you learn how to transfer pictures from Samsung S9 to computer using their software.
Here’s a look at some examples of those “benefits” that you’ll be getting by using the FoneDog Phone Transfer to transfer your photos:
Now that you know what you’ll be getting with using FoneDog Phone Transfer, it should be about time for you to learn how to transfer pictures from Samsung S9 to computer.
The very first thing you should remember before anything else is to download the software on the official website: https://www.fonedog.com/phone-transfer/guide.html.
This is so that you can avoid getting corrupted files instead of the official software. Now, let’s get into the step-by-step guide of how to transfer pictures from Samsung S9 to computer.
Step 1 – Launch the FoneDog Phone Transfer software.
This should be done before you execute any other steps.
Step 2 – Connect your Samsung to the PC with a USB cable.
With your phone and PC connected, the software will automatically identify the device and show the details in the software’s interface.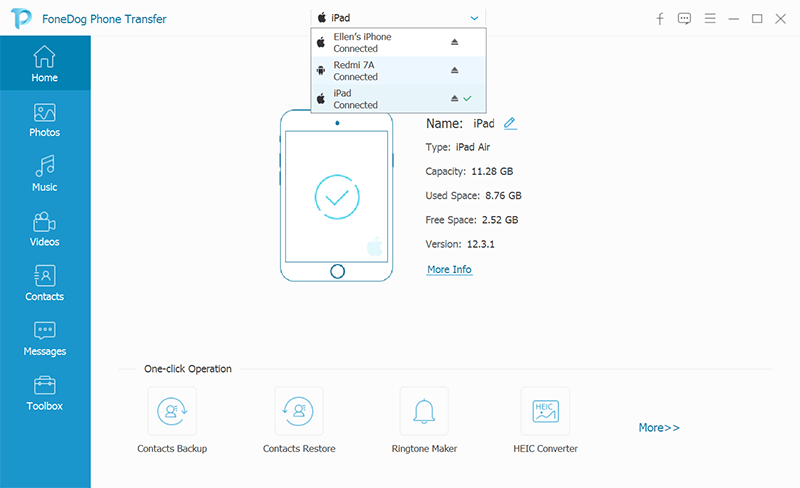
Step 3 – Select the data type - Photos.
You can choose whether you want to transfer your music, videos, and more. In this case, you would want to click on the Photos button right after the Home button.
This will take you to a window that shows all the photos stored in your Samsung S9. It will also show a box in the top-left corner which you can click to check or uncheck.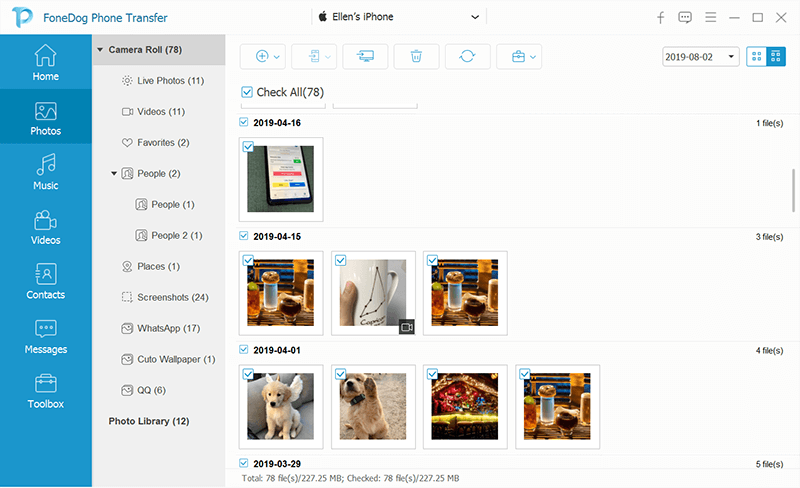
Step 4 – Choose the photos.
In the selection panel on the right side, select every item or photo you want to transfer to the computer.
To choose the files, simply click on the box in the top-left corner to check the box. Check means you’ll include them in your next command, otherwise, leave them unchecked.
Step 5 – Transfer between the devices.
With the photos you want to transfer all selected, you can proceed on clicking the Export to PC button on the top of the selection panel.
This can be found to the left of the trash can icon along with other commands that the software can execute.
Step 6 – Wait for completion.
This will prompt the FoneDog Phone Transfer software to start the transferring process.
Now all you have to do is wait for the process to complete itself and you’re done. You have now learned how to transfer pictures from Samsung S9 to computer.
Additional Step: Convert HEIC images.
If for some reason, the image that you transferred was in HEIC format, then you can convert them into PNG or JPG format.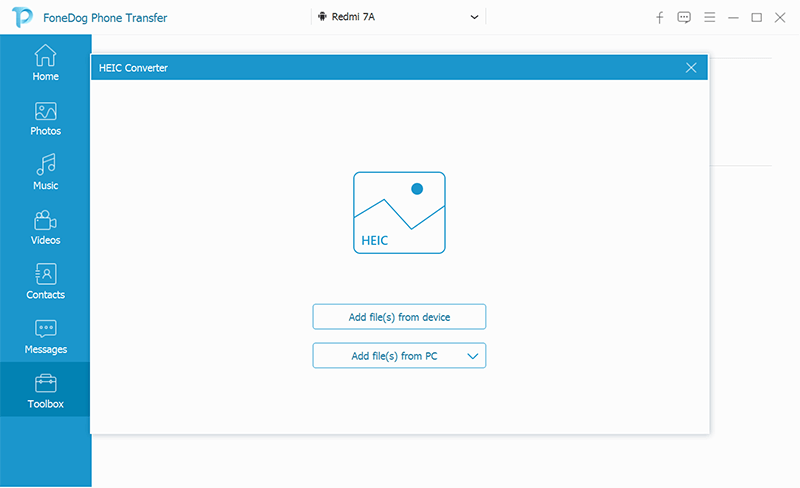
You can do this by selecting the button that can be found in the line along the Export to PC button, so it shouldn’t be too hard to find.
Without a doubt, this is the most effective way to how to transfer pictures from Samsung S9 to computer.
However, we still can’t change the fact that people prefer to use traditional methods without the help of third-party software.
So in addition to this guide of FoneDog Phone Transfer, let’s talk about more options you may have on how to transfer pictures from Samsung S9 to computer.
Without further ado, let’s start with our first traditional method to transfer pictures from Samsung S9 to computer involving File Explorer.
The File Explorer, also known as Windows Explorer by users of Windows of the earlier version, is a file browser that is a default software found in versions Windows 95 and later.
This will be the main object and the one that will be in the spotlight in this section’s tutorial on how to transfer pictures from Samsung S9 to computer.
Now, here are the steps you need to follow in order to transfer photos using the File Explorer.
You can do this by simply pressing Win + E; manually searching for “File Explorer” in the search bar of your computer, and pressing Win + R and type “explorer” and Enter.
You can select multiple items by holding Ctrl while choosing one photo at a time. You can also use Ctrl + A to select all of them.
While this is one way to learn how to transfer pictures from Samsung S9 to computer, it can be said that it’s too limited.
First, the photos you want to transfer might not be in the DCIM folder and in somewhere else instead. FoneDog Phone Transfer fixes that problem by showing all the photos in your Samsung S9 in the selection panel, regardless of its location in the storage.
Since this is the case, we’ll be discussing another option on how to transfer pictures from Samsung S9 to computer which now involves Dropbox.
Dropbox is a file hosting service provider that offers cloud storage, among many others. As you may have already guessed, their cloud storage allows for one to use it to learn how to transfer pictures from Samsung S9 to computer.
In fact, you can use Dropbox using a mobile device be it Samsung, Huawei, or even using an iPhone. This is why Dropbox is one of the most popular service providers for cloud storage.
In our case where we are looking for a way to learn how to transfer pictures from Samsung S9 to computer, Dropbox is an ideal solution since it can be used for free and wirelessly.
Just remember that it’ll require a stable internet connection and of course, an account. You can also consider these things as the prerequisites of this tutorial.
So without further ado, let’s talk about the steps on how to transfer pictures from Samsung S9 to computer using Dropbox:
After logging in to your account, you can close the application if you want. After all, you won’t be using the app directly on your Samsung S9.
At this point, there would be no need to use your Samsung S9 anymore. The next step on how to transfer pictures from Samsung S9 to computer will be focusing mainly on the use of your computer.
There, you’ll see all the files, including the photos, that you’ve uploaded, be it the photos on your Samsung S9 or photos that you uploaded in the past.
This will be the last step on how to transfer pictures from Samsung S9 to computer. After that, you just have to wait for the download to finish.
As previously said, while it’s free to use and you can do it wirelessly, you still need an internet connection. Plus, you will need to spend money if you want to increase the files that can be stored in your Dropbox account.
So you should still have an option that teaches you how to transfer pictures from Samsung S9 to computer without having to rely on the internet or money. That takes us to our last option, using a USB cable to learn how to transfer pictures from Samsung S9 to computer.
A USB cable should already be familiar to you. It’s an equipment that allows the transfer of data from one place to another by connecting the two ends in the ports of the devices.
The AutoPlay, on the other hand, is a feature that will automatically show up once a portable device is recognized by the computer. It’s the perfect partner for your USB cable.
What’s great about it is that once you have these two things, you can learn how to transfer pictures from Samsung S9 to computer as much as you want without having to worry about internet or expenses.
So without making this any longer, let’s hop into the step-by-step guide on using a USB cable and AutoPlay on how to transfer pictures from Samsung S9 to computer:
Step 1 – Connect your Samsung S9 to the computer using a USB cable.
This will allow your device to show up on your computer as a Portable Device.
Once the computer recognizes your device, a popup will show up. This is what we call we call the AutoPlay feature.
This will show options such as Import Pictures and Videos, Open with File Explorer, and more.
Step 2 – Pick from the options.
In the case of Open with File Explorer, you should already know how to operate it from our discussion in the earlier sections of this article.
Now for Import Pictures and Videos, all you have to do is wait as the computer searches your phone for photos and videos.
After the computer finishes, another window will pop up and ask you to Import all items. Just click on this button and it will automatically transfer your pictures from Samsung S9 to computer.
The downside with this is that you can’t manage what would be transferred to your computer. So we still recommend using more precise software to learn how to transfer pictures from Samsung S9 to computer.
There are times when you just badly need to transfer your pictures from your Samsung S9 to your computer. After all, you can’t just share your photos in an unprofessional way.
That’s why you’ll need to learn how to transfer pictures from Samsung S9 to computer if you’re going to use your Samsung S9’s camera frequently.
If that’s the case, there are many ways to do this. You can use the File Explorer, Dropbox, or AutoPlay. However, all of them are full of flaws to the point that you might suffer from disadvantages rather than enjoy its benefit.
As such, we recommend using FoneDog Phone Transfer. Not only does it allow for the transferring of pictures from Samsung S9 to computer, but it also allows conversion of pictures.
Leave a Comment
Comment

Technical Expertise for PC/Website Optimization
One of my passion is to develop software of my own
I write articles to share knowledge about IT technology and some experience in developing my own software, and developing my own software is one of my passions for work.
Phone Transfer
Transfer data from iPhone, Android, iOS, and Computer to Anywhere without any loss with FoneDog Phone Transfer. Such as photo, messages, contacts, music, etc.
Free DownloadHot Articles
 /
/
INTERESTINGDULL
/
SIMPLEDIFFICULT
Thank you! Here' re your choices:
Excellent
Rating: 4.8 / 5 (based on 109 ratings)
