FoneDog Screen Recorder
FoneDog Screen Recorder
Special Offer
Special Offer


By Nathan E. Malpass, Last updated: January 24, 2024
Switching from an Android to an iPhone is an exciting move, offering you access to a world of new features and capabilities. However, one of the most daunting tasks when making this transition is ensuring that all your cherished photos make the journey too. The good news is that the process on how to transfer pictures from Android to iPhone doesn't have to be a complex, nerve-wracking process.
In this comprehensive guide, we'll walk you through the simplest and most effective methods to securely move your photos, ensuring that no memories are left behind in the process. Whether you're a tech novice or an experienced user, our step-by-step instructions will make this task a breeze, ensuring that you can enjoy your favorite moments on your new iPhone with ease.
Part #1: How to Transfer Pictures from Android to iPhonePart #2: How to Transfer Pictures from Android to iPhone Using FoneDog Phone TransferSummary
Transferring pictures from your Android to your new iPhone can be surprisingly straightforward, and one of the quickest methods involves using messaging apps or email services. Here's a step-by-step guide on how to do it:
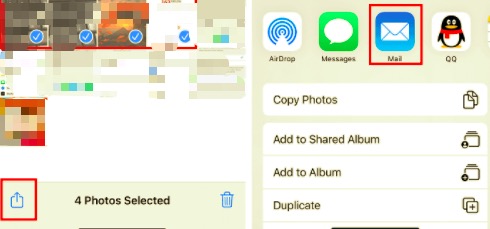
Step #1: Choose Your Photos
Start by opening the photo gallery on your Android device and select the photos you want to transfer. You can choose multiple photos by tapping on each image or using the "Select" option to pick several at once.
Step #2: Share via Messaging App or Email
Once you've selected the photos, tap the share button, which usually looks like an arrow pointing upwards or the word "Share". From the sharing options, choose your preferred messaging app or email service. Common choices include WhatsApp, Facebook Messenger, or your email app.
Step #3: Send the Photos
In the selected app, choose the recipient, which will be your own email address or a chat with yourself. Then, hit send. The photos will be attached to a message or email.
Step #4: Access the Photos on Your iPhone
Open the messaging app or check your email on your iPhone. You'll find the message or email you sent from your Android device with the attached photos. Download the photos to your iPhone's photo gallery.
Using messaging apps or email to transfer pictures is a convenient method, especially for a small number of photos. However, it may not be ideal for large photo libraries due to file size limitations and the number of photos you can send at once. If you have an extensive collection, consider the alternatives discussed in the upcoming sections of this article.
Transferring pictures from your Android to an iPhone becomes even more convenient when you leverage cloud storage services like Google Drive. Google Drive allows you to store your photos securely and access them from any device. Follow these steps on how to transfer pictures from Android to iPhone using Google Drive:
Step #1: Install Google Drive on Your Android Device
If you don't already have Google Drive installed on your Android, download it from the Google Play Store and sign in with your Google account.
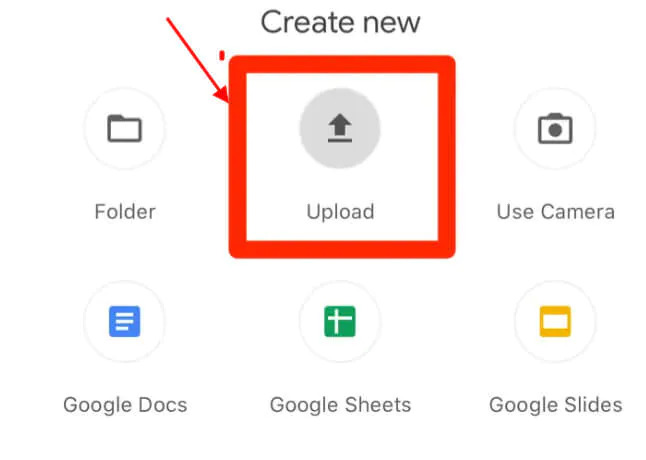
Step #2: Upload Your Photos to Google Drive
Open Google Drive and tap the "+" icon, which usually stands for "New" or "Add". Select "Upload" or "File Upload" and choose the photos you want to transfer from your device's storage.
Step #3: Organize Your Photos (Optional)
You can create a new folder within Google Drive and move your photos into it for better organization.
Step #4: Share the Folder
Long-press on the folder containing the photos you want to transfer. Select the "Share" option and choose the sharing method, such as generating a shareable link or sharing it with specific contacts.
Step #5: Access Google Drive on Your iPhone
On your iPhone, download the Google Drive app from the App Store if you don't have it already. Sign in with the same Google account used on your Android device.
Step #6: Download the Photos to Your iPhone
Open the shared folder within Google Drive on your iPhone and select the photos you want to transfer. Tap the three dots (...) or the "More" option and choose to download the photos to your iPhone's gallery.
Transferring photos via Google Drive is a great option, especially if you have a large collection of pictures. It provides a seamless and organized way to access your photos from multiple devices, making it a valuable solution for Android to iPhone migrations.
Above are two ways you can transfer pictures to your iPhone without iCloud or iTunes. Now if you're switching from an Android to an iPhone, using iCloud.com via a web browser can be an effective method to transfer pictures. iCloud is Apple's cloud storage service, and you can access it on any web browser. Here's how to transfer pictures using iCloud.com:
Step #1: Sign in to iCloud.com
Open a web browser on your computer and visit iCloud.com. Sign in using your Apple ID and password. If you don't have an Apple ID, you can create one for free.
Step #2: Access the iCloud Photos
Once you're logged in, click on the "Photos" icon. This will take you to your iCloud Photos library.
Step #3: Upload Photos from Android
To upload photos from your Android device, click the upload icon, which usually looks like a cloud with an arrow pointing up. Select the photos you want to transfer from your Android device and upload them to your iCloud Photos library.
Step #4: Access iCloud Photos on Your iPhone
On your iPhone, make sure you're signed in to the same Apple ID you used on the iCloud website. Open the Photos app, and you should see the photos you uploaded from your Android device in your iCloud library.
Using iCloud.com is a useful method to transfer pictures, especially if you plan to use iCloud for storage and synchronization on your iPhone. It's worth noting that you'll need an Apple ID for this method, but it provides a seamless way to manage your photos and other data across your Apple devices.
Transferring pictures from your Android to an iPhone through a PC and iTunes can be an efficient method, especially if you have a large photo library. Here's a step-by-step guide on how to do it:
Step #1: Prepare Your Android Device
Connect your Android device to your computer using a USB cable. Ensure that your Android device is set to file transfer mode or media transfer protocol (MTP) so that your computer can access its files.
Step #2: Copy Photos to Your Computer
On your computer, open the file explorer (Windows) or Finder (Mac), and you should see your Android device listed. Navigate to your device and locate the photos you want to transfer. Copy these photos to a folder on your computer.
Step #3: Install iTunes
If you don't have iTunes installed on your computer, download and install it from the official Apple website.
Step #4: Connect Your iPhone
Connect your iPhone to the computer using a USB cable. If prompted, choose to trust this computer on your iPhone.
Step #5: Launch iTunes
Open iTunes on your computer.
Step #6: Import Photos to iTunes
In iTunes, select your iPhone, and go to the "Photos" tab. Check the box to "Sync Photos" and choose the folder where you copied the Android photos in Step 2.
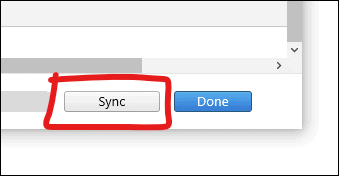
Step #7: Apply Changes
Click the "Apply" or "Sync" button in iTunes. This will transfer the selected photos from your computer to your iPhone.
Step #8: Verify on Your iPhone
Disconnect your iPhone and open the Photos app. You should see the photos you transferred from your Android device.
Using a USB cable, a PC, and iTunes is an effective method, particularly when dealing with a substantial number of photos. It also ensures that your photos are stored locally on your iPhone, which can be beneficial if you want to access them without an internet connection.
Dropbox is a widely used cloud storage service that allows you to easily transfer pictures from your Android to your iPhone. Here's a step-by-step guide on how to transfer pictures from Android to iPhone using Dropbox:
Step #1: Install Dropbox on Your Android Device
If you don't already have Dropbox installed on your Android device, download it from the Google Play Store and sign in with your Dropbox account or create a new one.
Step #2: Upload Your Photos to Dropbox
Open the Dropbox app on your Android device and tap the "+" icon to upload photos. Select the photos you want to transfer and upload them to your Dropbox account.
Step #3: Install Dropbox on Your iPhone
Download the Dropbox app from the App Store on your iPhone and sign in using the same Dropbox account you used on your Android device.
Step #4: Access Your Photos on Your iPhone
Open the Dropbox app on your iPhone and navigate to the folder where you uploaded your photos from your Android device. You can view and download them to your iPhone's gallery.
Using Dropbox to transfer photos is a convenient method because it allows you to access your photos from virtually any device with an internet connection. It's especially useful if you plan to use Dropbox as a storage and synchronization solution for your photos on both Android and iPhone.
FoneDog Phone Transfer is a user-friendly and efficient third-party iPhone 15-supported software designed to make the process of transferring pictures and various other data between Android and iPhone devices as smooth as possible. This tool is particularly helpful when you have a substantial number of photos to move, ensuring that none of your precious memories are left behind during the transition.
Phone Transfer
Transfer files among iOS, Android and Windows PC.
Transfer and backup text messages, contacts, photos, video, music on computer easily.
Fully compatible with the latest iOS and Android.
Free Download

Steps on how to transfer pictures from Android to iPhone using FoneDog Phone Transfer:
Step #1: Install and Launch FoneDog Phone Transfer
Begin by downloading and installing FoneDog Phone Transfer on your computer. After installation, launch the software.
Step #2: Connect Your Android and iPhone Devices
Connect both your Android and iPhone devices to the computer using USB cables. Ensure that your Android device is recognized as the source device and the iPhone as the target device. You can use the "Flip" button to switch their positions if needed.
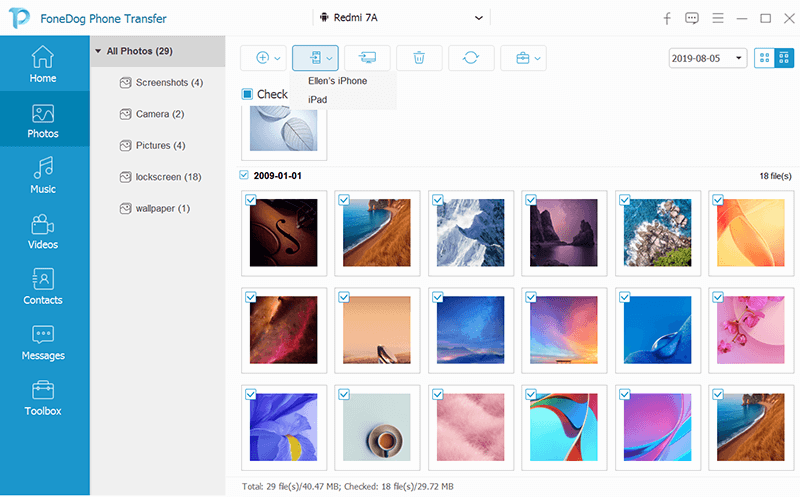
Step #3: Select the Data Types
In the main interface, you will see a list of data types that can be transferred. Select "Photos" or "Gallery" to choose the photos you want to transfer.
Step #4: Start the Transfer Process
After selecting the desired photos, click the "Start Transfer" button. FoneDog Phone Transfer will begin copying the selected photos from your Android device to your iPhone.
Step #5: Verify the Transfer
Once the transfer process is complete, you'll receive a confirmation that the photos have been successfully moved. You can now access your pictures on your iPhone's photo gallery.
FoneDog Phone Transfer simplifies the photo transfer process, making it a practical choice for those who want a hassle-free method to move pictures from Android to iPhone without compromising on quality or content. This tool ensures a seamless transition of your cherished memories to your new iPhone device.
People Also ReadBEST GUIDE: Using iTunes Transfer Photos from iPhone to PC5 Easy Ways on How to Transfer Photos from iPhone to iPad
In summary, transferring pictures from your Android to an iPhone can be accomplished through various methods, each offering its own advantages. Using messaging apps or email services is quick and straightforward for a small number of photos.
Google Drive provides an excellent solution for those with larger photo collections, allowing you to access your photos from multiple devices. For a more seamless integration into the Apple ecosystem, iCloud.com via a web browser offers a convenient way to migrate your photos. Utilizing a USB cable, a PC, and iTunes is ideal for managing extensive photo libraries efficiently.
Additionally, Dropbox is a reliable cloud storage solution for those who prefer accessibility across devices. Lastly, third-party tools like FoneDog Phone Transfer streamline the process, ensuring a smooth and user-friendly experience while transferring photos between your Android and iPhone devices. How to transfer pictures from Android to iPhone depends on your specific needs, whether it's simplicity, data volume, or integration into your new iPhone experience.
Leave a Comment
Comment

iPhone/Android Devices’ Maintenance Expert
Staying home, listening to music, writing tech articles
Many people asked me to repair their mobile phones so I have a lot of experience in mobile phone repair, and I know a lot about Android or Apple phones.
Phone Transfer
Transfer data from iPhone, Android, iOS, and Computer to Anywhere without any loss with FoneDog Phone Transfer. Such as photo, messages, contacts, music, etc.
Free DownloadHot Articles
 /
/
INTERESTINGDULL
/
SIMPLEDIFFICULT
Thank you! Here' re your choices:
Excellent
Rating: 4.8 / 5 (based on 97 ratings)
