FoneDog Screen Recorder FoneDog Screen Recorder
Special Offer Special Offer
Only Only
$4.49 $4.49
to get a ONE-month license to get a ONE-month license
Sale ends in xx days Sale ends in xx days
Buy Now
sale

How to Transfer Photos to New iPhone without iCloud: SOLVED

By Nathan E. Malpass, Last updated: September 5, 2023

Upgrading to a new iPhone is always an exciting endeavor. The latest features, improved performance, and sleek design can make you eager to make the switch. However, one of the most common concerns during this transition is transferring your cherished photos from your old device to the new one.

While iCloud offers a convenient way to store and sync your photos, not everyone wishes to rely solely on cloud-based solutions due to concerns about privacy, storage limitations, or simply personal preference.

Fortunately, it’s possible to transfer photos to new iPhone without iCloud. There are several alternative methods that allow you to accomplish this task securely and efficiently. In this article, we will guide you through the step-by-step process of transferring your photos to your new iPhone without using iCloud, especially via the help of a top iPhone transfer tool.

Whether you're moving from an older iPhone or a different smartphone platform altogether, we've got you covered with a variety of methods to suit your needs.

From utilizing a direct device-to-device transfer to leveraging third-party software, we will explore different approaches to ensure your cherished memories make the seamless journey to your new device. So, let's dive into the methods that will empower you to take control of your photo transfer process and make your iPhone upgrade experience even more delightful.

Part #1: How to Transfer Photos to New iPhone without iCloud from Your Android DevicePart #2: How to Transfer Photos to New iPhone without iCloud from Your Old iOS DevicePart #3: Transfer Photos to New iPhone without iCloud from Android Or iOS - FoneDog Phone Transfer Tool

Part #1: How to Transfer Photos to New iPhone without iCloud from Your Android Device

Method #1: Using Google Drive App

Transferring your photos from an Android device to a new iPhone without relying on iCloud can be accomplished through various methods. One of the most straightforward ways is by using the Google Drive app. If you've been using Google Photos to back up your pictures, you're already halfway there. Here's how to complete the process:

  1. Back Up Your Android Photos to Google Drive: Open the Google Photos app on your Android device. Tap the three horizontal lines (menu) in the top-left corner. Select “Settings” and then “Back up & sync”. Ensure your photos are being backed up to your Google account. Wait for the backup to complete, ensuring all your photos are uploaded.
  2. Download Google Drive on Your iPhone: Open the App Store on your new iPhone. Search for “Google Drive” and download the app. Sign in with the same Google account used for the photo backup.
  3. Access Your Photos on iPhone: Open the Google Drive app on your iPhone. Locate the “Photos” folder or the folder where your photos are stored. Select the photos you want to transfer by tapping and holding each one.
  4. Download Photos to Your iPhone: Once the photos are selected, tap the three dots (menu) in the top-right corner. Choose “Send a copy”. Select “Save Image” to save the selected photos to your iPhone’s Camera Roll.
  5. Organize and Enjoy: Your transferred photos will now be available in your iPhone’s Photos app. Organize them into albums or folders as desired.

Transfer Photos to New iPhone Using Google Drive

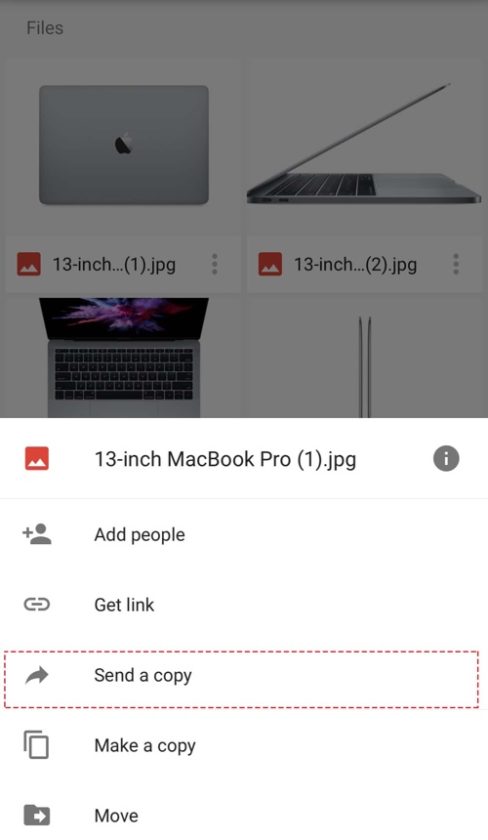
Using the Google Drive app provides a direct and reliable way to move your photos from your Android device to your new iPhone without the need for iCloud. This method is particularly useful if you've been using Google Photos to back up your images. Remember to check your storage space on both devices to ensure you have enough room for the transfer.

Method #2: Using Dropbox App

Transferring photos from your Android device to a new iPhone without relying on iCloud can also be achieved through the Dropbox app. Dropbox is a popular cloud storage service that allows you to sync and share files across devices. Here's how to transfer photos to new iPhone without iCloud instead of using Dropbox:

  1. Upload Photos to Dropbox from Android: Download and install the Dropbox app on your Android device from the Google Play Store. Sign in or create a Dropbox account. Upload the photos you want to transfer to a specific folder in your Dropbox account.
  2. Install Dropbox on Your iPhone: Open the App Store on your new iPhone. Search for “Dropbox” and install the app. Sign in to your Dropbox account using the same credentials.
  3. Access and Download Photos on iPhone: Open the Dropbox app on your iPhone. Navigate to the folder where you uploaded your photos. Tap on a photo to view it.
  4. Download Photos to Your iPhone: Tap the three dots (ellipsis) icon at the top-right corner of the photo. Select “Export” and then choose “Save Image”. This will save the photo to your iPhone’s Camera Roll.
  5. Repeat for Other Photos: Repeat the process for each photo you want to transfer.
  6. Organize and Enjoy: Your transferred photos will now be available in your iPhone’s Photos app. You can further organize them into albums or folders according to your preferences.

Using the Dropbox app provides a secure and versatile way to transfer photos between different devices. This method is particularly useful if you're already familiar with Dropbox and have been using it to store your files. Keep in mind that Dropbox offers both free and paid storage plans, so ensure you have sufficient space for your photo transfer.

Method #3: Using "Move to iOS" App

If you're transferring from an Android device to a new iPhone, Apple has developed a dedicated app called "Move to iOS" to simplify the migration process. This app allows you to transfer your photos, contacts, messages, and more from your Android device to your new iPhone. Here's how to use the "Move to iOS" app for transferring photos:

  1. Prepare Your Android Device: Set up your new iPhone until you reach the “Apps & Data” screen during the initial setup process. Select “Move Data from Android”.
  2. Download “Move to iOS” on Android: On your Android device, open the Google Play Store. Search for “Move to iOS” and download the app. Install and open the app.
  3. Start the Transfer Process: Accept the terms and conditions. Tap “Next” in the upper-right corner of the “Find Your Code” screen.
  4. Retrieve the Code on Your iPhone: On your new iPhone, a six- to ten-digit code will appear on the “Transfer from Android” screen. Enter this code into your Android device.
  5. Select What to Transfer: Choose “Photos and Videos” from the list of data types you can transfer. Tap “Next” to initiate the transfer process.
  6. Wait for the Transfer to Complete: The transfer may take some time, depending on the amount of data being transferred. Ensure both devices are connected to Wi-Fi and have sufficient battery life.
  7. Complete the Setup on iPhone: Once the transfer is complete, your Android device will indicate that the process has finished. Tap “Done” on your Android device. Continue setting up your iPhone as prompted.
  8. Organize and Enjoy: Your transferred photos will be available in your iPhone’s Photos app. You can organize and manage them just like any other photos on your iPhone.

Transfer Photos to New iPhone Using "Move to iOS" App

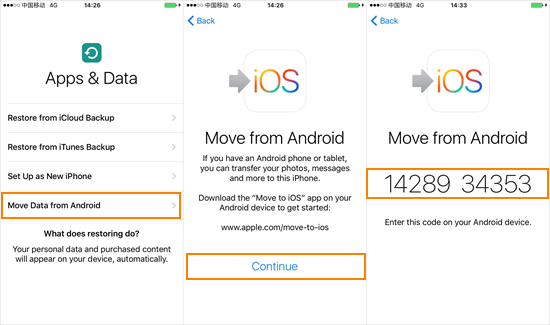
The "Move to iOS" app streamlines the process to transfer photos to new iPhone without iCloud. It's a convenient option for those making the switch from Android to iOS and ensures a smooth transition of your valuable photos.

Part #2: How to Transfer Photos to New iPhone without iCloud from Your Old iOS Device

Method #1: Using iTunes Backup

Transferring photos from your old iOS device to a new iPhone without relying on iCloud can be effectively achieved through an iTunes backup. This method allows you to create a complete backup of your old device, including photos, and then restore that backup to your new iPhone. Here's how to proceed:

  1. Create a Backup of Your Old iOS Device: Connect your old iOS device to your computer using a USB cable. Open iTunes on your computer. (If you’re using macOS Catalina or later, use Finder.) Select your old device within iTunes or Finder. Choose “Back Up Now” to initiate a full backup, including photos, to your computer.
  2. Set Up Your New iPhone: Power on your new iPhone and complete the initial setup process. When prompted, select “Restore from iTunes Backup” during the “Apps & Data” setup screen.
  3. Connect Your New iPhone to Your Computer: Connect your new iPhone to the same computer where you created the backup.
  4. Restore the iTunes Backup to Your New iPhone: In iTunes or Finder, select your new iPhone. Choose the backup of your old iOS device that you previously created. Click “Restore Backup” and confirm your choice.
  5. Wait for the Restoration Process: Allow the restoration process to complete. The duration depends on the size of the backup.
  6. Organize and Enjoy: Once the restoration is finished, your photos will be available in the Photos app on your new iPhone. You can organize, view, and manage your photos just like you did on your old device.

Using an iTunes backup offers a direct and secure method to transfer photos from your old iOS device to your new iPhone. This approach is particularly beneficial for individuals who prefer to keep their data within their local environment and avoid cloud-based services.

Method #2: Using AirDrop

Transferring photos from your old iOS device to a new iPhone without relying on iCloud is seamlessly achievable using Apple's built-in wireless sharing feature, AirDrop. AirDrop allows you to send photos directly between devices using Wi-Fi and Bluetooth. Here's how to transfer photos to new iPhone without iCloud instead of using AirDrop:

  1. Enable AirDrop on Both Devices: On your old iOS device, swipe down from the upper-right corner to open the Control Center. Press and hold the network settings card (with Wi-Fi, Bluetooth, etc.). Tap “AirDrop” and select “Contacts Only” or “Everyone” based on your preference. Repeat the same steps on your new iPhone to enable AirDrop.
  2. Select and Send Photos: Open the “Photos” app on your old iOS device. Navigate to the album containing the photos you want to transfer. Select the photos by tapping on them. You can select multiple photos. Tap the “Share” icon (a square with an upward arrow) located at the bottom-left corner.
  3. Choose Your New iPhone: Your new iPhone will appear as an available AirDrop destination. Tap your new iPhone’s icon to initiate the transfer.
  4. Accept the Transfer on Your New iPhone: A notification will appear on your new iPhone, asking you to accept the incoming AirDrop. Tap “Accept” to receive the photos.
  5. Organize and Enjoy: The transferred photos will be saved in your new iPhone’s Photos app. You can organize, view, and manage them as you would with any other photos.

Transfer Photos to New iPhone Using AirDrop

AirDrop offers a quick and direct way to transfer photos between iOS devices without the need for external apps or services. This method is especially useful if you value simplicity and speed in your photo transfer process.

Method #3: Using Finder (macOS Catalina and later)

For those using macOS Catalina or later, Finder can be used as an alternative to iTunes for transferring photos from an old iOS device to a new iPhone. This method allows you to create a backup of your old device and then restore that backup to your new iPhone. Here's how to proceed:

  1. Back Up Your Old iOS Device: Connect your old iOS device to your Mac using a USB cable. Open Finder on your Mac. In the Finder sidebar, locate and select your device under the “Locations” section. Click on the “Back Up Now” button to initiate a full backup, including photos.
  2. Set Up Your New iPhone: Turn on your new iPhone and complete the initial setup process. When prompted, select “Restore from Mac or PC” during the “Apps & Data” setup screen.
  3. Connect Your New iPhone to Your Mac: Connect your new iPhone to the same Mac where you created the backup.
  4. Restore the Finder Backup to Your New iPhone: In Finder, select your new iPhone under the “Locations” section. Click the “Restore Backup” button. Choose the backup of your old iOS device that you previously created. Click “Restore” and confirm your choice.
  5. Wait for the Restoration Process: Allow the restoration process to complete. The duration depends on the size of the backup.
  6. Organize and Enjoy: Once the restoration is finished, your photos will be available in the Photos app on your new iPhone. You can organize, view, and manage your photos just like you did on your old device.

Using Finder on macOS Catalina and later provides a direct and secure method to transfer photos and other data from your old iOS device to your new iPhone. This approach is ideal for individuals who prefer to keep their data within their local environment and avoid cloud-based services.

Part #3: Transfer Photos to New iPhone without iCloud from Android Or iOS - FoneDog Phone Transfer Tool

When it comes to transferring photos from your old Android or iOS device to a new iPhone without relying on iCloud, the FoneDog Phone Transfer Tool stands out as an efficient and versatile solution.

Phone Transfer Transfer files among iOS, Android and Windows PC. Transfer and backup text messages, contacts, photos, video, music on computer easily. Fully compatible with the latest iOS and Android. Free Download FoneDog Phone Transfer

This tool offers a straightforward way to migrate your photos while ensuring a seamless and secure transfer process. Here's how to transfer photos to new iPhone without iCloud instead of using FoneDog Phone Transfer:

Step #1: Download And Install FoneDog Phone Transfer Tool

Visit the FoneDog website and download the Phone Transfer tool. Ensure that you choose the version compatible with your computer's operating system (Windows or macOS). Install the software by following the on-screen instructions.

Step #2: Connect Your Devices

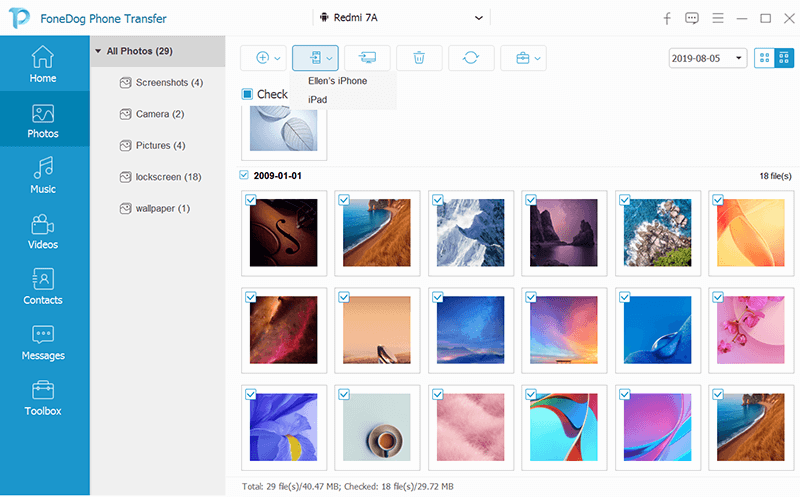
Launch the FoneDog Phone Transfer Tool on your computer. Connect both your old Android or iOS device and your new iPhone to your computer using USB cables.

Step #3: Choose Photos to Transfer

The software will automatically detect and display your old and new devices. Your old device should be the source device, and the new iPhone should be the target device. Select "Photos" as the data type you want to transfer.

Step #4: Start the Transfer Process

Click the "Start Transfer" button to initiate the transfer process. The tool will begin transferring your selected photos from the source device to the target iPhone. Once the transfer is complete, you will receive a notification indicating that the process was successful.

Step #5: Organize And Enjoy

Disconnect both devices from your computer. Open the Photos app on your new iPhone to find and organize the transferred photos.

Transfer Photos to New iPhone without iCloud from Android Or iOS - FoneDog Phone Transfer

The FoneDog Phone Transfer Tool is iPhone 15-supported and simplifies the process of transferring photos from both Android and iOS devices to a new iPhone. Its user-friendly interface, cross-platform compatibility, and efficient transfer capabilities make it an excellent choice for individuals who want a reliable and comprehensive solution for their photo migration needs.

Whether you're moving from an Android or iOS device to a new iPhone, there are several methods available to transfer your photos without relying on iCloud. Choose the method that aligns with your preferences, technical comfort level, and the tools you have at hand. By following the steps outlined in this article, you can ensure a smooth and successful transition of your cherished photos to your new iPhone.

People Also Read3 Best iPod Music Transfer Softwares in 2023!2023 Fixed: How to Transfer Music from Computer to iPhone without iTunes?

Leave a Comment

Comment

Comment ()
author image

Nathan E. Malpass

iPhone/Android Devices’ Maintenance Expert

Staying home, listening to music, writing tech articles

Many people asked me to repair their mobile phones so I have a lot of experience in mobile phone repair, and I know a lot about Android or Apple phones.

Phone Transfer logo

Phone Transfer

Transfer data from iPhone, Android, iOS, and Computer to Anywhere without any loss with FoneDog Phone Transfer. Such as photo, messages, contacts, music, etc.

Free Download

How Do You Like This Article?

Check icon/ Check icon

INTERESTINGDULL

Check icon/ Check icon

SIMPLEDIFFICULT

Thank you! Here' re your choices:

Rate This Article: Excellent

Rating: 4.6 / 5 (based on 81 ratings)

Phone Transfer logo

Phone Transfer

Transfer data from iPhone, Android, iOS, and Computer to Anywhere without any loss with FoneDog Phone Transfer. Such as photo, messages, contacts, music, etc.

Free Download

FoneDog uses cookies to ensure you get the best experience on our website. Click here to learn more.