By Adela D. Louie, Last updated: April 24, 2024
Are you a Mac user eager to unleash your creativity on YouTube? Say hello to seamless video recording! Crafting engaging content for your channel starts with knowing how to expertly capture your ideas on your Mac. In this full guide, we unveil the secrets to effortlessly record high-quality YouTube videos using your Mac with YouTube recorders.
From choosing the right software to optimizing settings and nailing flawless recordings, this article serves as your go-to manual on how to record YouTube videos on Mac. Dive in to discover step-by-step instructions, valuable tips, and recommended tools, empowering you to produce professional-grade YouTube content effortlessly. Let's transform your Mac into a powerhouse for creating captivating videos and make your channel stand out!
Part 1. What's YouTube and Its features?Part 2. Best Tool to Record YouTube on Mac with SoundPart 3. Methods on How to Record YouTube Videos on MacPart 4. Tips for Optimizing High Quality YouTube Recordings Conclusion
Part 1. What's YouTube and Its features?
YouTube stands as a highly acclaimed and widely utilized online platform dedicated to video-sharing, providing an expansive array of functionalities for its user base. Established in 2005, this platform has burgeoned into a preeminent online destination, ranking among the most frequently visited websites on a global scale.
The platform's evolution over the years has resulted in a rich tapestry of features, encapsulating a personalized viewing experience, the cultivation of user-generated content, and the facilitation of widespread engagement among a vast and diverse audience:
- Video Sharing
- Viewing and Browsing
- Subscriptions
- Comments and Interaction
- Monetization:
- Analytics and Insights
- Live Streaming
- Accessibility and Localization
Part 2. Best Tool to Record YouTube on Mac with Sound
FoneDog Screen Recorder stands out as an exceptional tool for recording YouTube videos on a Mac, offering a seamless and comprehensive approach to capturing high-quality content. This software presents itself as a versatile solution, specifically designed to cater to Mac users' needs, ensuring an effortless recording experience. Here is how to use it to record YouTube on Mac.
 Free Download
For Windows
Free Download
For Windows
 Free Download
For normal Macs
Free Download
For M1, M2, M3
Free Download
For normal Macs
Free Download
For M1, M2, M3
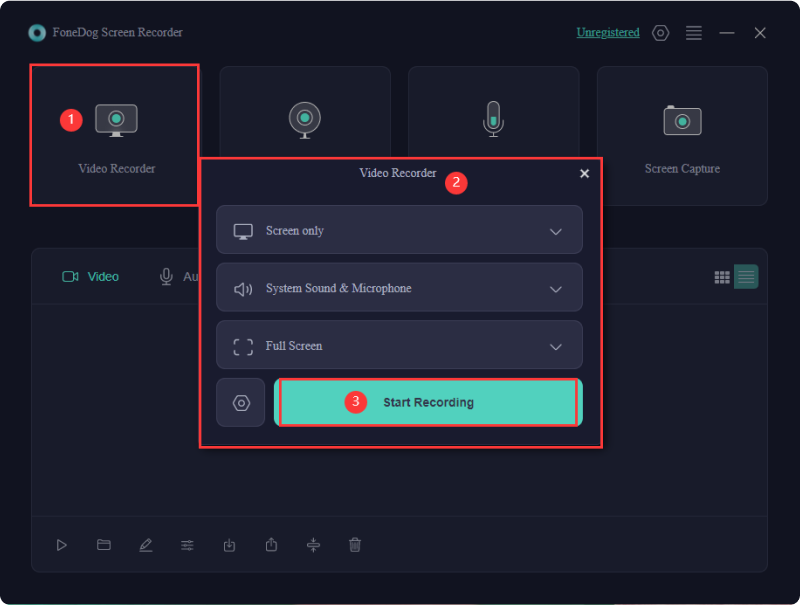
- Start by downloading and installing the FoneDog Screen Recorder software on your Mac.
- Once installed, launch the application. Familiarize yourself with its intuitive interface, which provides easy navigation and accessibility to its various features.
- Prior to initiating the recording, configure the settings according to your preferences. This includes selecting the desired screen area to capture, specifying the audio input source, adjusting frame rates, resolutions, and any additional settings required.
- With the settings optimized, initiate the recording process by clicking the "Start Recording" button.
- Upon completion of the recording session, halt the process by clicking the stop button or using the hotkey as designated within the software. It provides seamless transition to post-processing, allowing users to review and edit their captured content effortlessly within the software interface.
- Export the finalized recording in your preferred format. The software facilitates hassle-free exporting, ensuring compatibility with various platforms and devices. Share your polished video content with your audience or upload it directly to your YouTube channel.
FoneDog Screen Recorder distinguishes itself as a reliable and user-centric tool, providing Mac users with an all-encompassing solution for recording YouTube videos or even record YouTube music. Its user-friendly interface, robust features, and seamless functionality make it an optimal choice for content creators seeking a streamlined and efficient recording experience on their Mac systems.
Part 3. Methods on How to Record YouTube Videos on Mac
There are several methods to record YouTube videos on a Mac, using both built-in and third-party software. Here are some popular methods along with the steps to achieve how to record YouTube videos on Mac:
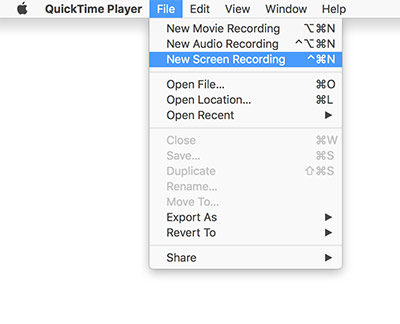
Method 1. QuickTime Player (Built-in Mac app)
The QuickTime Player comes pre-installed on Mac computers, serving as a convenient tool for performing fundamental screen recordings.
- To initiate QuickTime Player, you must then navigate ahead to the Applications folder or simply locate it using the Spotlight search feature.
- Once QuickTime Player is open, you must then indeed access the menu bar and don't forget to select the "File" option. From the dropdown menu, you then indeed choose "New Screen Recording".
- Upon doing so, a recording control panel will materialize on your screen. To commence the screen capture, you must have to simply click on the designated record button within this control panel.
- You have the flexibility to decide whether to record the entire screen or just a specific section. To record a specific area, you may then use your cursor to drag and select the desired region.
- Upon completion of your recording, terminate the process by clicking on the stop button within the menu bar. Alternatively, you can press the keyboard shortcut "
Command + Control + Esc" to conclude the recording session.
- Finally, you may then save your captured video to a location of your preference, ensuring it is stored where you can easily access it for future use or perhaps editing.
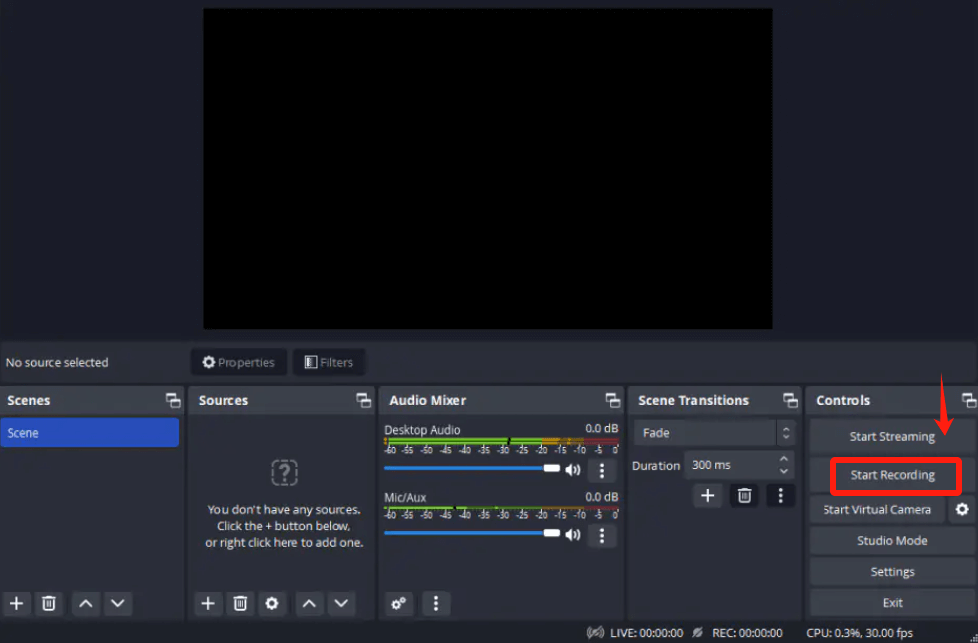
Method 2. OBS (Open Broadcaster Software)
Open Broadcaster Software (OBS) stands as a robust, no-cost, and open-source application catering to both video recording and live streaming purposes. To initiate the utilization of OBS:
- Access the official website to download OBS. Follow the installation instructions provided to complete the installation process on your Mac.
- Upon launching OBS, you could now delve into the settings menu to adjust various recording parameters. This includes settings related to resolution, frame rate, audio input, as well as those other relevant configurations to match your preferences and requirements.
- Within OBS, you may then create a new scene by navigating to the "Scenes" box as well as selecting the "+" icon. This step sets the stage for organizing and also indeed fully capturing specific content or setups.
- Populate your scene by incorporating sources such as screens or webcams. After doing so, you may then click on the "+" icon within the "Sources" box to add these elements to your recording environment.
- Once your scene is set and sources are added, navigate to the bottom-right corner of the interface and click on "Start Recording" to commence capturing your screen or designated content.
- Upon completion of your recording session, you may then now click on "Stop Recording". OBS will automatically save the recorded video in accordance with the settings you previously configured.
These steps ensure a structured approach to utilizing OBS for proficient video recording on your Mac, providing control over various parameters and settings for a tailored recording experience.
Method 3. ScreenFlow
ScreenFlow represents a specialized, paid software meticulously crafted to facilitate the creation and refinement of screencasts exclusively tailored for Mac systems.
- To commence the process, install the ScreenFlow application onto your Mac operating system, ensuring proper installation and setup. Upon launching the application, direct your attention to the toolbar where the record button prominently resides.
- By clicking this button, a suite of recording options emerges, which then enabling you to select your preferred settings. These settings encompass vital aspects such as the specific screen area to capture, the choice of audio source, integration of webcam footage, and more.
- With the configurations finalized, initiate the recording process by clicking the "Record" button, commencing the capture of your screen content. To conclude the recording session, you could then access the stop button located in the menu bar or perhaps the utilize the designated hotkey, ceasing the screen capture.
- Post-recording, you can engage with the ScreenFlow editor to refine as well as indeed embellish your captured footage, incorporating enhancements as well as the edits as desired. Subsequently, prepare your video for dissemination or perhaps even the publication by exporting it in the desired format or resolution.
Part 4. Tips for Optimizing High Quality YouTube Recordings
Here are some tips to optimize the quality of your YouTube recordings:
- Use High-Quality Recording Equipment: Invest in a good quality camera and microphone. A high-definition camera and a decent external microphone can significantly enhance the overall quality of your recordings.
- Ensure Proper Lighting: Good lighting is essential for high-quality videos. Natural light or studio lighting can make a huge difference in the clarity and visual appeal of your recordings.
- Choose the Right Recording Software: Select a reliable recording software that suits your needs. For Mac users, options like QuickTime, OBS (Open Broadcaster Software), or ScreenFlow are popular choices.
- Set Optimal Video and Audio Settings: Adjust the video resolution, frame rate, as well as the audio quality settings according to the type of content you're recording. Higher resolutions and frame rates offer better quality, but they may require more storage space.
- Consider Background and Composition: Pay attention to the background and composition of your videos. A clean as well as any uncluttered background can make your content more professional. Ensure you're centered and well-framed within the shot.
- Use a Stable Recording Environment: Avoid shaky footage by using tripods or even perhaps the stabilizers to keep the camera steady. Stable footage contributes to better video quality.
- Test and Adjust Settings Before Recording: Before starting your main recording, conduct test runs to ensure everything is set up correctly. Check the audio levels, video framing as well as the overall quality to avoid issues during the actual recording.
- Record in a Quiet Environment: Minimize background noise by recording in a quiet space. Consider using soundproofing materials or even a quality microphone to reduce unwanted noise.
- Edit and Enhance Your Footage: After recording, use video editing software to enhance your footage. You can adjust colors, add effects, trim unnecessary parts, as well as indeed include overlays to improve the overall quality.
- Regularly Monitor and Improve: Continuously monitor your recordings, analyze audience feedback, and make improvements. Regularly upgrading your equipment or even indeed refining your recording techniques can further enhance video quality.
People Also ReadHow to Record Audio from YouTube in 2024? [7 Methods]7 Best Methods to Record from YouTube to MP3 [2024]
Conclusion
To conclude, knowing how to record YouTube videos on Mac device, you indeed explored various methods like QuickTime, OBS, as well as the ScreenFlow. We emphasized optimizing settings, ensuring stable recordings, and post-editing enhancements. Practice and experimentation are pivotal for mastering these techniques.
So, dive in, experiment, and refine your skills. Embrace your Mac's potential to craft exceptional videos. Your creativity combined with these tools can bring your YouTube content to extraordinary heights. Start your YouTube journey on Mac today!


 /
/
