By Adela D. Louie, Last updated: April 16, 2024
Ever wondered how to etch the unforgettable moments of a Facebook Live session? Discover the art of immortalizing your live streams effortlessly! This article is your go-to companion, unlocking the secrets of how to record Facebook Live sessions with finesse. Whether it's for business, personal branding, or sheer fun, we've got you covered. Once you get the hang of it, recording video is a piece of cake.
Dive into expert tips, tools, and step-by-step instructions to preserve your live content seamlessly. Join us to master how to record Facebook Live - your gateway to preserving and sharing your cherished moments!
Part 1. How to Record Facebook Live on iOS/AndroidPart 2. Top Tool to Screen Record Facebook Live Sessions on PC (Windows & Mac)Part 3. Another Way to Record Facebook Live on MacOS/WindowsConclusion
Part 1. How to Record Facebook Live on iOS/Android
Record Facebook Live on iOS Devices
Here are the steps to record a Facebook Live video using an iOS device:
- Accessing Facebook Live: Open the Facebook app on your iOS device and log in to your account.
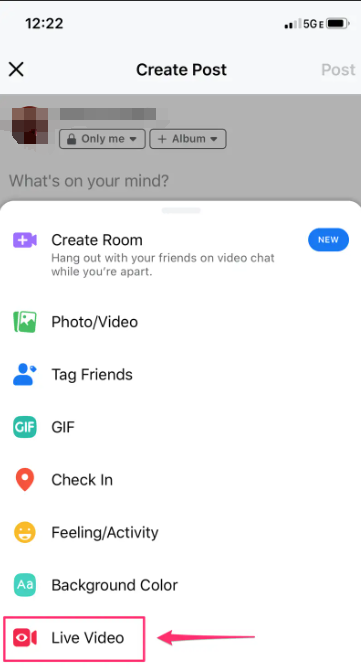
- Initiating a Live Video: Tap on the "Create a Post" section. You'll find this at the top of your News Feed or your profile. It usually looks like a box with "What's on your mind?" written inside.
- Selecting "Live": Among the options that appear (like Photo/Video, Check-In, etc.), locate and tap on "Live" which is represented by an icon of a video camera.
- Granting Permissions: If prompted, allow Facebook to access your camera and microphone. Ensure these permissions are granted for the live video to work properly.
- Setting up Your Live Video: Before going live, you can:
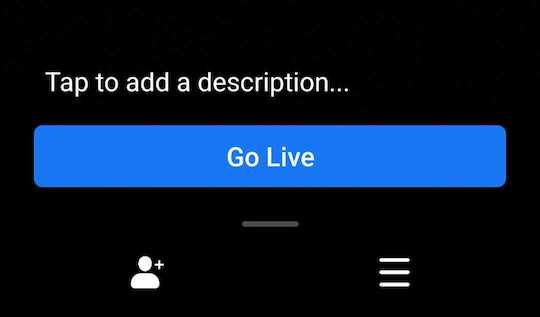
- Write a captivating description for your live video in the "Say something about this Live video..." section.
- Choose the privacy settings for your video (Public, Friends, Only Me, etc.) using the dropdown menu.
- Tag friends, add location, or add feelings/activity icons by tapping the icons provided.
- Ensure your camera is facing the right way, and your audio is clear.
- Starting the Live Broadcast: Once all the settings are adjusted, tap on the "Start Live Video" button. You'll see a countdown indicating that you're going live.
- Broadcasting Your Content: Share your content, speak to your audience, and interact with viewers in real-time. Engage with comments and reactions as they appear on the screen.
- Ending the Live Video: When you're ready to finish the broadcast, tap on the "Finish" button. Confirm the action by tapping "Finish" again in the popup that appears.
- Saving Your Live Video: After ending the live session, Facebook usually gives you the option to save the video to your Camera Roll. If you want to keep the video, select "Save Video" or "Save to Camera Roll".
Remember, the steps might slightly vary based on updates or changes in the Facebook app interface. Always ensure your device has a stable internet connection before initiating a Facebook Live session.
Record Facebook Live on Android Devices
Here are the steps to record a Facebook Live video using an Android device:
- Open the Facebook App: Launch the Facebook app on your Android device and log in to your account if you haven’t already.
- Accessing the Live Option: Tap on the "What's on your mind?" section at the top of your News Feed or profile. You'll see various options like Photo/Video, Check-In, etc.
- Select "Live": Scroll through the options until you find and tap on "Live", represented by a video camera icon. This will open up the live video interface.
- Grant Permissions: If prompted, allow Facebook to access your camera and microphone. These permissions are necessary for the live video to function correctly.
- Setting up Your Live Video: Before going live, you can:
- Write a description for your live video in the "Say something about this Live video..." section.
- Choose the privacy settings (Public, Friends, Only Me, etc.) using the dropdown menu.
- Tag friends, add location, or add feelings/activity icons by tapping the icons provided.
- Ensure your camera is positioned correctly and your audio is clear.
- Starting the Live Broadcast: After setting up, tap the "Go Live" button. You might see a countdown indicating that you're about to go live.
- Broadcasting Your Content: Engage with your audience, share your content, and interact with viewers in real-time. Respond to comments and reactions as they appear during the live session.
- Ending the Live Video: When you're ready to finish the broadcast, tap on the "Finish" button. Confirm the action by tapping "Finish" again in the popup that appears.
- Saving Your Live Video: After ending the live session, Facebook usually gives you the option to save the video to your device. If you want to keep the video, select "Save Video" or "Save to Gallery".
Keep in mind that the steps might slightly differ based on updates or variations in the Facebook app interface. It's essential to have a stable internet connection to ensure a smooth Facebook Live session on your Android device.
Part 2. Top Tool to Screen Record Facebook Live Sessions on PC (Windows & Mac)
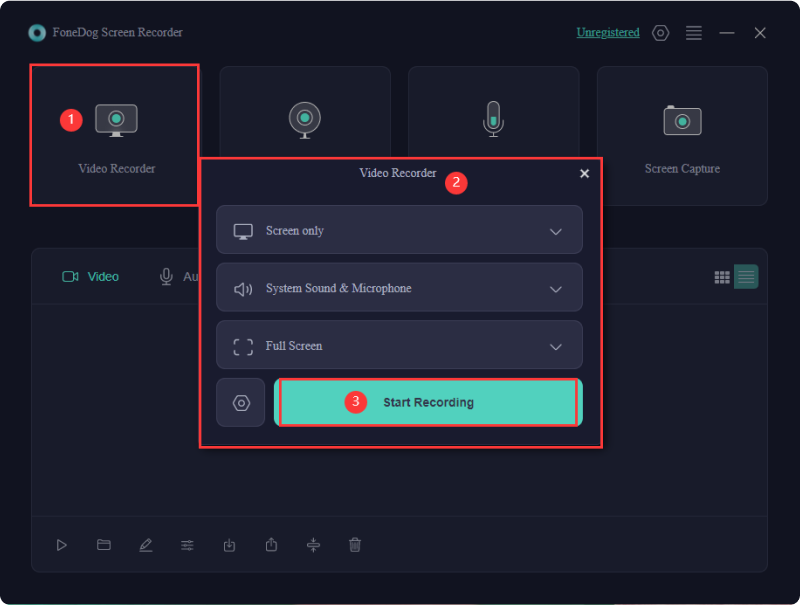
FoneDog Screen Recorder is a powerful and user-friendly software designed to capture and record live sessions, including Facebook Live streams, on your computer. It offers a comprehensive set of features to capture high-quality video content from your screen effortlessly.
With its intuitive interface and robust functionalities, FoneDog Screen Recorder stands out as a top tool for recording live sessions, enabling users to preserve and share valuable content easily. You can also use it to record live streams on a computer easily. Here are the steps to use FoneDog Screen Recorder to record live sessions:
 Free Download
For Windows
Free Download
For Windows
 Free Download
For normal Macs
Free Download
For M1, M2, M3
Free Download
For normal Macs
Free Download
For M1, M2, M3
- Download the software suitable for your operating system (Windows or Mac). Follow the installation instructions to install the software on your computer.
- Open the application after installation. In the interface, choose the recording mode based on your preferences:
- "Full Screen": Record the entire screen.
- "Custom Area": Select a specific area or window to record.
- "Webcam": Include your webcam feed in the recording (optional).
- Click on the settings icon to customize various recording settings, such as video format, quality, audio sources, hotkeys, etc.
- If you want to record audio along with the video, select the audio input source (system sound or microphone) in the settings.
- After setting up the preferences, click on the "Start Recording" button to start recording the live session.
- Open your web browser and navigate to the platform where the live session is taking place (e.g., Facebook). Initiate or join the live session you want to record.
- Once the live session is on, FoneDog Screen Recorder will capture everything happening on your screen. When the live session ends or when you've captured the desired content, click on the "Stop" button to end the recording.
- After stopping the recording, it will present a preview of the captured video. Review the recording and save it to your preferred location on your computer.
FoneDog Screen Recorder offers a seamless and efficient way to capture live sessions with precision and clarity, making it an ideal choice for users looking to archive and share valuable content from various platforms. Try it now!
Part 3. Another Way to Record Facebook Live on MacOS/Windows
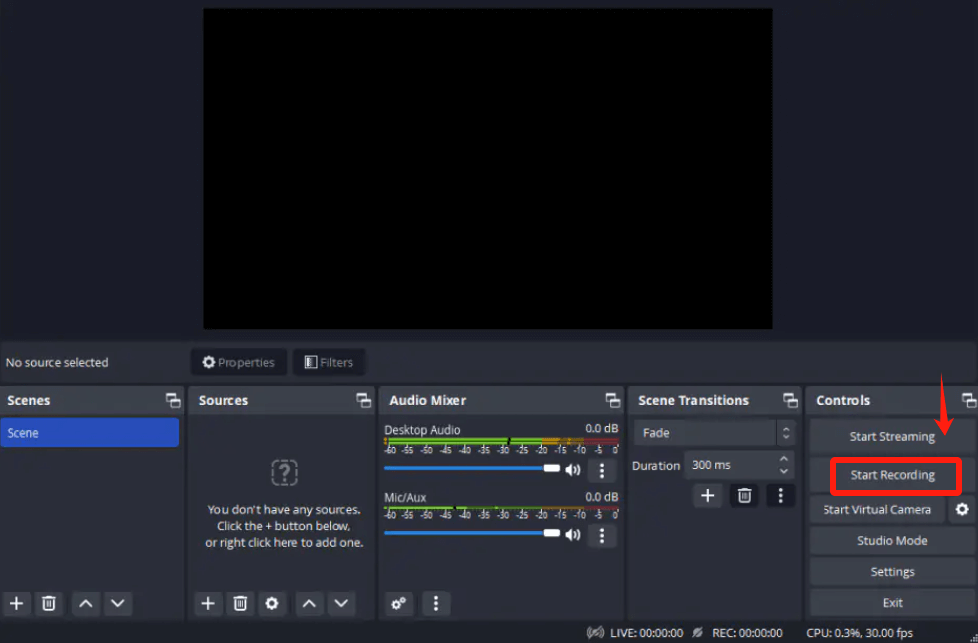
To record a Facebook Live video on MacOS or Windows, you'll need to use third-party software to capture your screen. One popular and widely-used software for this purpose is OBS Studio (Open Broadcaster Software). Here are the steps to record a Facebook Live video using OBS Studio:
- Visit the OBS Studio website and download the tool. Follow the installation instructions to install OBS Studio on your computer.
- Open OBS Studio on your computer. Click on the "+" icon under the "Sources" box in OBS Studio.
- Choose "Display Capture" to capture your entire screen or "Window Capture" to select a specific window (e.g., your web browser with Facebook opened). Follow the prompts to select the display or window you want to capture.
- Configure settings such as resolution, frame rate, and audio sources by clicking on "Settings" in the lower-right corner of OBS Studio.
- Under "Output", choose the desired recording format (e.g., MP4) and set the file path for the recorded video.
- Once you've set up your sources and adjusted settings, click on the "Start Recording" button in OBS Studio to begin capturing your screen.
- Open your web browser and go to Facebook. Navigate to your profile, page, or group where you want to go live.
- Click on the "Live" button or "Live Video" option to start setting up your live video. If you're streaming to a Facebook page or group, you may need to copy the stream key from the Facebook Live settings.
- In OBS Studio, click on "Settings", go to "Stream", select "Facebook Live" as the service, and paste the stream key.
- After setting up the stream key (if required), return to Facebook and complete the setup for your live video. When ready, click on "Go Live" or "Start Live Video" on Facebook.
- When you're done, return to OBS Studio and click on the "Stop Recording" button to end the screen capture.
- Locate the recorded video file in the directory you specified earlier in OBS Studio and share it as desired.
Remember that OBS Studio provides extensive customization options, so you might need to adjust settings according to your preferences and system capabilities.
People Also ReadHow to Record While Playing Music on iOS/Android/PC/Mac10 Easy Methods: How to Record TV Shows in 2024
Conclusion
In conclusion, archiving live content holds immense value by preserving ephemeral moments, knowledge, and interactions. Capturing live sessions, like Facebook Live, ensures a lasting record, fostering learning, sharing, and revisiting impactful experiences. The significance lies in creating enduring narratives, enhancing engagement, and perpetuating meaningful connections through archived live content. Happy Reading!


 /
/
