FoneDog Screen Recorder FoneDog Screen Recorder
Special Offer Special Offer
Only Only
$4.49 $4.49
to get a ONE-month license to get a ONE-month license
Sale ends in xx days Sale ends in xx days
Buy Now
sale

4 Easy Ways: How to Record Vertical Video on Mac

By Adela D. Louie, Last updated: April 25, 2024

Are you irritated by the cumbersome task of rotating your device in order to take an ideal vertical video? Eliminate the inconvenience and welcome effortless recording with your Mac! Mastering the skill of recording vertical videos is crucial in a world where vertical material prevails.

This post provides a comprehensive instruction on how to easily record vertical video on Mac, whether this is for online media outlets, presentations, or perhaps for personal usage. We will guide you through the entire process and providing software recommendations.

Bid farewell to horizontally oriented videos and welcome professionally crafted, refined vertical content. Let us enhance your video clip collectively!

Part 1. Best Way to Record Vertical on Mac – FoneDog Screen RecorderPart 2. Ways on How to Record Vertical Video on MacPart 3. Tips for Good Screen Recording Vertical Videos on MacPart 4. FAQs of Recording Vertical Video on MacConclusion

Part 1. Best Way to Record Vertical on Mac – FoneDog Screen Recorder

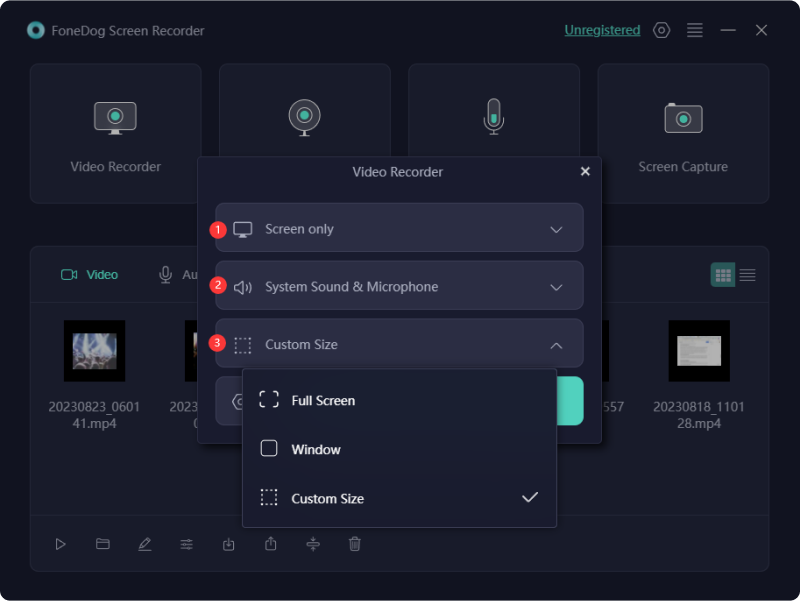
FoneDog Screen Recorder stands out as the premier method for capturing vertical content on Mac devices. This intuitive software seamlessly records vertical videos with remarkable ease and precision.

With its user-friendly interface and robust features, FoneDog Screen Recorder offers unparalleled convenience for Mac users seeking to create vertical content effortlessly. Say goodbye to cumbersome processes—FoneDog simplifies vertical recording on Mac like never before. Here’s how to make use of it:

windows Free Download For Windows mac Free Download For normal Macs mac Free Download For M1, M2, M3

  1. Start off by obtaining the FoneDog Screen Recorder and after that begin with setting up it on Mac device. The installation method is straightforward and swift.
  2. At this point, open up the software in order to gain entry to its main interface. From the several recording options that are available, select the one labeled "Screen Only".
  3. To specify the recording make sure that the settings and the orientation is set to vertical. After which, select the area of the screen that must be recorded, making sure it aligns vertically.
  4. Subsequent to that, commence the screen capture by selecting the option "Start Recording". During the recording time frame, a movable toolbar including tools for annotating and other options will stay visible.
  5. Furthermore, make sure to employ the button that says "Edit" to access annotation features.
  6. Tap that color red "Stop" icon to end the recording. The recorded audio will then be saved on the operating system where it was recorded.
  7. To stop the recording, simply press down upon "Pause", and to start it up again, click upon it immediately. By pressing the "Restart" button, the prior recording is removed and a new one will be available.

Record Vertical on Mac Using FoneDog Screen Recorder

Part 2. Ways on How to Record Vertical Video on Mac

Numerous techniques exist on the internet for producing vertical videos on Mac computers. However, upon careful examination, many fall short in delivering videos of superior resolution and quality. We've curated this section of Mac video recording tools to assist you in record vertical video on Mac device.

2.1 Record Vertical on Mac (QuickTime)

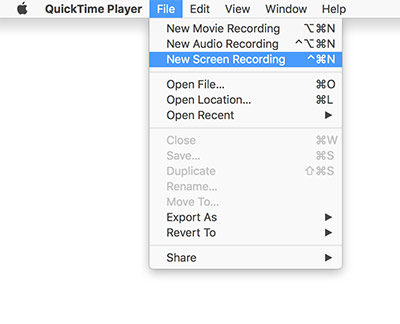
The default multimedia player pre-installed on all Apple devices is QuickTime Player. Renowned for its robust playback and fundamental editing functions, it lacks the extensive capabilities of professional video editing software but provides ample essential features for personal video or audio editing.

Included within this application is a screen recording feature, enabling users to capture content displayed on their computer screens. This feature allows users to define a recording area vertically before commencing recording. However, recording microphone audio requires the installation of a plugin known as Soundflower.

  1. Initiate QuickTime Player and navigate to the "File" menu.
  2. From there, select "New File Recording" from the options presented.
  3. Following that, confirm the settings by clicking the small arrow icon within the ensuing pop-up window.
  4. Define the vertical recording area by dragging the cursor, after that simply initiate recording by clicking the "Red Record" button.
  5. Terminate the recording by clicking the "Stop" button.
  6. After which, choose the desired format and then save the recording by clicking "Save".

Record Vertical on Mac via QuickTime Player

2.2 Record Vertical on Mac (OBS)

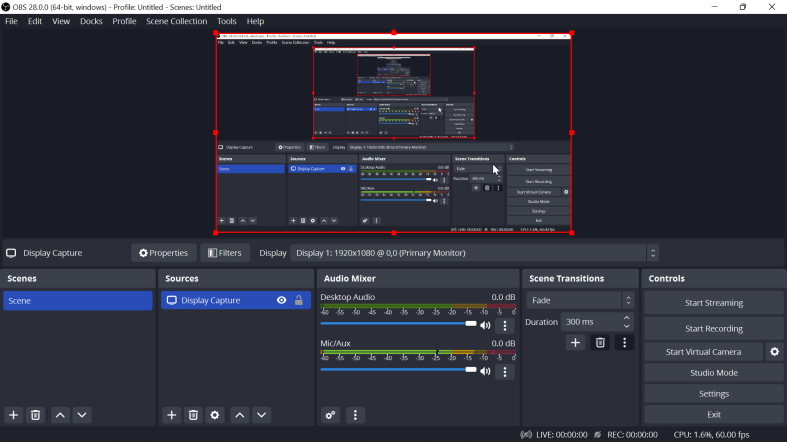
The OBS platform delivers real-time recording and mixing of audio and video content. It seamlessly integrates an array of scenes captured from screens, webcams, or third-party sources. It boasts compatibility across Mac, Linux as well as the Windows operating systems. Crafting vertical videos on Ma c using OBS Studio is a straightforward process, encompassing the following steps:

  1. Initiate a new profile tailored for vertical video production.
  2. After that, make sure to launch OBS and navigate indeed towards the "Profile" section.
  3. Within the menu, select "Add Profile", then proceed to designate a name for the newly created profile.
  4. Following that, make sure to right-click onto that “Scene” option and from that, opt for Duplicate, a crucial step for configuring the layout to fit a vertical format.
  5. After that, adjust the video resolution to suit the vertical orientation.
  6. Within the OBS application, simply access "Settings", after that head over towards into the "Video" section. Here, a variety of resolution options are presented, allowing for customization such as entering a vertical resolution like 1080p.
  7. Implement the modified settings, thereby transforming the scene to display in a vertical format. If any portion of the screen extends beyond the designated boundaries, utilize the cursor to reposition it accordingly.
  8. Play any desired video on the screen, and OBS will capture it in vertical mode. Similarly, the webcam can be captured in this desired resolution.

Record Vertical on Mac Using OBS

2.3 Record Vertical on Mac (iMovie)

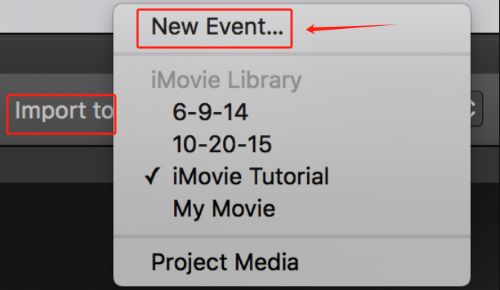
iMovie is a video manipulation application crafted exclusively for users of Mac systems. It encompasses an extensive array of video enhancement features, color adjustments, and tools for stabilizing images. This application empowers individuals, regardless of their proficiency in editing, to elevate the quality of their videos.

iMovie facilitates direct video capture utilizing the integrated FaceTime HD Camera of your Mac device. Subsequently, you have the capability to reorient the video into a vertical orientation. Below is the comprehensive procedure.

  1. To get started, make sure to launch iMovie right within the Mac operating system.
  2. After that, initiate the import process by simply selecting the import button to unveil the import Media interface.
  3. Following that, navigate right within the camera segment within the import window
  4. From there, opt for the integrated camera. This will display live feeds from the FaceTime Camera.
  5. After which, click on the "Import to" dropdown menu and opt for the “New Event” option. Customized names can be added to this event if desired to.
  6. Initiate video recording from the camera through simply clicking onto the record icon. Upon completion, make sure to save the video.
  7. Reopen the video within iMovie and fully access the “Crop” menu.
  8. All cropping controls will be displayed. From that, choose the rotate clockwise option right within the available selections.
  9. Rotate the video to obtain a vertical orientation. Subsequently, save it for sharing purposes.

Record Vertical on Mac via iMovie

Part 3. Tips for Good Screen Recording Vertical Videos on Mac

Here are four tips for creating high-quality vertical screen recordings on Mac:

  • Aspect Ratio Optimization: Ensure your recording software is set to a vertical aspect ratio to match the dimensions of vertical videos. This prevents unnecessary cropping or distortion when viewing the final footage.
  • Clear Workspace: Declutter your desktop and close unnecessary applications to maintain focus on the content being recorded. An organized and tidy workspace improves the aesthetic attractiveness of your film and minimizes disruptions for viewers.
  • Audio Consideration: Use an external microphone or headset to capture clear audio without background noise. Place the microphone within close proximity towards your mouth to achieve the best possible audio quality and reduce any disruptions caused by ambient noises.
  • Smooth Movements: When navigating through screens or demonstrating actions, move the cursor deliberately and smoothly to maintain clarity. To maintain a high level of professionalism throughout the video, it is advisable to refrain from making quick or unpredictable movements that may hinder the clarity of the recording.

Part 4. FAQs of Recording Vertical Video on Mac

How can I optimize the lighting and framing for vertical video capture on my Mac?

To optimize lighting and framing for vertical video on your Mac, position your subject centrally, ensuring even lighting without harsh shadows. Consider using natural light or soft artificial lighting, and avoid cluttered backgrounds for cleaner compositions.

What exactly are the suggested resolutions along with the aspect ratios for capturing vertical videos off a Mac?

When filming vertical videos from a Mac, it is generally advised to use specifications of either 1080p pixels along with 720p pixels, with each having a ratio of aspect about 9:16.

What file formats are typically used for saving vertical video recordings on Mac?

MP4, MOV, along with M4V are often employed file formats for storing vertical video files on Mac. These formats have extensive compatibility and provide high-quality playback without any interruptions on many devices and systems.

Can I use built-in Mac software to shoot vertical video?

Affirmative, the pre-installed QuickTime Player upon Mac might be utilized to capture vertical video. An alternative option is to utilize the FoneDog Screen Recorder software, which at first serves as our preferred tool for producing vertical films of exceptional quality.

windows Free Download For Windows mac Free Download For normal Macs mac Free Download For M1, M2, M3

People Also ReadFull Guide: How to Screen Record on Macbook Air with SoundSkype Video Record (Mac): How to Record Skype Video Call?

Conclusion

In conclusion, knowing how to record vertical video on Mac devices has never been more accessible and thanks to intuitive software solutions like FoneDog Screen Recorder. Embracing vertical video creation enhances versatility and meets the demands of modern content consumption. Overall, leveraging efficient software simplifies the process, unlocking creative potential for Mac users worldwide.

Leave a Comment

Comment

Comment ()
author image

Adela D. Louie

Tech Website Writing /Content Optimization

Singing, smiling, surprising every day!

So as a technical writer, it is my duty to gather effective and reliable solutions to answer questions on how to deal with the issues they are having with their devices.

Screen Recorder logo

Screen Recorder

Powerful screen recording software to capture your screen with webcam and audio.

How Do You Like This Article?

Check icon/ Check icon

INTERESTINGDULL

Check icon/ Check icon

SIMPLEDIFFICULT

Thank you! Here' re your choices:

Rate This Article: Excellent

Rating: 4.6 / 5 (based on 70 ratings)

Screen Recorder logo

Screen Recorder

Powerful screen recording software to capture your screen with webcam and audio.

FoneDog uses cookies to ensure you get the best experience on our website. Click here to learn more.