FoneDog Screen Recorder FoneDog Screen Recorder
Special Offer Special Offer
Only Only
$4.49 $4.49
to get a ONE-month license to get a ONE-month license
Sale ends in xx days Sale ends in xx days
Buy Now
sale

[4 Easy Ways] How to Record Yourself on Mac (2024)

By Adela D. Louie, Last updated: April 18, 2024

Have you ever experienced the surge of creativity yet found it difficult to successfully capture? If you are an entertainer, podcaster, vlogger, or just another individual who enjoys documenting their thoughts, becoming proficient at self-recording on your Mac provides numerous opportunities.

This guide will provide comprehensive instructions on how to record yourself on Mac within exceptional quality in the convenience of your environment. From selecting the appropriate the best webcam recording program to enhancing your configuration and refining your result, we have all aspects taken care of. Eliminate technological obstacles and welcome effortless, engaging content generation.

Part 1. Best Tool to Screen Record Yourself on Windows or MacPart 2. Methods on How to Record Yourself on MacPart 3. Tips to Enhance Recording Yourself on MacPart 4. FAQs of Record Self on MacConclusion:

Part 1. Best Tool to Screen Record Yourself on Windows or Mac

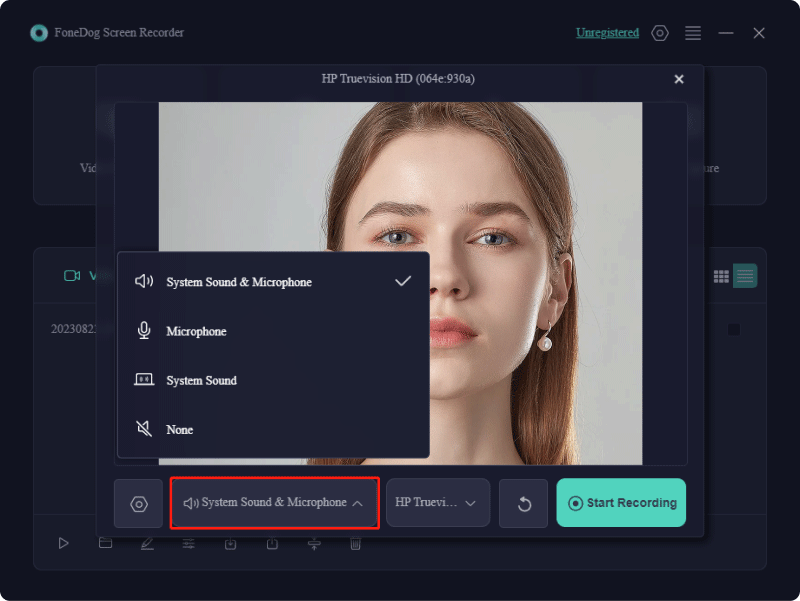
Among the best options for recording screen activity onto Mac and Windows was indeed FoneDog Screen Recorder. The software's intuitive interface and extensive range of functions make it perfect for effortlessly capturing one's own recordings.

With options to capture system sounds, microphone audio, as well as webcam footage simultaneously, FoneDog ensures high-quality recordings tailored to individual preferences. Its versatility, coupled with intuitive controls, establishes FoneDog Screen Recorder as the ultimate tool for seamlessly capturing and sharing screen experiences.

windows Free Download For Windows mac Free Download For normal Macs mac Free Download For M1, M2, M3

  1. First, be sure to activate and set up the FoneDog Screen Recorder onto the Mac or Windows devices by obtaining, setting up, and activating it.
  2. Open the software onto the Mac or Windows and go into the main interface. From there, choose the "Webcam Recorder" mode.
  3. Following that, select the option labeled "System Sound & Microphone" in order to record both the audio from the system and the microphone at the same time.
  4. On the other hand, select either the "Microphone" or even "System Sound" option for recording merely one audio input.
  5. At this point, choose the webcam needed to record yourself. To start the scanning process for the webcam even though it is not identified, simply press down upon the "Recheck" button.
  6. After that, set up the preferred settings, initiate the recording procedure through clicking through the "Start Recording" button. The settings menu is situated within the corner of the recording opening allowing to capture screenshots by just clicking on the camera icon.
  7. To cease the recording, simply click on that “RED” stop button. Moreover, there are alternatives to "Restart" or temporarily halt the recording whenever needed.

Record Yourself on Mac via FoneDog Screen Recorder

Part 2. Methods on How to Record Yourself on Mac

Capturing footage on a Mac may appear daunting, yet it's entirely manageable! Equipped with the right tools such as a Mac webcam recorder and accessories, you can effortlessly produce top-notch audiovisual content, preserving those significant moments. Within this segment of the article, we'll guide you through various techniques on how to record yourself on Mac. Let's commence!

1. How to Record Yourself on Mac (PhotoBooth)

The PhotoBooth presents yet another uncomplicated option for capturing moments. Typically utilized for snapping pictures with various enhancements, it has increasingly become a preferred tool for crafting personal videos. How does one go about capturing a self-directed video using this setup? Begin with the following steps:

  1. To start, initiate a search for "Photo Booth" via Spotlight Search and proceed to open the application.
  2. Subsequently, a live feed of yourself will be displayed on the Mac screen.
  3. Following that, initially set to Camera mode, first navigate towards the lower left corner and ensure to select the “Record” icon to transition into recording mode.
  4. Once prepared to commence recording, activate the red camera button located at the screen's center.
  5. After that, the incorporate effects or filters to enhance the visual appeal of the recording.
  6. From there, ensure to cease recording by selecting the red square button.
  7. Finally, access the "File" menu and opt to "Save" the recording onto the Mac.

Record Yourself on Mac Using Photo Booth

2. How to Record Yourself on Mac (QuickTime)

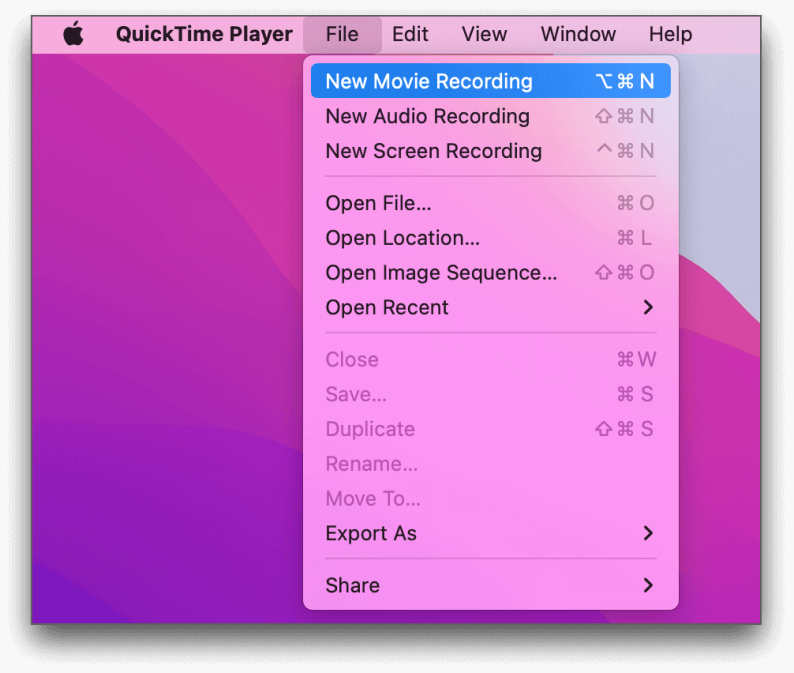
An alternative method for capturing yourself on a Mac involves utilizing QuickTime Player. Let's explore the process of screen recording with QuickTime Player!

  1. To get started, make sure to open the QuickTime Player application on the Mac device.
  2. After that, positioned right within the upper left corner of the display, from that ensure to press on option "File", and then proceed to select on option "New Movie Recording".
  3. Following that, navigate towards the “Options” tab, from there adjust settings for the camera, microphone as well as screen inputs.
  4. At this point, choose the recording level that which wanted.
  5. Once satisfied with the configurations, exit the “Options” menu and initiate the recording process by clicking onto the “Record” button which then located at the bottom of the screen.
  6. Upon completion of the recording session, halt the recording by clicking on “Stop”, then navigate to option that implies “File”, and opt to “Save” the file with a designated name.

How to Record Yourself on Mac via QuickTime Player

3. How to Record Yourself on Mac (Continuity Camera)

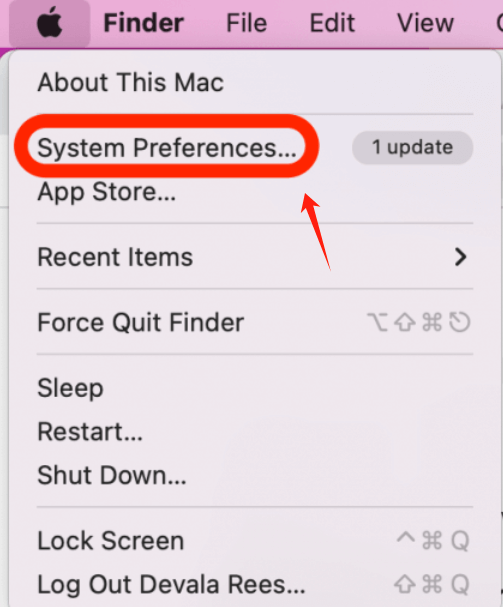
Utilize your iPhone or iPad camera in conjunction with your Mac's recording setup through the Continuity camera feature. Follow these steps:

  1. Begin by ensuring the iPhone or even iPad is securely positioned near the Mac for the duration of the recording. Employing a compatible mount or stand can be beneficial.
  2. To sustain power during recording, it's advisable to connect the iPhone or even the iPad onto the Mac or even a USB charger.
  3. After that, launch FaceTime or another suitable app to utilize iOS camera. If the app doesn't automatically detect the iPhone or perhaps iPad camera, manually select it within the app's video or camera settings.
  4. Following that, incorporate device's mic during recording, go through the Apple menu and choose on option "System Preferences".
  5. After that, access "Sound" right within the sidebar to designate iPhone or iPad mic into the audio "Input" section.
  6. When ready, start recording and focus right within iPhone or iPad camera.
  7. Upon satisfaction with the content, conclude the recording and ensure proper saving of files, ideally to both devices.

Record Yourself on Mac via Continuity Camera

Part 3. Tips to Enhance Recording Yourself on Mac

If you're unsure about how to initiate a webcam recording on your Mac operating system, here are some suggestions to enhance your outcomes:

  • Selecting an optimal location: The setting where you conduct your recording significantly impacts both the auditory and visual aspects. Ensuring minimal background noise and echo-free surroundings contributes to clear voice projection. Experiment with different spots to identify the most suitable backdrop, free from distractions.
  • Positioning your camera: A fundamental aspect of webcam recording involves positioning the camera at eye level. This arrangement fosters a natural viewing experience, akin to an in-person interaction with your audience.
  • Achieving proper framing: Effective framing plays a pivotal role in presenting yourself appropriately to viewers. Aim to position yourself centrally within the frame, with the top of your head and mid-chest area visible. Allow ample space above your head to prevent a cluttered appearance.
  • Optimizing lighting: Adhering to basic lighting principles can enhance recording quality across various environments. Indoors, prioritize rooms with abundant natural light, while outdoors, seek shaded areas to avoid harsh sunlight. When utilizing supplementary lighting, position sources in front of you to ensure even illumination across your face.

Part 4. FAQs of Record Self on Mac

Still uncertain about the process of recording yourself on a Mac device? Below, we address some commonly asked questions.

How can I capture myself with audio on my Mac?

Capturing yourself with audio on a Mac is a straightforward process! Most recording tools come equipped with built-in audio capture functionality. Simply ensure that you have selected the correct microphone within your application settings.

Before your actual recording, it's advisable to confirm that your audio is functioning correctly by reviewing the mixer panel or conducting a brief test project. Once confirmed, you're ready to commence recording!

Is it advisable to utilize the Mac's integrated camera for self-recording?

Using the Mac's built-in camera can serve as a viable option if alternative recording equipment is unavailable. However, it's important to note that the native camera's capabilities are somewhat limited, potentially resulting in lower quality video output characterized by graininess or dullness. For higher-quality video content, employing a dedicated video camera or even the camera on your iPhone or iPad connected to your Mac device is recommended.

Does Mac offer its own screen recording feature?

QuickTime Player is often regarded as the default screen recording tool on Mac. This no-cost software facilitates easy screen recording on Mac systems. Additionally, if necessary, you can opt to capture audio along with your screen recording!

Be prepared to edit: Every video endeavor has room for improvement! This underscores the importance of editing. After recording your material, review it as well as indeed refine it by removing unnecessary segments, incorporating effects, and enhancing it further.

People Also Read9 Advanced And Essential Webcam Video Recorders9 Best Screen Recorder with No Lag [No Watermark]

Conclusion:

In conclusion, recording yourself on a Mac is a simple process with the FoneDog Screen Recorder. By following the steps outlined, users can effortlessly capture their screen, system audio, microphone input, and webcam footage simultaneously. Overall, it stands as the go-to solution for anyone seeking to create high-quality recordings on their Mac device. Happy Recording!

windows Free Download For Windows mac Free Download For normal Macs mac Free Download For M1, M2, M3

Leave a Comment

Comment

Comment ()
author image

Adela D. Louie

Tech Website Writing /Content Optimization

Singing, smiling, surprising every day!

So as a technical writer, it is my duty to gather effective and reliable solutions to answer questions on how to deal with the issues they are having with their devices.

Screen Recorder logo

Screen Recorder

Powerful screen recording software to capture your screen with webcam and audio.

How Do You Like This Article?

Check icon/ Check icon

INTERESTINGDULL

Check icon/ Check icon

SIMPLEDIFFICULT

Thank you! Here' re your choices:

Rate This Article: Excellent

Rating: 4.8 / 5 (based on 92 ratings)

Screen Recorder logo

Screen Recorder

Powerful screen recording software to capture your screen with webcam and audio.

FoneDog uses cookies to ensure you get the best experience on our website. Click here to learn more.