By Adela D. Louie, Last updated: April 15, 2024
Ever wondered how to effortlessly capture your screen and share your brilliance? Look no further! In this ultimate guide, we'll unveil the secrets to seamless screen recording on your trusty Asus laptop. Whether you're a professional needing to create tutorials, a gamer eager to showcase your skills, or simply someone wanting to preserve memorable moments, this article is your ultimate solution.
Discover step-by-step instructions on how to screen record on ASUS laptop, recommended software, and expert tips to unleash the full potential of your device. Get ready to elevate your screen recording game and make sharing experiences a breeze!"
Part 1. Best Tool to Record your ASUS Laptop ScreenPart 2. How to Screen Record on ASUS LaptopPart 3. Tips for Successful Screen Recording on ASUS LaptopPart 4. Overview: Importance of Screen Recording on ASUS LaptopConclusion
Part 1. Best Tool to Record your ASUS Laptop Screen
FoneDog Screen Recorder was indeed your ultimate solution for flawless screen recording on Asus laptops! You may then unleash the full potential of your Asus device with FoneDog Screen Recorder the go-to tool for seamless, high-quality screen recording.
Whether you're capturing gaming highlights, creating tutorials, or presenting professional content, this user-friendly software offers an array of features to elevate your recording experience. To utilize this tool effectively on your Asus laptop, follow these steps:
 Free Download
For Windows
Free Download
For Windows
 Free Download
For normal Macs
Free Download
For M1, M2, M3
Free Download
For normal Macs
Free Download
For M1, M2, M3
- Download and Install: Visit the officia website and download the software. Run the installation file and follow the on-screen instructions to install it on your Asus laptop.
- Launch the Software: After installation, open the application by double-clicking its icon on the desktop or locating it in the installed applications list.
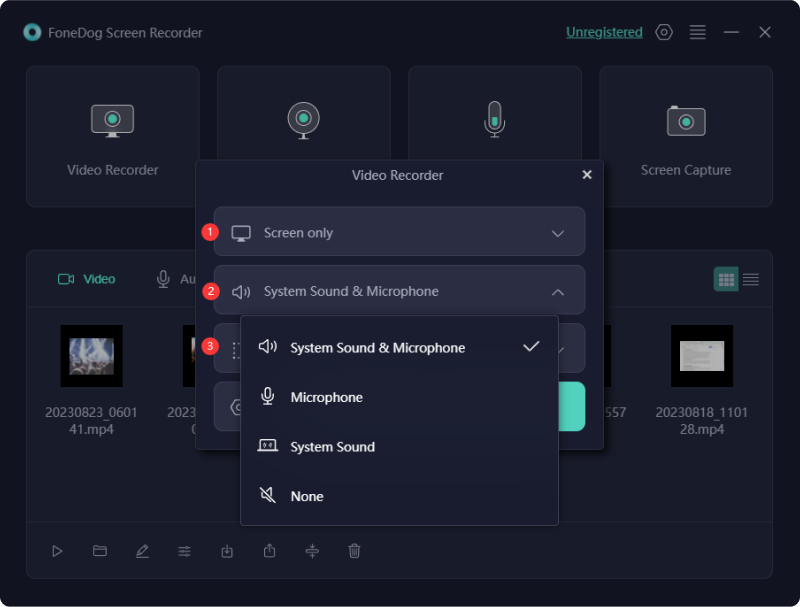
- Adjust Settings: Explore the software interface to configure recording settings. Customize options such as recording area, audio input source, video quality, and frame rate to match your preferences.
- Select Recording Area: Choose whether to record the entire screen, a specific window, or a custom region. It provides flexible options to capture precisely what you need.
- Set Audio Preferences: Ensure optimal audio settings by adjusting microphone levels and selecting the audio source you wish to record, whether it's system sound, microphone input, or both.
- Initiate Recording: Click the "Start Recording" button to begin the screen recording process. FoneDog Screen Recorder initiates capturing your screen according to the configured settings.
- Edit and Save: After recording, utilize the software's editing features to trim, add annotations, or enhance the video if necessary. Once satisfied, save the recording in your preferred format and location.
FoneDog Screen Recorder simplifies the screen recording process on your Asus laptop, offering versatility and efficiency to meet your recording needs. Elevate your content creation, tutorials, presentations, and gaming experiences effortlessly with this powerful tool.
Part 2. How to Screen Record on ASUS Laptop
Screen recording on an ASUS laptop can be accomplished using various methods, including built-in features, third-party software, or online applications. Here are some common methods along with steps to perform screen recording:
Method 1. Using Built-in Software:
Some ASUS laptops come with built-in screen recording functionality. Here's a general guide to using such software:
- Firstly, examine your ASUS laptop for any pre-installed software that may encompass screen recording capabilities. Take a glance at applications like ASUS ScreenPad, ASUS ROG GameVisual, or any other proprietary ASUS software that might potentially offer features for capturing your screen.
- Upon identifying the software, proceed by launching it. Navigate through the application interface to locate the specific function designated for screen recording. Be mindful that this functionality could be named differently based on the particular model of your ASUS laptop.
- Next, within the screen recording feature, access the settings to customize your recording preferences. These settings often include options to define the recording area, select the audio source, adjust frame rates, and optimize the recording quality, if such settings are available.
- Finally, when all the settings are configured to your preference, commence the screen recording process. This typically involves clicking on the designated 'Record' or 'Start' button within the software interface, initiating the capturing of your screen content.
Method 2. Using Third-Party Software:
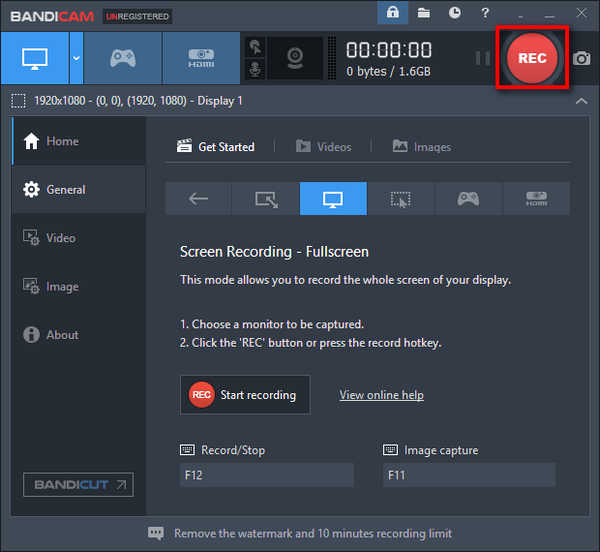
If your ASUS laptop doesn't have built-in screen recording capabilities, you can use third-party software. Popular options include OBS Studio, Camtasia, or Bandicam. Here's a general guideline:
- Download and Install Screen Recording Software: Begin by navigating to the official website of your selected screen recording software. Once there, locate the option to download the installation file. Proceed to download this file by clicking on it. After the download completes, initiate the installation process by running the installation file.
- Open the Software: Once the installation is complete, access the installed screen recording software. Locate the software icon either on your desktop, in the Start menu, or in the installed applications list. Double-click on the icon to launch the screen recording software.
- Adjust Recording Settings: Upon opening the screen recording software, explore the settings or preferences section. Here, you can fine-tune various recording parameters to suit your needs. Customize settings such as the recording area, audio input source, video quality, frame rate, and file format according to your preferences or specific requirements.
- Start Recording: After configuring the settings, prepare to start the screen recording process. Look for a 'Record' or 'Start' button within the software's interface. Click on this button to commence the screen recording. Ensure that all necessary settings are properly adjusted before initiating the recording process to capture your screen seamlessly.
Part 3. Tips for Successful Screen Recording on ASUS Laptop
Here are some tips to ensure successful screen recording on your ASUS laptop:
- Plan Your Content: Before recording, outline the content you want to cover. Having a clear plan helps in organizing the recording process and delivering a more coherent presentation.
- Optimize System Performance: Close unnecessary applications and processes running in the background to free up system resources. This ensures smoother recording without lags or interruptions.
- Choose the Right Recording Area: Select the appropriate screen area to record. Whether it's the entire screen or a specific window, ensure it effectively conveys your message without unnecessary distractions.
- Set Audio Levels: Check and adjust audio settings to ensure that your voice or any other audio input is clear and at an optimal level. Test the microphone beforehand to avoid sound issues during recording.
- Use High-Quality Settings: Opt for higher video quality and frame rates if your system can handle it. This ensures a clearer and more professional-looking recording.
- Consider Narration and Annotations: If applicable, plan for narration or add annotations during the recording to enhance the viewer's understanding. Utilize features like text overlays or drawing tools if the software supports them.
- Practice and Rehearse: Familiarize yourself with the screen recording software before the actual recording. Practice the process, refine your delivery, and ensure you're comfortable with the software's functions.
- Check Storage Space: Ensure you have enough storage space on your laptop to accommodate the recorded files. Large video files can quickly fill up storage, so consider saving recordings to an external drive if needed.
- Monitor Recording Time: Be mindful of the length of your recording. Keeping it concise and to the point improves viewer engagement. Consider breaking longer content into shorter segments if necessary.
- Review and Edit: After recording, review the footage for any errors, pauses, or irrelevant content. Use editing tools within the software or a separate editing program to trim, enhance, and finalize the recording before sharing it.
By following these tips, you can enhance the quality of your screen recordings on an ASUS laptop and deliver engaging and informative content to your audience.
Part 4. Overview: Importance of Screen Recording on ASUS Laptop
Screen recording on an ASUS laptop holds immense significance across various domains. It serves as a dynamic tool for professionals, educators, gamers, and content creators alike. Here's why it's essential:
- Educational & Tutorial Creation: Screen recording enables educators and trainers to craft engaging tutorials and presentations. It allows them to demonstrate software applications, conduct online classes, and simplify complex concepts with ease.
- Professional Use: Professionals benefit from screen recording by creating demonstrations for clients, recording meetings, or documenting software bugs for developers. It's a valuable asset for remote work, enhancing collaboration and communication.
- Gaming & Entertainment: Gamers utilize screen recording to capture gameplay, create walkthroughs, or share highlights on social media platforms. It helps build communities, entertain audiences, and showcase gaming skills.
- Content Creation: For content creators, screen recording is fundamental in producing how-to videos, product reviews, and engaging social media content. It's an indispensable tool for storytelling and sharing experiences.
- Troubleshooting & Support: It aids in troubleshooting technical issues by capturing and sharing screen recordings, enabling better assistance from support teams or online forums.
In essence, screen recording on an ASUS laptop is a versatile feature that empowers users to communicate, educate, entertain, and collaborate effectively across diverse fields.
People Also ReadRecording Made Easy: Top-Tier Video Recording Software FreeComplete Guide: How to Record Screen on Laptop like A Pro
Conclusion
Mastering screen recording on an Asus laptop opens doors to a world of possibilities—from professional presentations to engaging content creation and seamless gaming experiences. Elevate your recordings with FoneDog Screen Recorder, simplifying the process while offering versatility and quality. Don't miss out! Try FoneDog and implement tips for flawless recordings. Empower your storytelling, tutorials, and entertainment—it's time to capture and share your brilliance effortlessly. Happy Reading!
Free Download
For Windows
Free Download
For normal Macs
Free Download
For M1, M2, M3


 /
/
