FoneDog Screen Recorder
FoneDog Screen Recorder
Special Offer
Special Offer


By Gina Barrow, Last updated: August 27, 2019
One of the dreading problems you might encounter in a Windows PC is a blue screen of death. It might be the end of your computer if you are not able to fix it immediately.
Among the many blue screen issues, the error code 0x00000019 or also known as the Bad Pool Header. But, what is a bad pool header in Windows 7 and how to fix it? Find out in this new post.
Part 1. What Is A Bad Pool Header?Part 2. How to Fix Bad Pool Header in Windows 7, 8, 8.1, and VistaPart 3. Summary
People Also ReadTo Fix OneDrive Won't Sync On Windows 7/8/10Complete Guide :Solution to Fix iTunes Error 7 and Windows Error 127Para corregir OneDrive no se sincronizará en Windows 7 / 8 / 10
A bad pool header indicates a problem with the computer’s memory allocation, but can also be caused a lot of factors including disk writes, RAM, device drivers, and some routers.
Pool refers to the memory pool in Windows which allocates memory. A header is the header annotation that determines how parts should use certain values and parameters. Thus, a bad pool header may happen when the memory pool header is corrupted due to some processes that may have affected the memory.
Usually, the most common scenarios would be:

Luckily, a blue screen with bad pool header error is easy to fix as compared to other blue screen errors. I have compiled the effective troubleshooting steps you can apply when you see this error on your computers.
Disconnect all external devices connected to the computer except for the mouse and the keyboard. Observe if the blue screen goes away and it continues to boot up.
Enter into Safe Mode. If your computer does not progress and is only stuck at the blue screen, enter into Safe mode by pressing F8 until you see the Safe Mode option. Tap Enter.
Once inside the Safe mode, restart your computer in clean boot and check if the issue persists.
To do a clean boot, follow these steps:
Wait until your computer restarts in a clean boot. You may temporarily lose some computer function while in this environment. From here, you can uninstall apps and programs or continue troubleshooting.
Right after doing a clean boot and your computer restarts Windows then you can still rectify the issue, if not, then you might need to reinstall Windows 7. Here are your options:
If Windows restarts:
Open the Action Center
Update a Driver
Check for Memory Problems
If you cannot start Windows :
When you have exhausted the basic troubleshooting and you found out that you cannot start Windows at all, you can still revert or update software, repair, and restore the system by following these steps:
You can do all these methods on the System Recovery Options which come in pre-installed on the computer’s hard disk. If your Windows 7 came preinstalled, you may refer to the manufacturer’s website for other recovery options.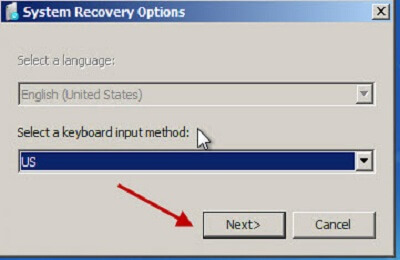
Run System Restore:
Run System Restore on Windows 7 using the installation disc, USB flash drive, or a system repair disc:
You can only do this method if you are unable to access the System Recovery Option or if your computer’s system is damaged.
If you are using an installation disc, click on Repair your computer, click Next, and select System Restore.
I hope by following these troubleshooting steps, you are able to fix the bad pool header issue on Windows 7. If in any case, you need data recovery faster, you can opt to use FoneDog Toolkit- Android/iOS Data Recovery.
This will help you recover important data faster and safer. Do you have other methods to share on how to fix the bad pool header problem? Share it with us in the comments below!
Leave a Comment
Comment

Technical/Creative Writer
Kitchen, my safe space; black, my favorite color
Was a Technical Specialist for a while, troubleshooting Smartphone and Software-related issues until a writing stint caught my attention.
Android Toolkit
Recover deleted files from your Android phone and tablet.
Free Download Free DownloadHot Articles
 /
/
INTERESTINGDULL
/
SIMPLEDIFFICULT
Thank you! Here' re your choices:
Excellent
Rating: 4.9 / 5 (based on 109 ratings)
