FoneDog Screen Recorder
FoneDog Screen Recorder
Special Offer
Special Offer


By Adela D. Louie, Last updated: January 3, 2024
In today’s world, we are all fond of using social media for so many reasons. Some of the reasons are for entertainment or to connect with some friends and families that is far from us. We are also fond of posting some videos and photos to our social media account for us to share with other people. And obviously, one of the most popular social media platforms that we use nowadays is Facebook.
So if you are wondering on how you can clear the Facebook cache on whatever device you are using, then this is definitely for you to read and apply on your device. This way, you will be able to save more space for you to use.
If you delete your Facebook information by mistake. You can retrieve deleted Messenger messages according to the detailed step-by-step guide.
Part 1: What Are Facebook Caches? - A Brief IntroductionPart 2: How to Clear Facebook Cache on iPhone DevicePart 3: How to Clear Facebook Cache on Android DevicePart 4: How to Clear Facebook Cache on Web BrowserPart 5: Conclusion
We have a lot of means on how we can access our Facebook account. As long as you have an internet connection or mobile data that you can use, you can browse to your Facebook account using your iPhone device, Android device, iPad, and even your computer.
And with using Facebook every day, we tend to have temporary files on our devices and these temporary files are called caches. These caches take up space on our Android, iPhone, and computer making it a reason as to why we need to clean them up once in a while.
Facebook caches are just like any other caches that you have on your device. These are as well temporary files that the Facebook app uses for it to load information that you see on your screen. However, for the time being, that you are using your Facebook, the caches that it made will also pile up on your device which becomes the reason as to why you are losing space for your storage.
So because of that, you should get rid of these Facebook caches to save more space and to avoid your device from poor performance as well.

For the time being that you use your iPhone device for browsing Facebook, you actually get so many caches that are stored on your iPhone device. And because of this, there is a high possibility that your iPhone might perform slow.
If you are going to check your Settings, the Facebook app that you have only accumulated a 100MB of space but it actually consumes more than that that is why you need to clear the Facebook cache on your iPhone device.
So, for you to get started, here are the things that you need to follow to clear the Facebook cache on your iPhone device.
Step 1: On your iPhone, go ahead and open up your Facebook application.
Step 2: From there, go ahead and tap on the three horizontal lines at the bottom of your screen beside your notification icon.
Step 3: From there, it will take you to another page wherein you are going to choose “Settings”.
Step 4: Then from Settings, go ahead and simply tap on the Account Settings option.
Step 5: From the Account Settings page, scroll down and choose on Browser.
Step 6: And from the Browser page, go ahead and simply tap on the Clear Data button. This will then clear out all of the caches that Facebook had produced on your iPhone device.
Another way for you to clear the Facebook cache on your iPhone device is by merely uninstalling the Facebook application and have it installed again. And for you to do this, here are the steps that you need to follow.
Step 1: Go ahead and open up the Settings app of your iPhone device.
Step 2: In Settings, go ahead and simply choose the General option.
Step 3: After that, simply tap on Usage.
Step 4: Then from Usage, select Manage Storage.
Step 5: From there, go ahead and choose on the Facebook app and then tap on the Delete App button.
Doing this will then delete the Facebook app from your iPhone device and at the same time, it will also clear out your Facebook caches. If you want to install Facebook again, all you have to do is to go to your App Store and search for Facebook and have downloaded.
NOTE: For all of iPhone user’s knowledge, it is must that you tend to clear the Facebook cache on your device once a month in the event that you are using Facebook every day of your life. But if you seldom use your Facebook on your iPhone device, then you can have it uninstalled and reinstalled on your device once every three months max.
All Android device nowadays comes with an application manager that you can use for your apps such as cleaning up every app’s cache. This comes handy if you would want to clear Facebook cache on your Android device. Because just like the iPhone device, the Facebook cache that you have on your Android device also occupies a lot of space that might lead to the poor performance of your device.
Every time that you use a certain app on your Android device, it also starts on keeping temporary files and serves as its reference. So, for you to get back those space that these caches gain on your Android device, then you should remove those Facebook cache. This could also be a way for you to fix any system glitch that you are having with the Facebook app on your Android device.
So for you to know how you can clear Facebook cache on your Android device, here are the things that you need to do.
Step 1: On your Android device, go ahead and open up the Settings app.
Step 2: From your Settings, go ahead and tap on Storage and this will take you to another page.
NOTE: If you have an Android device that is running on an Oreo OS version, then what you need to choose is the App Manager from your Settings.
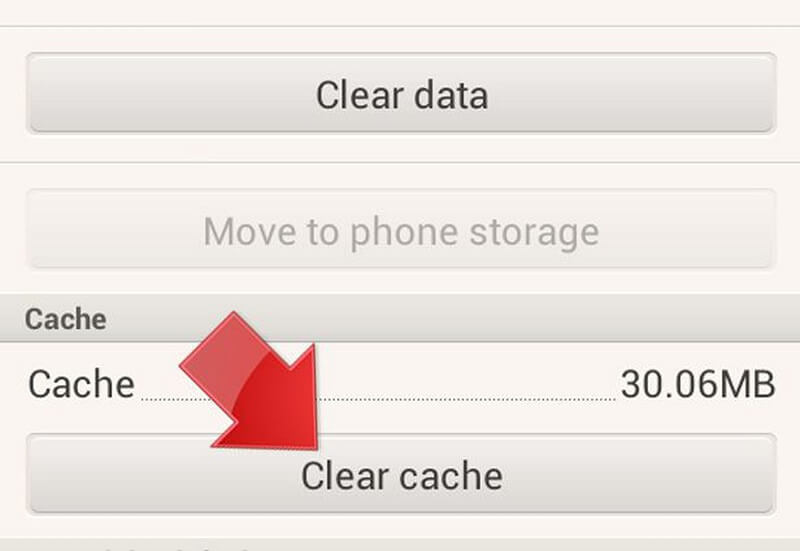
Step 3: Next is that go ahead and tap on Other Apps. This will then take you to another page wherein you will be able to see all the apps that you have on your Android device.
Step 4: From the list of apps that are shown on your screen, go ahead and simply look for your Facebook app and tap on it.
Step 5: Lastly, on the next page, There will be an option for you to clear the Facebook cache. And that is by choosing to tap on the Clear Cache button on your screen.
Once that you have clear Facebook cache on your Android device, when you try to use it again, all of the data that it needs will be downloaded again using your internet connection. Also, you do not have to worry about clearing the cache of your Facebook application. It is because it does not delete other data on your Android device. In fact, doing this will not only make you gain more space on your Android device but it can also fix some bugs that you are experiencing when you are using Facebook.
And in the event that you would want to clear your storage for good, then you can go ahead and do the same steps above. But instead of choosing Clear Cache, you should choose the Clear Storage button. However, doing this will remove all the data of your Facebook which includes your username, games, password, and some other data that you have.
If you are using your computer to access Facebook, there are situations wherein it will ask you to clear up your cache as a way for you o troubleshoot for something. And when you clean up Facebook cache on your computer, it is a task that you need to perform using your web browser.
And once that you clean up the cache on your browser, it will then refresh and will show you new information from Facebook when you visit its website. And with that, we have here ways on how you can clear Facebook cache on three of the most popular web browser that you might have used to access Facebook. Each web browser comes with different methods.
People Also ReadThe Ultimate Guide on How to Clear Cache on MacHow to Clear Cache on Chrome on Mac
Step #1: Using your keyboard, press the Alt key.
Step #2: Choose Tools > Clear Recent History > Time Range to Clear > Everything.
Step #3: Next, click on the arrow located beside the Details button.
Step #4: Tick “Cache” and then unmark everything else.
Step #5: Click "Clear Now" to clear Facebook cache and other cache.
Step #1: Click the Tools icon on the Internet Explorer browser on your computer.
Step #2: Choose Internet Options > Browsing History > Delete.
Step #3: Unmark the box beside Preserve Favorites website data
Step #4: Hit the Delete button to clear Facebook cache and cookies.
Step 1: First is to launch your Google Chrome browser on your computer.
Step 2: Then, the next thing you need to do is to click on the Tools icon.
Step 3: From the Tools icon, simply hit on the Options button.
Step 4: Next is that you have to go to the tab that says “Under the Hood”.
Step 5: Then from there, simply click on the Clear Browsing Data button.
Step 6: And from the drop-down menu on your screen, simply go ahead and choose “Everything” option.
Step 7: Then simply go ahead and mark the box that is next to “Empty cache” and have the boxes unmarked.
Step 8: Once that you are done with that, go ahead and simply hit on the “Clear browsing data” button for you to be able to clear Facebook cache from your Google Chrome browser.
With all of the different methods that we have shown you above on how to clear the Facebook cache on your web browsers, you have to keep in mind that once you clear out your cache, it will not just remove the caches that you Facebook made throughout the times that you are using it.
Clearing cache on a web browser will also let you remove all of the other caches that you have from the different websites that you have visited using that specific browser. It is still a good way for you to be able to clear out space on you compute and with this, you will also be able to use your web browser smoothly without compromising its performance.
Clearing Facebook cache on every device that you have and use to browse Facebook is actually not a complicated thing to do. And with all of the instructions that we have mentioned above, you will be able to do this easily on your own on either your Android device, iPhone device, or even on your computer.
Clearing Facebook cache will not only let you gain back the space that you have lost because of these caches but at the same time, you will also be able to get rid of some minor problems that you might have using the Facebook app on your mobile device or on your computer.
Leave a Comment
Comment

Tech Website Writing /Content Optimization
Singing, smiling, surprising every day!
So as a technical writer, it is my duty to gather effective and reliable solutions to answer questions on how to deal with the issues they are having with their devices.
Hot Articles
 /
/
INTERESTINGDULL
/
SIMPLEDIFFICULT
Thank you! Here' re your choices:
Excellent
Rating: 3.0 / 5 (based on 2 ratings)
