FoneDog Screen Recorder
FoneDog Screen Recorder
Special Offer
Special Offer


By Adela D. Louie, Last updated: January 3, 2024
Having trouble with the Image Capture app on your Mac? Does this not show you all of the photos that you have? If so, then keep reading this post as we are about to show you ways on how you fix the issue when Image Capture not showing all photos on your Mac.
The Image Capture app that you have on your Mac is one of the most useful apps there is. By using this app, you will be able to manage all of the photos that you have stored on your device. Also, it is one great way for you to transfer your photos from your iOS devices such as from your iPad or from your iPhone. You can also use this tool to transfer photos from your SD card to your Mac as well.
However, just like any other tool that you have on your Mac, there are instances wherein it fails to do its job or it gives you some glitches. There are times that when you try to connect your iPhone to your Mac, the Image Capture tool will show you a message that says there are no items found. And thus, it only shows you either a few photos or it will not show you anything at all.
So, if you have the same problem as this, then this blog is definitely for you. As we are going to show you the best solutions that you can apply in order for you to fix when Image Capture not showing all photos on your Mac computer.
Part 1. Ways on How to Fix When Image Capture Not Showing All Photos Part 2. Conclusion
When you experience that the Image Capture is not showing all photos on your other iOS devices such as your iPhone or your iPad, restarting both your Mac and iOS device is not enough. Here are 3 effective methods to fix when Image Capture is able to show all photos on iOS devices.
If the Image Capture won't detect your iPhone, the first thing is to see if your iCloud Photo Library and the Optimize Storage option are currently enabled on your iPhone at the same time. If so, your photos can only be stored on your iCloud and cannot be detected by Image Capture.
This is also the reason why whenever you try to check on y our photos, they still need to be downloaded on your iCloud instead of having them immediately on your iPhone device. This is the reason why you will not be able to transfer those photos from your iPhone to your Mac using the Image Capture app.
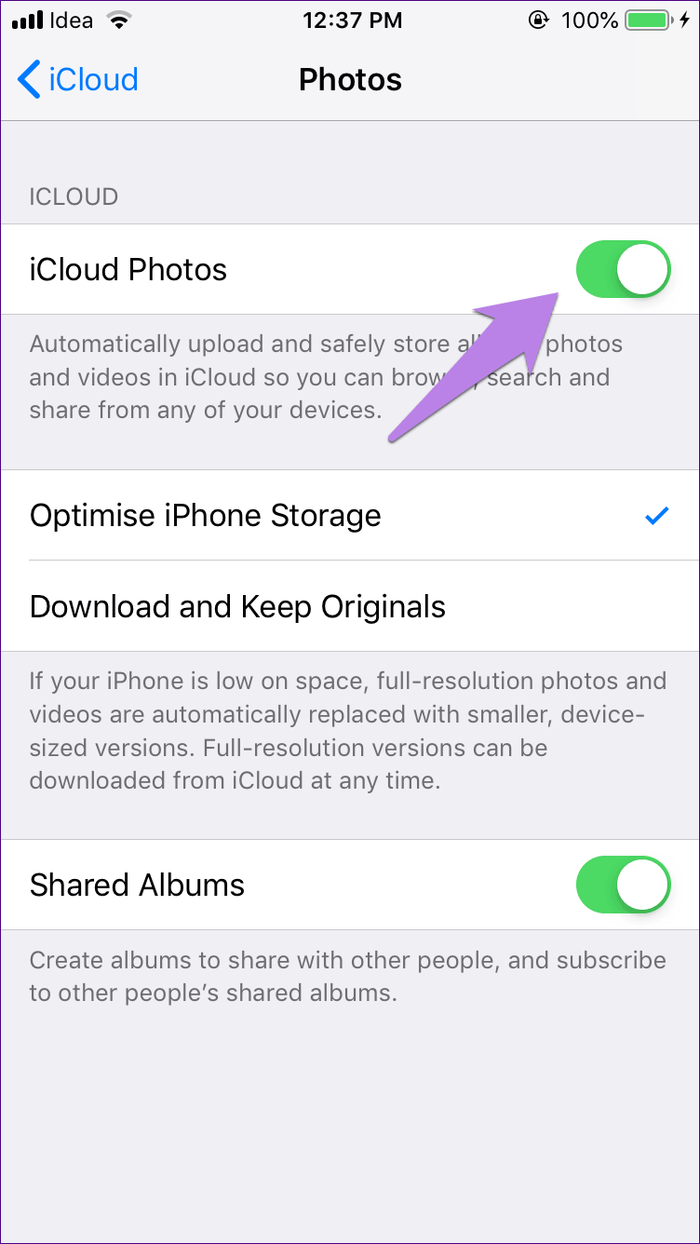
In order for you to fix this issue of Image Capture not showing all photos, you have to turn off the iCloud Library and as well as your Optimize Storage on your iPhone. So, for you to turn this off, here is what you need to do:
Step 1: Using your iPhone, navigate to Settings.
Step 2: Tap the Photos & Camera option. But, if you are using an iOS 12, tap the Photos option.
Step 3: From there, turn off the iCloud Photo Library option. Once you turned this off, the Optimize iPhone Storage will also be turned off simultaneously.
And once that you are done with all of those steps, all you need to do now is to wait until the photos will be downloaded back to your iPhone device itself. And once that those photos are downloaded, you can now go ahead and connect your iPhone device to your Mac to see if the Image Capture app will show you all your photos now.
If you have already turned off your iCloud Photo Library and your Image Capture is still not showing you all of your photos or it also cannot detect your iPhone device, In order to fix Image Capture not showing all photos, what you need to do from here is update your Mac system.
This is because there are some Mac who has an older version that is not actually compatible with the new iOS. That is why if you have not yet updated your iPhone or your iPad to the iOS 11 or newer, then you have to see if your Mac is running on a new version or not. If not, then what you need to do is to update your Mac to the latest version or with the one that is compatible with working with your iPhone.
When it comes to updating your Mac, there are two ways on how you can actually do it. One is through a manual update, and the other is by setting your Mac into updating itself automatically. So, to know how you can do both of these, here are the steps you need to follow.
Step 1: Click on the Apple icon or menu and then click on System Preferences.
Step 2: From there, click on the Software Update option.
Step 3: And if you want to update the software that you just got from the App Store, click on the Apple menu, then click on App Store and hit Updates.

Step 1: Click on the App menu > System Preferences > Software Update.
Step 2: Now, to install any macOS update automatically, choose "Automatically keep my Mac up to date".
Step 3: Then, if you want your Mac to update on the advance, click on the Advanced button and then do the following depending on what you like.
Step 4: Then, click on the OK button.
Then, you will be able to have your Mac updated whether with the new version of your Mac system or a newer version of applications that you have on your Mac.
Another way also for you to transfer your photos from your iPhone device to your Mac if the Image Capture not showing all photos is by using a FoneDog iOS Data Backup and Restore tool. And with that, there are actually tons of tools that you can use for you to do this. However, it will all be up to you on which of those apps will be a good fit for you.
iOS Data Backup and Restore
One click to backup the whole iOS device to your computer.
Allow to preview and restore any item from the backup to a device.
Export what you want from the backup to your computer.
No data loss on devices during the restore.
iPhone Restore Won't Overwrite Your Data
Free Download
Free Download

People Also ReadWhy Is MyMost Recommended Free Software to Transfer Photos from iPhone to PC6 Best Ways to Transfer Photos from Mac to iPad for Free
Now, if your Image Capture not showing all photos on your Mac comes in and bothers you, then all you need to do is to stick with the solutions that we have provided for you above. This way, you will be able to get this error to be fixed easily and quickly at the same time.
Leave a Comment
Comment

Tech Website Writing /Content Optimization
Singing, smiling, surprising every day!
So as a technical writer, it is my duty to gather effective and reliable solutions to answer questions on how to deal with the issues they are having with their devices.
Free Online Photo Compressor
Hot Articles
 /
/
INTERESTINGDULL
/
SIMPLEDIFFICULT
Thank you! Here' re your choices:
Excellent
Rating: 4.8 / 5 (based on 73 ratings)
Free Online Photo Compressor
