FoneDog Screen Recorder
FoneDog Screen Recorder
Special Offer
Special Offer


By Adela D. Louie, Last updated: March 27, 2019
Nowadays, there are Android devices that are clearly lacking in storage space. This happens because there are a lot of applications that you download to your Android devices.
That is why most of the Android users would prefer downloading some app killers for them to be able to clear out some space on their RAM.
So, if you are one of those people who is actually having a hard time on how to clear their RAM on Android, then this article is for you.
We have here included the best ways for you of how to free RAM on Android and how you would be able to manage them.
Part 1: What Is a RAM?Part 2: Clearing the RAM of Your Android in the Best WayPart 3: How Much RAM Do You Really Need?Part 4: Manage Your Data to Reduce RAM Usage on Android Using FoneDog ToolkitVideo Guide: How to Use FoneDog Toolkit - Android Data Backup & RestorePart 5: Conclusion
Having spent many years creating apps for Android devices, we have made a good tool for you.
A tip for you: Download FoneDog Android Data Backup & Restore to manage your files. You can read on to find more information.
Android Data Backup and Restore
Selectively backup Android data to computer with one click.
Encrypt your backup files.
Compatible with 6000+ Android devices.
Free Download
Free Download
The RAM or Random Access Memory is known to be expensive and at the same time, a much better and faster version of your memory. This is no just like your computer that actually has several types of memories.
This is because, in a computer, you can have a different RAM that will depend on the speed, the price and how it operates.
On the other hand, RAM or the Random Access Memory can forget everything once that it is not connected to a power supply.
This is because it actually serves as your work surface for all the applications that you have and for you to store any data that is needed by your Android device.
Here are some of the best way for you of how to free RAM on Android device. So, if you feel like your Android device is not performing well, then you might want to try to consider the following. This is for you to manage and optimize your RAM.
If your Android phone is running slow, you would need to know the apps that actually take up the most RAM on it. Follow the steps:
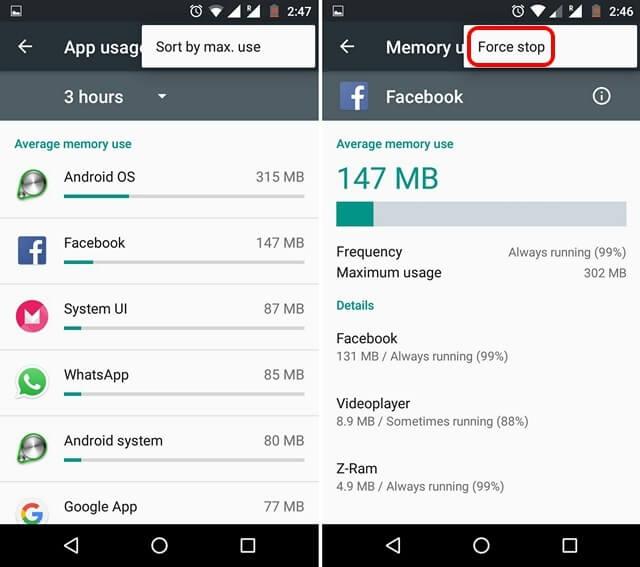
It is true that killing some apps actually free up some of your RAM on your Android device. However, this will not take forever because applications will have a possibility to restart in the background.
So, in case that you have some apps that you cannot uninstall from your Android device, then what you can do is to disable them. And once that you disable a certain app, then they will not be able to run in the background anymore.
You can only bring them back once that you enable them back again.
Now, for you to disable an app, all you have to do is to do the following.
NOTE: If you are going to disable an application on your Android device, then there might be a chance that it can result in inconsistency when it comes to its performance.

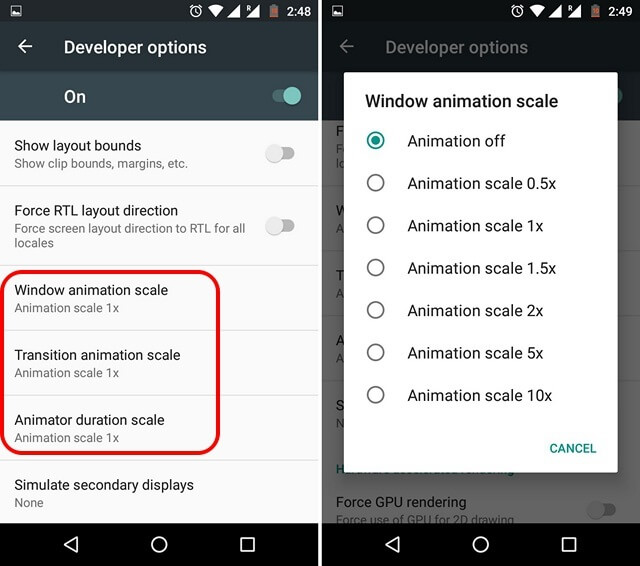
Having animations and transitions on your Android device will make it more pleasant to one’s eye. However, this also can take up a lot of RAM. Well, the good thing about this is that you can easily have this animation and transition disabled from your Android device. All you have to do is to follow the steps below.
But, before you can disable the animation and transition on your Android device, you have to get in Developers Option first. Here is what you need to do in case you do not know how.
Then once that you are done with that, you can go ahead and disable the animation and transition that you have on your Android device. Here are the things that you need to do.
Today, there are actually a lot of wallpapers that you can get from your Google Play Store and this will make your Android device cool and they will also look very pleasant.
However, these live wallpapers can also eat up a lot of space on your RAM and at the same time, it can also consume your battery faster.
This is the reason as to why we are not likely to recommend you to use any live wallpapers on your Android device especially if you are having some performance issues.
Extensive widgets also come up with live wallpapers and these can also take up your RAM.
There are also some other applications that you can use for you to be able to clean up your Android device’s RAM and this will make it work properly and have a better performance.
One application that you can trust is the Clean Master application which can make a “Memory Boost” on your Android device.
This application will also let you manage your auto-starting applications on your Android device. With this, you will be able to disable the applications that are taking up memory on your device.
For those high-end smartphones, they actually come with a 4, 6, or 8GB. With this, having the 6GB of RAM should be enough on an Android device.
However, if you are having a 4GB of memory on your Android device, then there is a high chance that it may be used up quickly once that you try to launch applications simultaneously or if you are into mobile games.
It might as well help if you try to manage the data that you have on your Android device. And for you to be able to do that, you have to remove all the things that you no longer need or at least make a backup so that you can remove them from your Android device.
And for you to do this, we have the perfect tool that you can use which is the FoneDog Toolkit – Android Data Backup and Restore.
The FoneDog Toolkit – Android Data Backup and Restore will help you in backing up your Android device to your PC with One Click. Using this tool, you can also have your Apps and your Apps Data backed up and as well as your Contacts, Messages, Photos, Videos, Call Logs, and more.
You can also preview your data and have any backup that you have been restored on any Android device that you have if you wish to. And the good thing about the FoneDog Toolkit – Android Data Backup and Restore is that it actually supports more than 8,000 Android devices and that it is very safe to use.
To know how to use the FoneDog Toolkit – Android Data Backup and Restore, here is a guide for you that you can follow for backing up and restoring the data on your Android device.
Have the FoneDog Toolkit – Android Data Backup and Restore from our official website. Then after that, have the program installed on your PC so that you can start backing up your data from your Android device.
Once that you have successfully installed the FoneDog Toolkit on your PC, go ahead and launch it. From here, you have to make sure that there is no any other backup application that is running on your PC the same time as you are running the FoneDog Toolkit.
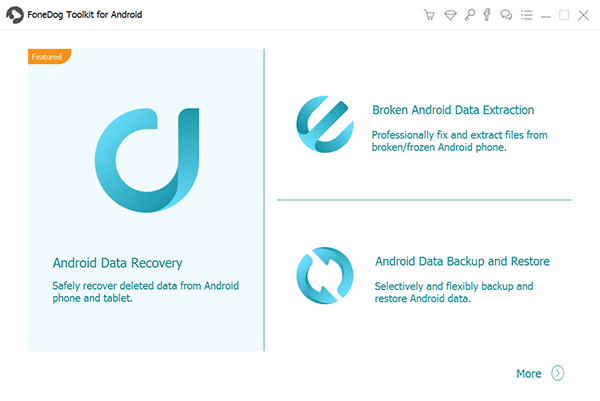
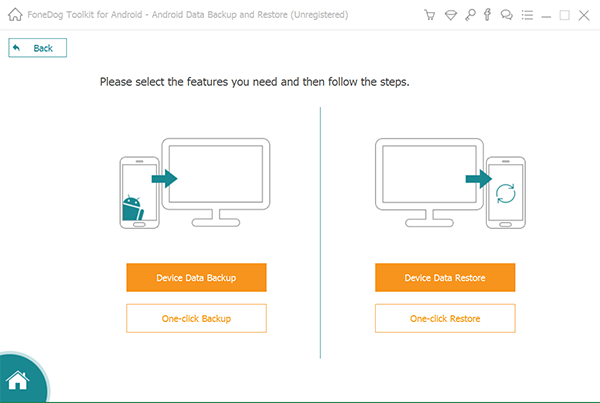
Once that the FoneDog Toolkit is up and running, go ahead and choose the “Android Data Backup and Restore” from the main interface of the program. And then, have your Android device connected to your PC using your USB cable.
Here, you have to make sure that you have enabled USB debugging on your Android device. And if in case that you have a device that is running on a 4.0 version, then you will be able to see a pop-up window on your phone that will ask you to allow USB debugging. From there, go ahead and tap on the “OK” button.
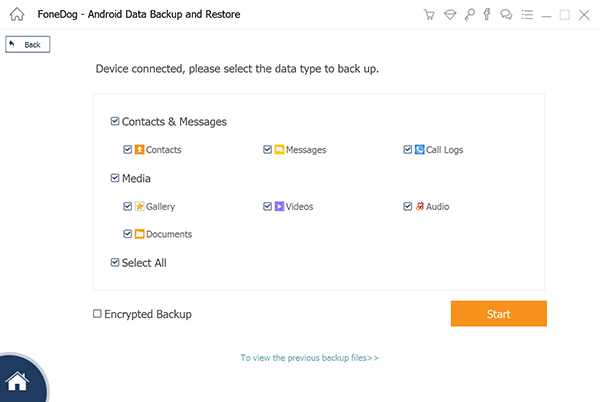
Once that the FoneDog Toolkit was able to detect your Andriod device, go ahead and choose “Device Data Backup" from your screen. Then you will be able to see a list of data folders that the FoneDog Toolkit can support to backup.
After that, from the list that is shown on your screen, go ahead and choose all the data that you would want to back up. You can do this by marking all the data files that are shown on your screen.
Once that you are done choosing all the data files that you wish to backup, go ahead and click on the “Start” button. The FoneDog Toolkit – Android Data Backup and Restore will then start to backup all the data that you have chosen. This may take some time depending on the file size of your data. Also, you have to make sure that you do not disconnect your Android device from your PC while the process is ongoing.
Then after that, once that the backup process is done, go ahead and simply click on the “OK” button. Then, you will be able to view all the data that you have chosen to backup from your Android device to your PC.
And if you would want to restore the backup file that you made, here is what you need to do.

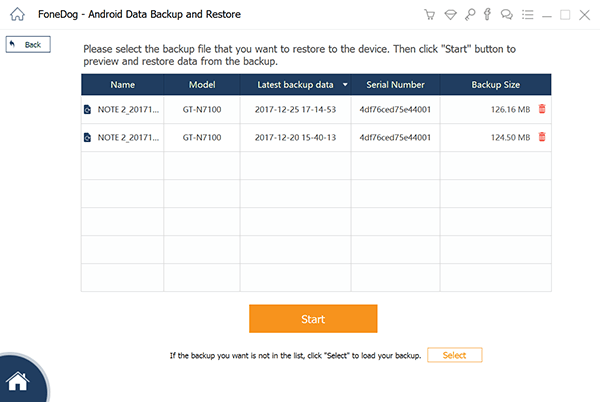
From the main interface, go ahead and choose “Device Data Restore” option. Then the FoneDog Toolkit – Android Data Backup and Restore will then show you a list of your backup files.
Then, go ahead and choose from the list on your screen. You can simply base it on the time and date of the backup file. Then once done, go ahead and click on the “Start” button.
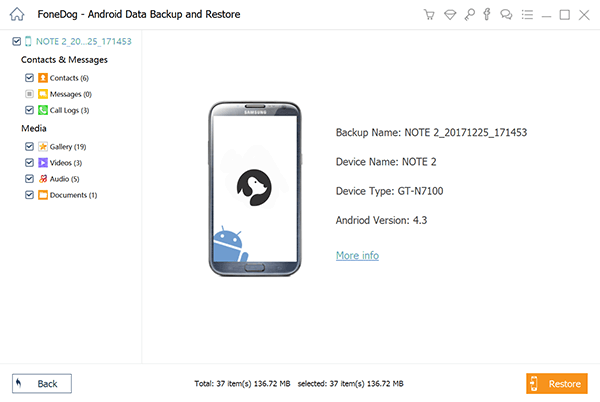
The program will then start to scan all the items that your backup file contains.
Once that the program is done with the scanning process, it will then show you all the data files that it contains. From there, go ahead and choose all the data that you would want to restore from your PC to your Android device.
Then go ahead and click on the “Restore” button to start the process and then confirm it by clicking on the “OK” button.
Then wait for a few minutes to finish the whole process. Make sure you do not disconnect your Android device from your PC.
As you can see, it is very easy to clear RAM of your Android device. All you need to have is the right knowledge on how you can do it and we have it here for you. Also, it is a must that you manage the data that you have on your Android device. And with this, you can use the FoneDog Toolkit – Android Data Backup and Restore and it definitely helps you the most convenient way.
Leave a Comment
Comment

Tech Website Writing /Content Optimization
Singing, smiling, surprising every day!
So as a technical writer, it is my duty to gather effective and reliable solutions to answer questions on how to deal with the issues they are having with their devices.
Android Toolkit
Recover deleted files from your Android phone and tablet.
Free Download Free DownloadHot Articles
 /
/
INTERESTINGDULL
/
SIMPLEDIFFICULT
Thank you! Here' re your choices:
Excellent
Rating: 4.7 / 5 (based on 90 ratings)
