FoneDog Screen Recorder
FoneDog Screen Recorder
Special Offer
Special Offer


By Adela D. Louie, Last updated: March 24, 2019
OneDrive is known to be one of the most reliable storage that we can use for our documents. However, there is an error code that OneDrive experience. This error code is the OneDrive error code 2. Once that you have encountered this error code, then that means that you are not able to access any details from your account. This includes accessing the files that you have stored in your OneDrive.
But do not worry, because, in this article, we are going to show you several ways on how you can possibly get rid of the OneDrive error code 2 that you are getting. And also, so that you will be able to access all of the files that you have on your OneDrive.
Part 1: Why Do You Get OneDrive Error Code 2?Part 2: How to Get Rid of OneDrive Error Code 2?Part 3: The Best Way to Backup and Restore Data – Without Having Any ErrorsPart 3: Conclusion
There are actually several reasons as to why you are getting the OneDrive error code 2. And just like any other OneDrive error that there is, this is a result of a problem on your syncing process once that you try to log in to your account.
Another reason is that the OneDrive error code 2 occurs when you are having some trouble with your authentication. So if in case that you are having trouble with the OneDrive error code 2 and that it only appears for a short period of time, then it can be a result of a temporary issue or a malfunction in your software.
There are actually a lot of ways on how you can get rid of the OneDrive error code 2 that you are experiencing. And because of that, we have gathered all the most common solution that you can once that this error appears. After doing all these solutions, then you will be able to access all the files that you have stored on your OneDrive.
This solution is actually the first thing that you should check for you to be able to fix the OneDrive error code 2. All you have to do is to restart the device that you are using when you are accessing your OneDrive. Then after that, go ahead and make sure that you are connected to a strong internet connection. However, if you do not have any internet connection, go ahead and try to access your OneDrive using another device and check if the problem still occurs.
Once that you have done the first solution that we have provided you and you are still getting the error code 2, then the next thing that you should do is to check the status of your Microsoft service.
Once that you have seen that there is an error happening in the system, then that means that the problem is just temporary and the problem does not only occur in your account.
So if there is a problem happening with OneDrive services, all you have to do is to wait until such time that the issue is fixed. That is the only time that you will be able to access your OneDrive account and as well as your files.
If you have seen that there are no occurring problems with OneDrive, then there is a possibility that the problem is with your account. So, the thing that you would be needed is to try to log in on your Microsoft account and see if there are any problems regarding your authentication.
And if in case that there is no problem with authentication, or if you were able to access any other Microsoft services, then you have nothing to worry about. This is because the issue that you are experiencing is just temporary.
If you try to access the Microsoft website, you can also fix some certain problems that you are having with OneDrive syncing. All you have to do is the following.
From there, you will be able to fix any issues regarding syncing your account.
If you were able to do all the solutions that we have mentioned above and you still could not fix OneDrive error 2, then the issue might be completely different. This time, you will be needing to contact the technical support team of Microsoft.
Once that you call them, they will be needing some information such as your server address, the error code that you are getting – which is the OneDrive error code 2, and other issues that you are having with your account.
You can contact their support team for them to assist you with your issues about OneDrive and thus they will be asking for the whole problem that you are encountering.
Now since that OneDrive is known to be one of the most used cloud storage that you can use for your files and documents using your Microsoft account, there is, on the other hand, another tool that you can use for you to backup and restore any data from your Android device to your computer. This is by using the FoneDog Toolkit – Android Data Backup and Restore.
Unlike using your OneDrive to backup your important data and getting some errors in using it, the FoneDog Toolkit – Android Data Backup and Restore will be able to back up your data from your Android device to your PC without occurring any errors. This means that you will be able to backup and restore any of your data or backup file without worrying about anything. The FoneDog Toolkit – Android Data Backup and Restore can let you backup all of your apps and as well as your app data.
And if you would want to restore them, you can do so using the same program. The great thing about restoring your data using the FoneDog Toolkit – Android Data Backup and Restore is that it will allow you to preview your data first before you completely restore them on your Android device. This way, you will be sure that you are having the right data that you need. The FoneDog Toolkit – Android Data Backup and Restore can also support more than 8,000 Android devices.
And you can also restore any of your backup files to any Android device that you have. Using this program will ease your feeling about errors that might occur because this tool will not give you any stress. For you to know how to use the FoneDog Toolkit – Android Data Backup and Restore, here is a simple guide for you that you can follow. *Backing Up Your Data Using FoneDog Toolkit*
First, you have to download the FoneDog Android toolkit from our official website. If this is the first time to get this program, then you have the option to download it for free and use it for 30-days. Once that you are done with the download, go ahead and simply install the program on your PC.
Once that you have successfully installed the program, go ahead and launch it for you to start with the process. This time, you have to make sure that there is no any other backup application running in your PC aside from the FoneDog Toolkit.
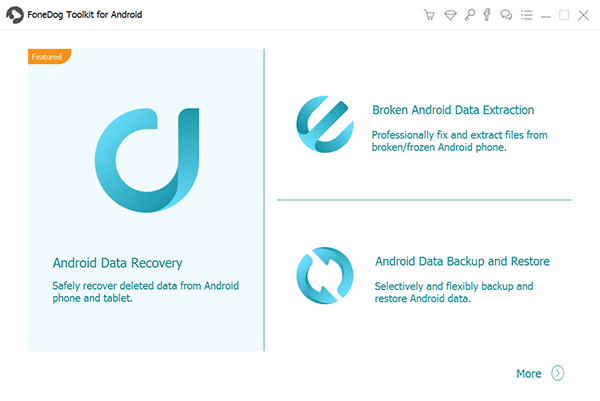
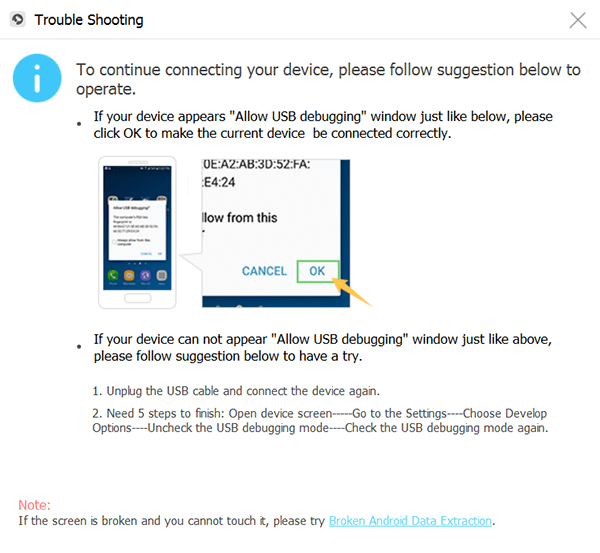
After that, go ahead and choose the “Android Data Backup and Restore” option that you see on the main interface of the program. And then have your Android device connected to your PC using your USB cable. Here, you have to make sure that you have to make sure that you have enabled USB debugging on your Android device. And if you are using an Android device that is running on an OS version 4.0, you will see a pop-up message on your screen asking permission to turn on USB debugging. From there, just go ahead and tap on “OK”.
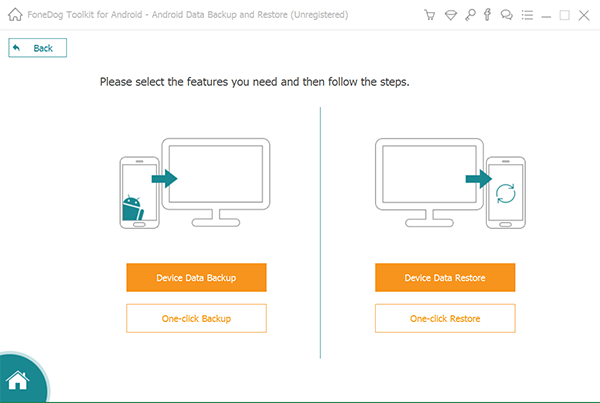
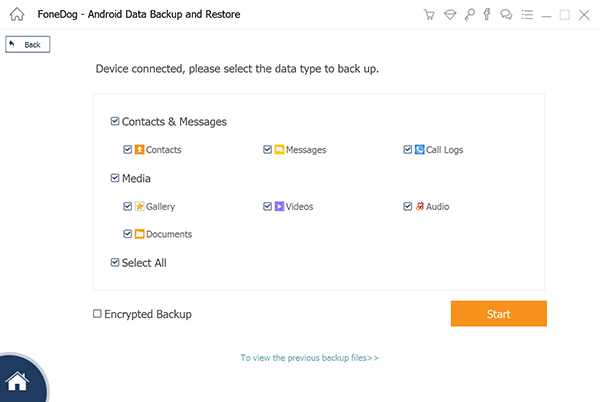
Once that the FoneDog Toolkit was able to fully detect your Android device, go ahead and choose “Device Data Backup” option on your screen. Then the program will then be able to show you all the files that it supports for back-ups such as Contacts, Messages, Videos, and more. And by default, the program will have all the files types have checked mark beside it.
In this step, all you have to do is to select all the data that you would want to backup from your Android device to your PC. And once that you are done choosing the data, go ahead and simply click on the “Start” button. After that, the FoneDog Toolkit – Android Data Backup and Restore will then start to backup all the files that you have chosen. From there, make sure that you do not disconnect your Android device or use it while the process is ongoing.
The backing up process may take some time depending on how large the files are that you are trying to work on. And once that the backup is complete, just go ahead and click on the “OK” button. After that, you will then be able to see all the data that you have backed up.

*Restoring Backup File To Any Android Device*
All you have to do is to launch the program on your PC. Then go ahead and choose “Android Data Backup and Restore. After that, go ahead and connect any Android device that you have wherein you would want to restore data on.
After that, the FoneDog Toolkit will then show you another page. On this page, go ahead and choose “Device Data Restore” for you to begin the process of restoring your backup file.
Then, the FoneDog Toolkit – Android Data Backup and Restore will then show you a list of backup file that you have made. From there, all you have to do is to choose your desired backup file that you want to restore. You can also base on the time and the date the backup file was made.
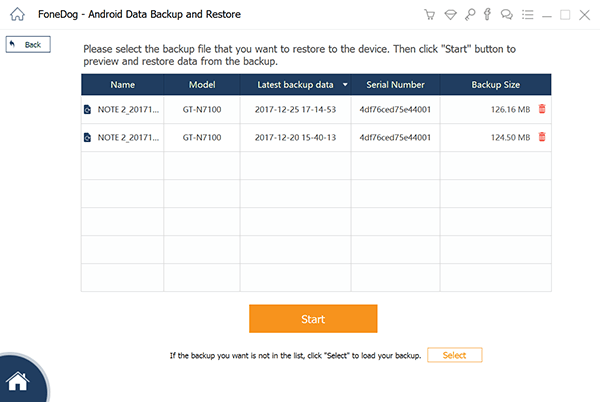
Once that you are done choosing the backup file that you want, go ahead and click on the “Start” button. The FoneDog Toolkit – Android Data Backup and Restore will then start to scan your backup file. This may take some time depending on the size of your backup file.
Once that the scanning process is complete, you will then be able to see all the file types that your backup file contains on the left side of your screen. From here, all you have to do is to choose all the file types that you wish to restore on your Android device.
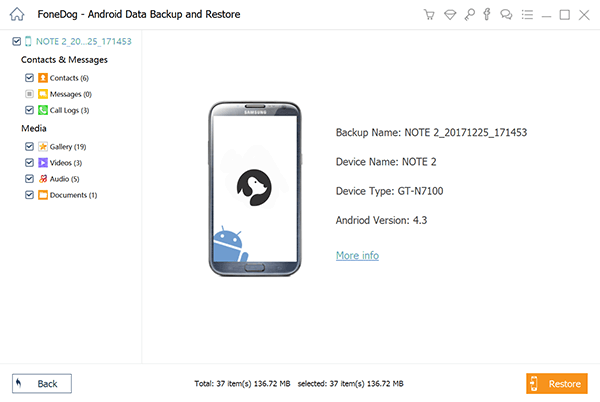
Once that you have chosen all the data type that you would want to restore on your Android device, go ahead and simply click on the “Restore” button to begin the actual process. Then confirm this action by clicking on the “OK” button. Again, you have to make sure that you do not disconnect nor use your Android device to prevent any interruptions. The FoneDog Toolkit – Android Data Backup and Restore will then be able to notify you once that the restoration process is complete.
People Also ReadTo Fix OneDrive Won't Sync On Windows 7/8/10Um zu beheben, dass OneDrive unter Windows 7 / 8 / 10 nicht synchronisiert wird
As you can see, dealing with the OneDrive error code 2 is very easy and simple to do. But, if you would want to avoid any interruptions on using a tool to backup and restore any of your data from your Android device, then we highly recommend you to use the FoneDog Toolkit – Android Data Backup and Restore. This way, you will not have any more problems in accessing your backup file or backing up your important data.
Leave a Comment
Comment

Tech Website Writing /Content Optimization
Singing, smiling, surprising every day!
So as a technical writer, it is my duty to gather effective and reliable solutions to answer questions on how to deal with the issues they are having with their devices.
Android Toolkit
Recover deleted files from your Android phone and tablet.
Free Download Free DownloadHot Articles
 /
/
INTERESTINGDULL
/
SIMPLEDIFFICULT
Thank you! Here' re your choices:
Excellent
Rating: 4.5 / 5 (based on 93 ratings)
