FoneDog Screen Recorder
FoneDog Screen Recorder
Special Offer
Special Offer


By Adela D. Louie, Last updated: March 24, 2019
Did you ever know that there is actually a secret menu that is hidden in your Android device’s Settings? This feature is what we called the “Developers Option”. This actually gives you additional access to some other useful tools on your Android device.
And as what the name implies, this tool is commonly used by developers. However, there are also other users who actually like using this feature. This is because it can actually help Android users to turn off any animations for them to speed up their Android devices and more.
However, since not all of the Android users know about this feature on this Android device and that they do not actually know how to use it, they would just want to turn off developer mode on their Android device. With that, we are going to show you on how you can actually disable this feature on your Android device.
Part 1: What Are The Benefits Of Using The Developer Option On Android DevicePart 2: Turning Off Developer Options on AndroidPart 3: Other Use Of Developer OptionPart 4: Conclusion
Before we actually proceed to the part where we are going to show you on how you can turn off the developer mode on your Android device, we have here some of the benefits that you can get by using this feature. Look into it and you might find something interesting that might change your mind.
When you actually try to switch from one application on your Android device, the animation of it plays by default. So, once that you are actually having a slow Android device, then these animations that you will slow down your device more. However, if you are using a faster Android device, then switching between screens will not be a problem. This is because you can actually have the animation turned off or you can also adjust the animation speed.
If you are actually using one of the high-end Android devices today and you are into high-end games that has a graphic extensive on it, then you can actually have the “Force 4x MSAA” setting from developer option can actually help when it comes to the improvement of the graphic of the game or on a certain application.
USB debugging may sound a bit weird but this is actually one of the most commonly used features under the Developer Option. This is because it actually allows your Android device to connect with an Android SDK or Software Developer Kit using your USB cable. Once that you have this, your Android device will be able to send and receive some files and data from your computer. Also, your computer will also be able to get some information such as log files from your Android device
If you are able to turn on USB debugging on your Android device and make use of ADB for you to make a complete backup, then you will be able to protect the backup file that you have made just by encrypting it with a password by using the “Desktop backup password” settings which are located under the developer option. However, you have to make sure that you remember your password because, without it, you will not be able to access the backup file that you made.
Getting your GPS location faked up can become useful for some reasons. One reason is that you may not want a certain app to know where you are exactly or if you would want to see some places without going there. If that is the case, then you can actually fake your GPS location by using the Mock location app under the Developer Option.
Normally, once that you charge your Android device, your screen would turn off. You can actually bypass this limit while your Android device is charging by using the screen saver function. This will be able to allow you to run one app.
The feature “stay awake” setting under the developer options will actually keep your Android device awake while you are charging. And because of that, you will be able to interact and view an application at the same time.
In case that you would want to know what is happening on your Android device, then you can go ahead and turn on the “Show CPU usage” setting under the Developer Option. The CPU usage will be able to show you an app that you are using and that you will be able to see this at the top of your screen.
Well, you might not want this to appear on your screen all the time. However, it will become handy at times and you can also avoid any installation of any third-party floating CPU apps for it to do the same thing.
Also, if in case that you would want to know your system load average, then you can go ahead and have a peek at the information on the processes running on your Android device. All you have to do is go to your Developer options and then choose “Running Services”. And then, you will be able to see a list of what are the services that are actually in use. And also, it will show you the apps that are taking up your RAM and how many processes and service those apps are actually taking.
So there you have it. Aside from the benefits that we have mentioned above, there are still several of them that would make your experience with your Android device more convenient and much better.
People Also ReadHow to Recover Deleted Photos from Gallery of an Android Phone.The Best Android Launchers for 2023
With all the benefits that we have mentioned earlier and you still would want to turn it off, then you can. You can do this and at the same time, you can still leave it available from the Settings of your Android device.
Or you can also have the option of making the Developer option on your not available in your Android device. This is by hiding it completely from your Android device. So here, we are going to show you both ways on how you can just merely turn it off, and how you can hide it from your Andriod device.
o Go ahead and launch the Settings app of your Android device.
o After that, go ahead and choose “Developer Options”.
o After that, go ahead and tap on the slider beside it for you to turn it off.

o Go ahead and launch the Settings of your Android device.
o And then, go ahead and choose “Apps”.
o After that, go ahead and scroll down and look for “Settings” from the list on your screen.
o Now, from the “Settings” app info, go ahead and tap on “Storage”.
o And then, tap on “Clear Data”.
o After that, you will receive a warning that the files, settings, accounts database, and more will be removed permanently. Do not worry because only the developer options settings will be set back to default and the other settings on your Android device will not be affected.
o Then after that, go ahead and tap on “Delete” from the dialogue box.
o Then you will be able to notice that the developer option is gone from the “Settings” of your Android device.
Aside from the benefits that we have mentioned above, there is another use of having the Developer option on your Android device turned on your device. And one of which is by doing and Android Data Recovery method. This is actually a method wherein you can recover all the data that was lost or accidentally deleted from your Android device.
And if you would want to recover any data that was lost or accidentally deleted from your Android device, we have the most recommended tool for you that you can use. This is by using the FoneDog Android Data Recovery Toolkit.
The FoneDog Android Data Recovery Tool will is known to be the most effective Android data recovery tool for you to get back those deleted messages, contacts, call history, photos, audios, videos, WhatsApp, and more data from your Android device. It also has an easy to use interface that anyone will be able to use it on their own.
Using the FoneDog Android Data Recovery Toolkit will also be able to preview all the files that you would want to recover from your Android device. It is also very safe to use because you will not lose any data from your Android device. And on your very first download of the FoneDog Android Toolkit, you will be able to experience all the best of the program for 30-days absolutely for free.
Now, for you to be able to know how to use the FoneDog Android Data Recovery Tool, here is a quick guide for you.
First is that you need to download the FoneDog Android Toolkit from our official website. And once that you have downloaded the program, go ahead and have it installed on your Mac or Windows PC.
Once that the installation process is complete, go ahead and launch the program on your PC. And then, from the main interface of the program, go ahead and choose “Android Data Recovery” option. And then have your Android device connected to your PC.

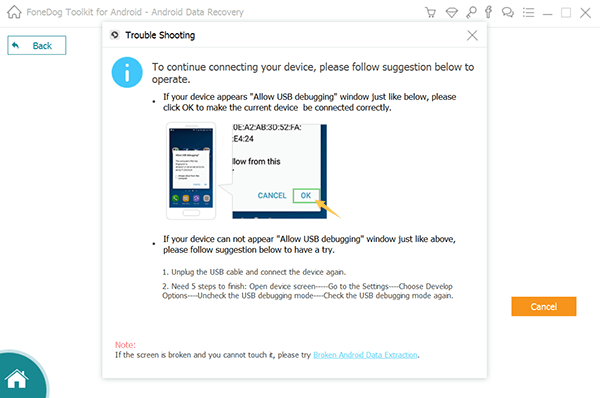
Here is the part wherein you will be needing the Developer option of your Android device. This is used for you to be able to enable USB debugging so that the program will be able to fully recognize your Android device. Here is how to turn on USB debugging.
For Android 2.3 or earlier version:
• Go ahead and launch “Settings” on your Android device.
• And then, tap on “Applications”.
• Then tap on “Development”
• And then choose USB debugging.
For Android device3.0 to 4.1:
• Go ahead and launch “Settings”.
• And then, tap on “Developer Options”.
• And lastly, tap on USB debugging.
For Android device 4.2 or newer:
• Go ahead and enter “Settings” on your Android device.
• And then, tap on “About Phone”.
• And then tap on “Build number several times until such time that you get a note that says “You are under developer mode”.
• Then go back to your “Settings”.
• Then tap on “Developer Options”.
• And lastly, tap on “USB Debugging”.
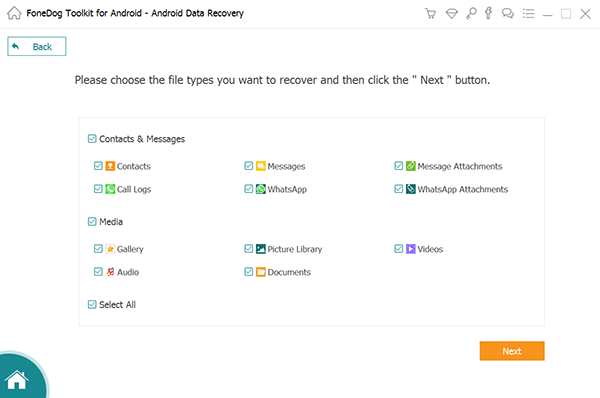
Once that the program was successfully detected by the FoneDog Android Data Recovery Tool, it will then show you all the files that it can support to recover.
You will be seeing that all files have a checked mark by default. But dot worry because you can still selectively choose which files that you want to recover. Once that you have chosen all the files that you want, go ahead and click on the “Next” button. After that, the scanning process will now take place.
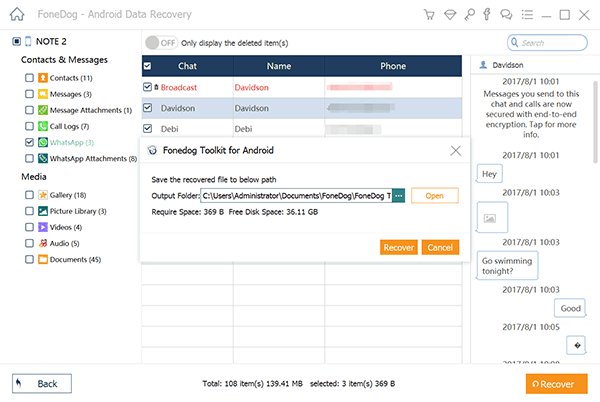
The scanning process may take some time depending on how large the files are you are trying to recover. Once that the scanning process is complete, you will be able to see all the items that the file contains.
From there, you will be able to preview all the items that each file contain. Go ahead and choose all the items that you would want to recover. And once that you are done choosing all the items that you want to take back, go ahead and click on the “Recover” button. And all the items that were recovered will all be saved on your PC.
So, there you have it. Now you know more about the Developer options on your Android device and how you can turn it off. Simple and easy, right? Also, you can use the Developer option in recovering all the lost data from your Android device. And to do this, go for FoneDog Android Toolkit – Android Data Recovery program.
Leave a Comment
Comment

Tech Website Writing /Content Optimization
Singing, smiling, surprising every day!
So as a technical writer, it is my duty to gather effective and reliable solutions to answer questions on how to deal with the issues they are having with their devices.
Android Toolkit
Recover deleted files from your Android phone and tablet.
Free Download Free DownloadHot Articles
 /
/
INTERESTINGDULL
/
SIMPLEDIFFICULT
Thank you! Here' re your choices:
Excellent
Rating: 4.7 / 5 (based on 105 ratings)
