FoneDog Screen Recorder
FoneDog Screen Recorder
Special Offer
Special Offer


By Gina Barrow, Last updated: January 24, 2018
“Do you want to know how you can un-brick Android devices? This article is for you. Find out how you can fix bricked Android devices in no time!”
Android being an open-source operating system allows expert and newbie developers to play around the ROM and customize it. However, a single wrong tweak may result in bricking the Android device; bricking means totally wrecking the phone and leaves it useless. There is a great increase in the number of users who are experiencing bricked devices, especially in Android.
Part1. What are The Types of Bricking?Part2. How to Fix Bricked Android DevicesPart3. Recover Data from Bricked Android DevicesPart4. How to Use FoneDog Toolkit- Broken Android Data ExtractionVideo Guide: How to Fix Bricked Android DevicePart5. Summary
There are two types of Android bricking: Soft and Hard brick. A soft brick happens when the phone is stuck on a boot loop that is caused by a software error. This can be fixed by flashing the ROM in recovery mode. A Hard brick doesn’t turn on the phone at all which can only be repaired by going to a technician, service center, or you can repair it if you are familiar with the troubleshooting, however, in most cases, the phone may be totally dead and you are unable to recover data from it. It can be caused by any of the following:
So before performing any kinds of customization on your Android device make sure that you are familiar with the consequences and the possible work-around if things go wrong.
How to Fix Bricked Android Device
In order to fix bricked Android devices, first, you must be familiar with the root cause of bricking your device. Once you have understood and have diagnosed the issue, find ways to troubleshoot it sooner. Here are some ways to do when your Android gets bricked:
Although rooting the Android device voids the warranty, you can ask for their repair service so their technicians can repair the bricked Android safely for you.
If you have installed a new ROM, then wait for a while about 10 minutes. If it doesn’t do anything, remove the battery out and reset the phone by holding down the Power button for about 10 seconds.
Enter Recovery mode then go to “Advanced”, tap “Wipe Dalvik Cache”. Return to the main screen and then tap “Wipe Cache Partition” and then tap “Wipe Data/Factory Reset”.
In order to fix bricked Android devices first, consider recovering all the phone contents before anything gets worse. Use FoneDog Toolkit- Broken Android Data Extraction, the only program with full solution to any recoverable files from broken or bricked devices. FoneDog Toolkit- Broken Android Data Extraction allows you to recover:
FoneDog Toolkit- Broken Android Data Extraction has the following abilities:
FoneDog Toolkit- Broken Android Data Extraction is simple and user-friendly software that can be used by beginners or non-technical people in case they want to extract their personal information from broken devices. To begin data recovery with FoneDog Toolkit- Broken Android Data Extraction, download and install the software on your computer and refer to the guides below:
Launch the program FoneDog Toolkit- Broken Android Data Extraction and then go to the main menu and click on Broken Android Data Extraction. Afterwards, connect the Android device to the computer using a USB cable and wait for the program to detect the software.
Launch Fonedog Toolkit--Step1
On the screen, you will see the different issues experienced by the bricked Android, choose from the options the correct and exact issue you are experiencing. The most common issues are: ‘Touch doesn’t work/Cannot access the phone’ and ‘Black/Blank Screen’.
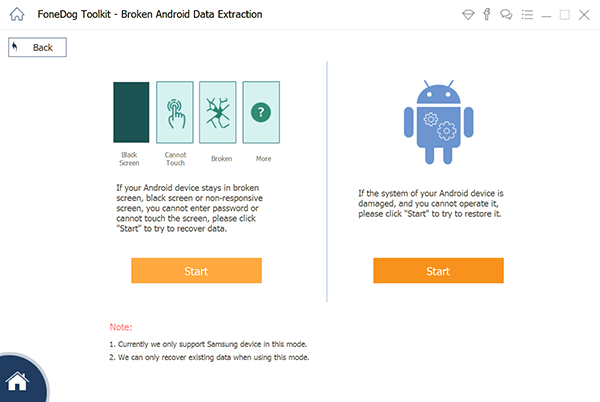
Choose the Matching Issue Displayed--Step2
FoneDog Toolkit- Broken Android Data Extraction will ask you to enter the correct make and model of the Android device in order to download and install the software version compatible with the current device.
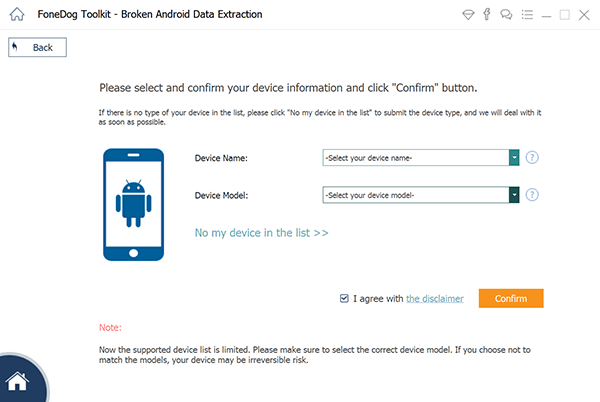
Enter Device Information--Step3
The next thing to do is to enter into Download Mode. This is a state in wherein it will be used for flashing the ROM or software update. To do this on the Android phone, refer below:
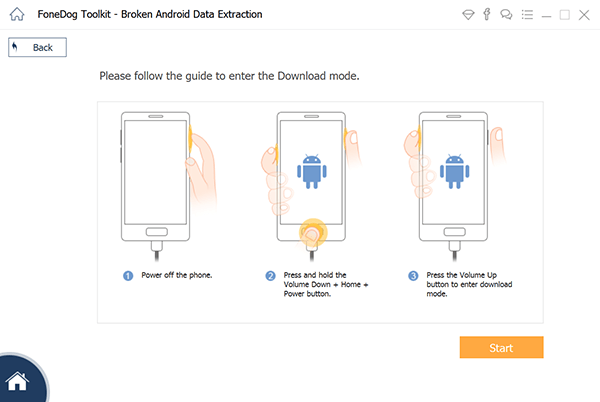
Enter Download Model--Step4
After the download mode was set on the Android phone, FoneDog Toolkit- Broken Android Data Extraction will now begin to download the recovery package. First, it will analyze the phone situation and then download the corresponding recovery package. This may take a few seconds to complete.
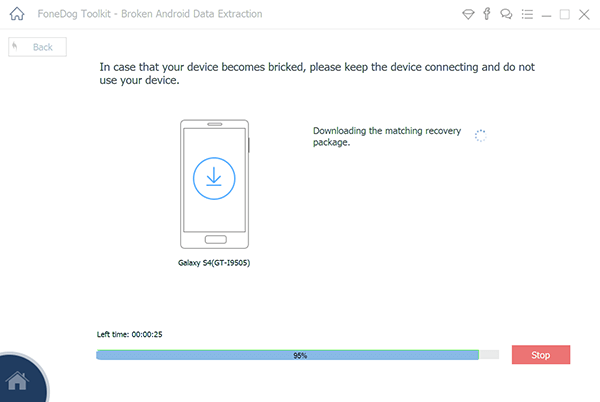
Download Recovery Package--Step5
FoneDog Toolkit- Broken Android Data Extraction will now scan, extract and recover all the phone contents inside the internal memory of the Android device. This process may take a few minutes. Once done, all the existing phone contents will be displayed according to its category on the left panel such as Contacts, messages, Call Logs, gallery, audio, and more, while you can preview the items on the right screen size. Find those important contents or the ones you only need and then mark them one by one and then click the “Recover” button at the end of the screen.
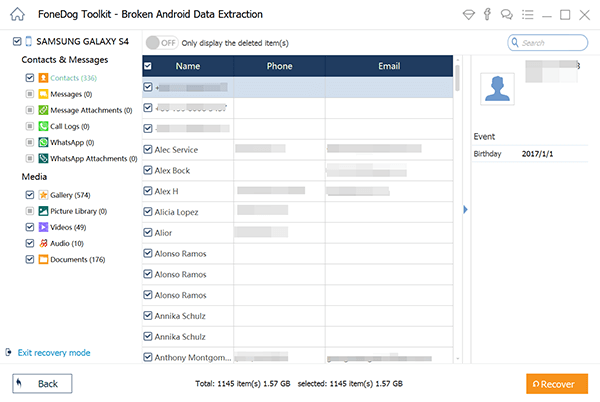
Preview and Recover Data from Bricked Android Device--Step6
You have just learned how to fix bricked Android devices and recover important data by only using FoneDog Toolkit- Broken Android Data Extraction. If you are planning to customize your Android phone by installing other apps or software version then always think of the possible
Leave a Comment
Comment

Technical/Creative Writer
Kitchen, my safe space; black, my favorite color
Was a Technical Specialist for a while, troubleshooting Smartphone and Software-related issues until a writing stint caught my attention.
Broken Android Data Extraction
Extract data from broken Android phone and fix brick phone.
Free DownloadHot Articles
 /
/
INTERESTINGDULL
/
SIMPLEDIFFICULT
Thank you! Here' re your choices:
Excellent
Rating: 4.5 / 5 (based on 98 ratings)
