FoneDog Screen Recorder
FoneDog Screen Recorder
Special Offer
Special Offer


By Vernon Roderick, Last updated: June 16, 2021
Macintosh computer systems have a built-in feature called Time Machine that creates automatic backups of a user’s data files and the Mac system itself. In cases of accidental deletion or corruption of your hard drive or system, it would be easier and more convenient to do data restoration with the created backups.
Problems however may occur wherein you will not be able to delete the backups from Trash or these are getting stuck in Time Machine. This article will show how to delete Time Machine backups from Trash in your Mac device.
In case that you have deleted some files that do not have to be deleted, you can use a reliable data recovery tool which is introduced below with step-by-step instructions. By the way, here is an article on how to forcefully empty the mac trash and how to cancel it if you accidentally emptied it? If you happen to have this doubt, then these two articles are definitely for you
Part 1. The Best Softwware to Recover FilesPart 2. What is Time Machine BackupPart 3. Steps on How to Delete Time Machine Backups from TrashPart 4. In Summary
An amazing data recovery tool that makes data recovery possible, FoneDog Data Recovery is a trusted and professional program that allows recovery of deleted and missing data from any device. An easy and convenient to use toolkit that allows you to launch, scan, and restore. Scan and preview your files before performing the data recovery to make sure that the expected files are restored. Your data will be safe and secured with this reliable data recovery utility.
FoneDog Data Recovery offers a free trial version of the tool. You can purchase it with a 30-day money-back guarantee. This tool supports both Windows and Mac operating systems which you can do recovery from any sort of data and from any form of device.
No matter what kind of situation you encounter with your data and device, you can perform restoration of your files with this FoneDog Data Recovery such as recovery for crashed Mac and Windows, file, hard drive, memory card, partition, and many more. The step-by-step instructions are provided below on the usage of the tool.
Data Recovery
Recover deleted image, document, audio and more files.
Get deleted data back from computer (including Recycle Bin) and hard drives.
Recover loss data caused by disk accident, operation system crushes and other reasons.
Free Download
Free Download

Access the newly installed program by double-clicking its shortcut icon located on the desktop or clicking its pinned icon on your taskbar (if a shortcut is created or pinned to the taskbar). Also, you can access it from the Start menu then find FoneDog Data Recovery from the Programs list.
Go to the home screen of FoneDog Data Recovery and select all the file types to be recovered and the disk drives (hard disk or removable) where you want to obtain the files. Then, choose the drive in the Removable Drives or Hard Disk Drives. Establish a stable connection between the computer and your other devices when you begin the scan and recovery.
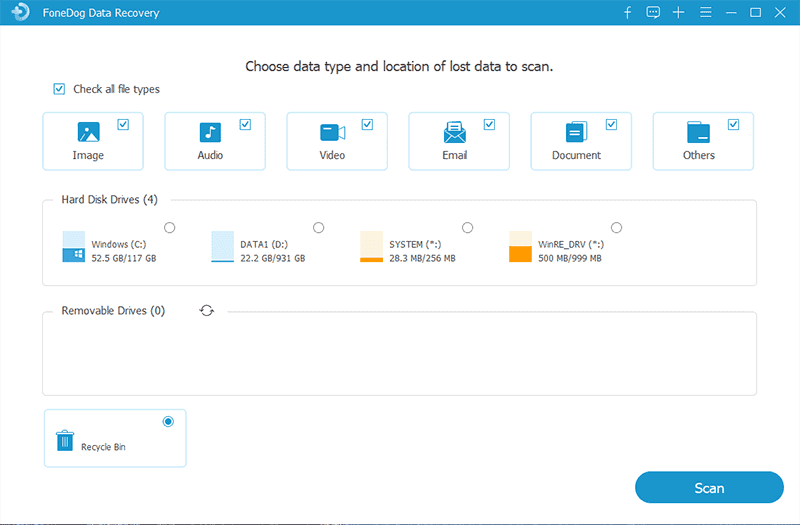
Scan your device either in a Quick Scan or Deep Scan method. The quick scan will perform in a fast manner while the deep scan will take a longer time to scan and will return more data results. Click the Scan button located on the bottom right of the screen to proceed. When the scan is done, the file results are returned. You can choose to preview the files before doing the data recovery.
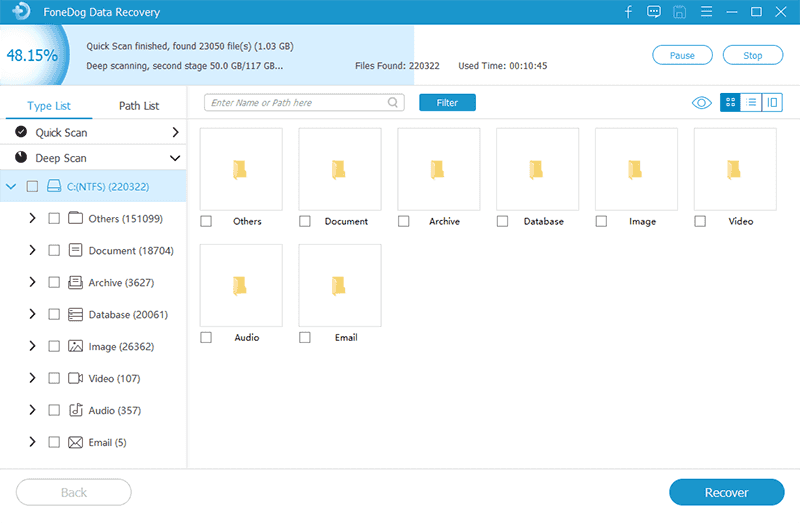
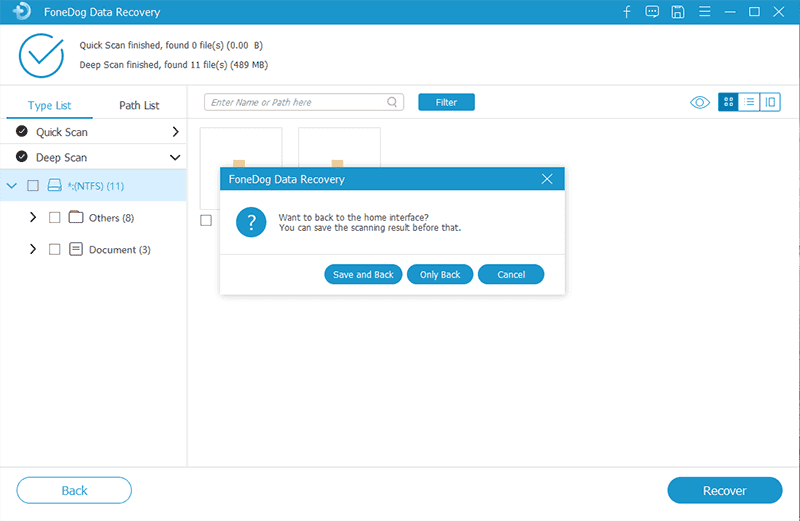
Select all files that you want to restore. The contents are shown by type or by the path. Type in the file name or file path on the search box to filter the search results. Then, click Recover located on the bottom right corner of the tool. This will start the restoration of files. Choose the disk or drive location where the recovered files will be saved.
Time Machine is a built-in feature in Mac OS that creates automatic backups of your device once every hour which includes system files, documents, applications, and all other files stored in your Mac computer. By default, this is protected through SIP or the System Integrity Protection security protocol which helps safeguard your data from harm and from malicious software threats.
Time Machine backups help you in restoring your data in cases of deleted, missing, or corrupted files or system failure. The backups are kept for the past 24 hours. Time Machine keeps daily and weekly backups depending on the free space on your hard drive. When the backup drive becomes full, the oldest backups are deleted from Time Machine and moved to Trash.
When the Time Machine backups are stored in Trash, it will also take up a good amount of space on your hard drive, hence a need to delete these backups that are no longer used. There are issues that some users encounter when they delete Time Machine backups from Trash. Some say that they cannot delete the files and an error occurs or the backup files are stuck in the Trash. The solutions discussed in detail below will help on how to delete Time Machine backups from Trash.
Deleting Time Machine backups from the Trash will save you space because even if the files are in the Trash, still it would take up a huge amount of space in your hard drive. Regularly empty your Trash to save on space. But some files cannot be deleted in Trash. To answer your question on how to delete Time Machine backups from Trash in Mac, follow the step-by-step instructions below.
First, turn off SIP or System Integrity Protection. If you move the backup to the Trash, a warning message will display that “Some items in the Trash cannot be deleted because of System Integrity Protection.” It is Mac’s security protocol that locks the important files so that no malicious program can do harm to the data and the device preventing deletion of your important system files.
Step 01: Make sure that your Mac device is shut down.
Step 02: Turn on the Mac device until you hear a sound and see a logo, press and hold the Command + R keys to boot the system into Recovery mode.
Step 03: Once the Recovery menu is displayed, just ignore it. On the menu bar located at the top of the screen, click on Utilities and then select Terminal.
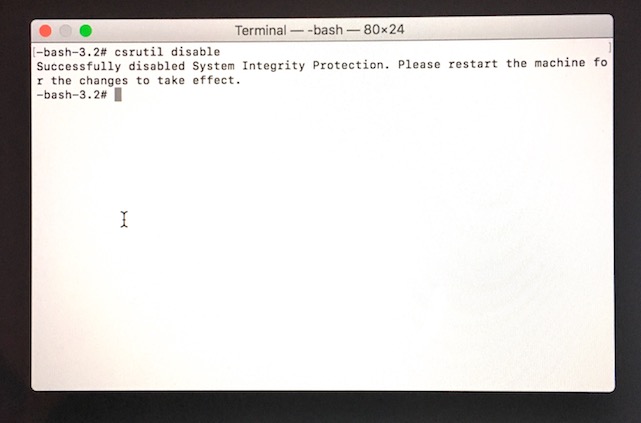
Step 04: Type in csrutil status to verify the status of SIP and hit Enter.
Step 05: To disable it, type in csrutil disable; reboot into the Terminal and hit Enter.
Step 06: Your Mac device will restart automatically.
Step 01: After SIP is turned off and your Mac device has rebooted normally, drag your old Time Machine backups to the Trash.
Step 02: Delete the Time Machine backups in Trash and empty the Trash.
Step 03: The time to complete the deletion will depend on the size of the Time Machine backup. As such, do not use yet your Mac device as SIP is turned off which makes your system unprotected but wait for the backup deletion to be completed. The next step is to turn on SIP.
Step 01: Make sure that your Mac device is shut down.
Step 02: Turn on the Mac device until you hear a sound and see a logo, press and hold the Command + R keys to boot the system into Recovery mode.
Step 03: Once the Recovery menu is displayed, just ignore it. On the menu bar located at the top of the screen, click on Utilities and then select Terminal.
Step 04: Type in csrutil status to verify the status of SIP and hit Enter.
Step 05: To enable it, type in csrutil enable; reboot into the Terminal and hit Enter.
Step 06: Your Mac device will restart automatically.
People Also Read3 Different Ways to Use Undo DeleteHow to Recover Deleted Files from SD Card
Data backups are an integral feature in a system because it helps users easily restores their data when bad situations happen such as accidental deletion or system failures. These backups also take up a huge amount of space in your device when not deleted or get stuck and cannot be deleted. Mac has a Time Machine feature that creates such regular automatic backups. The article discusses how to delete Time Machine backups from Trash.
In case you need help in restoring deleted or missing data that should not have been deleted, you can utilize a highly recommended data recovery program such as FoneDog Data Recovery which allows retrieval and restoration of all files of any type and from any device.
Leave a Comment
Comment

Technical Expertise for PC/Website Optimization
One of my passion is to develop software of my own
I write articles to share knowledge about IT technology and some experience in developing my own software, and developing my own software is one of my passions for work.
Data Recovery
FoneDog Data Recovery recovers the deleted photos, videos, audios, emails, and more from your Windows, Mac, hard drive, memory card, flash drive, etc.
Free Download Free DownloadHot Articles
 /
/
INTERESTINGDULL
/
SIMPLEDIFFICULT
Thank you! Here' re your choices:
Excellent
Rating: 4.6 / 5 (based on 89 ratings)
