FoneDog Screen Recorder
FoneDog Screen Recorder
Special Offer
Special Offer


By Nathan E. Malpass, Last updated: November 14, 2023
We've all been there - you're in the zone, crafting a brilliant PowerPoint presentation that's set to impress, and suddenly, disaster strikes. Whether it's due to an unexpected power outage, a system crash, or simply forgetting to save your progress, the sinking feeling of losing hours of work on an unsaved PowerPoint file is all too familiar.
But fear not! In this article, we'll guide you through the process on how to recover PowerPoint file not saved, so you can breathe a sigh of relief and salvage your hard work. With the right tools and techniques at your disposal, you'll never have to fret over lost presentations again. Let's dive in and explore the art of recovering Microsoft Project files.
Part #1: How to Recover PowerPoint File Not SavedPart #2: The Best Tool on How to Recover PowerPoint File Not Saved: FoneDog Data RecoverySummary
Losing a PowerPoint presentation due to an unexpected event or forgetting to save your work can be incredibly frustrating. Fortunately, Microsoft PowerPoint offers a built-in feature called AutoRecover that can help you recover unsaved files. In this section, we'll walk you through the steps to use this feature effectively and retrieve your valuable work.
Step #1: Launch Microsoft PowerPoint
First, open Microsoft PowerPoint, which you may have already done if you're reading this in an attempt to recover a file.
Step #2: Navigate to the File Menu
Click on the "File" tab located in the top-left corner of the PowerPoint window. This action will take you to the "File" menu.
Step #3: Access the Info Tab
In the "File" menu, click on the "Info" tab on the left-hand side. Here, you'll find information about your currently open presentation.
Step #4: Locate the Manage Versions Option
Within the "Info" tab, look for the "Manage Versions" option. This is where PowerPoint keeps track of your unsaved files.
Step #5: Select "Recover Unsaved Presentations"
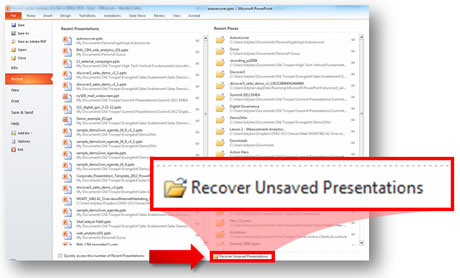
Click on "Manage Versions," and a dropdown menu will appear. From this menu, choose "Recover Unsaved Presentations".
Step #6: Find and Select Your Unsaved File
A dialog box will appear, displaying a list of unsaved presentations. These files are typically named something like "Presentation1" or "Autorecovery save of Presentation". Locate the file you wish to recover, select it, and click "Open".
Step #7: Save Your Recovered File
Once you've opened the unsaved file, make sure to save it immediately to avoid losing your work in the future. Click "File" > "Save As", choose a location on your computer to save the file, and give it a meaningful name.
Congratulations! You've successfully recovered an unsaved PowerPoint file using the AutoRecover feature in Microsoft PowerPoint. This method can be a lifesaver when you find yourself in a precarious situation with your presentations. However, if you can't locate your file through this method or if AutoRecover didn't capture your work, don't worry; we have more methods to explore in the next sections.
When the AutoRecover feature doesn't save the day, there's another potential lifeline for recovering your unsaved PowerPoint files: the temporary folder. Microsoft Office applications often store temporary copies of your files, and with a little detective work, you can sometimes find your lost presentation. Here's how to recover PowerPoint file not saved using the temp folder:
Step #1: Close PowerPoint
If you haven't already, close Microsoft PowerPoint to prevent any further changes or overwriting of temporary files.
Step #2: Open the Run Dialog
Press the Windows Key + R on your keyboard simultaneously to open the Run dialog.
Step #3: Access the Temp Folder
Type %temp% into the Run dialog and press Enter. This command will take you to the Windows temporary folder.
Step #4: Search for PowerPoint Temporary Files
In the Temp folder, look for files that have a naming pattern similar to "pptXXXX.tmp" or "pptXXXX.pptx," where "XXXX" represents a random string of characters. These files are often temporary copies created by PowerPoint.
Step #5: Sort by Date Modified
To make your search easier, sort the files by "Date Modified" to locate the most recently modified files. This can help you identify the file associated with your unsaved presentation.
Step #6: Copy and Rename the File
Once you've identified a potential PowerPoint temporary file, right-click on it, copy it, and paste it into a different folder, such as your desktop.
Step #7: Change the File Extension
Change the file extension of the copied file from ".tmp" to ".pptx" (e.g., from "pptXXXX.tmp" to "presentation-recovered.pptx"). This step is crucial as it tells your computer to treat the file as a PowerPoint presentation.
Step #8: Open the Recovered File
Now, double-click the renamed file to open it with Microsoft PowerPoint. With any luck, you'll find your lost presentation intact.
Step #9: Save the Recovered Presentation
Once you've opened the recovered file, make sure to save it immediately with a meaningful name and in a location of your choice.
Using the Temp folder to recover unsaved PowerPoint files can be a hit-or-miss method, but it's certainly worth a try when other options have failed. Remember to periodically save your work and consider using cloud-based storage solutions to reduce the risk of data loss in the future.
If you're using Windows as your operating system, you have access to a powerful feature called File History, which can help you recover unsaved PowerPoint files as long as you've been using it to back up your files. Here's how to use Windows File History for PowerPoint file recovery:
Step #1: Open File Explorer
Launch File Explorer on your Windows computer. You can do this by pressing the Windows Key + E or by searching for "File Explorer" in the Start menu.
Step #2: Navigate to the Folder Where Your PowerPoint File Was Saved
Go to the folder where you originally saved your PowerPoint file. This is important because File History backs up files in specific folders.
Step #3: Click on the "History" Button
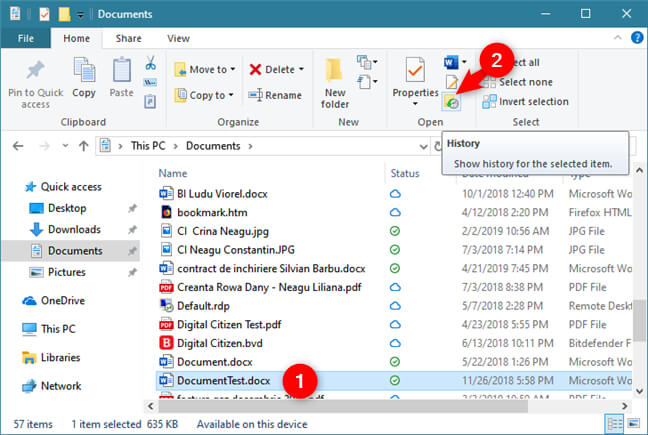
With the folder open, you should see a "History" button in the File Explorer toolbar at the top. Click on it to access File History.
Step #4: Browse Previous Versions
In the File History interface, you'll see a timeline on the bottom, allowing you to scroll back in time. Find the date and time when you last worked on your PowerPoint presentation and want to recover. File History will show you the versions of files that were backed up at that time.
Step #5: Locate and Restore Your PowerPoint File
Scroll through the versions until you find the one that corresponds to your unsaved PowerPoint file. Once you've identified it, select the file, right-click, and choose "Restore" to bring it back to its original location.
Step #6: Confirm and Save
File History will confirm that you want to replace the existing file with the restored version. Click "Replace the file in the destination" to proceed.
Step #7: Open the Recovered PowerPoint File
Now that you've restored the unsaved PowerPoint file, navigate to its original location and open it using Microsoft PowerPoint.
Step #8: Save the Recovered Presentation
Once you've successfully opened the recovered file, make sure to save it immediately with a meaningful name and in a location of your choice.
Windows File History is a valuable tool for recovering unsaved or lost files, as long as it has been enabled and configured to back up the folder where your PowerPoint files are stored. This method is not only useful for PowerPoint but can be applied to recover various types of files.
If you're a Mac user, you have access to a powerful backup and recovery tool called Time Machine. Time Machine can help you recover unsaved or lost PowerPoint files unless you delete your Time Machine backups from Trash. Here's how to recover PowerPoint file not saved using Time Machine:
Step #1: Connect Your Time Machine Backup Drive
Ensure that your Time Machine backup drive is connected to your Mac. Time Machine backs up your files to an external drive, so this drive must be accessible.
Step #2: Open Finder
Open a Finder window on your Mac.
Step #3: Navigate to the Folder Where Your PowerPoint File Was Saved
Go to the folder where you originally saved your PowerPoint file. Time Machine will allow you to recover files from specific folders.
Step #4: Activate Time Machine
With the folder open, click on the Time Machine icon in the macOS menu bar at the top right of your screen. Alternatively, you can access Time Machine through System Preferences > Time Machine and then click "Enter Time Machine".
Step #5: Browse Previous Versions
Time Machine will launch, displaying a timeline on the right side of your screen. You can scroll through this timeline to find the date and time when you last worked on your PowerPoint presentation and want to recover.
Step #6: Locate and Restore Your PowerPoint File
Navigate through the timeline to find the version of your unsaved PowerPoint file. Once you've identified it, select the file and click the "Restore" button to bring it back to its original location.
Step #7: Confirm and Replace
Time Machine will ask if you want to replace the existing file with the restored version. Confirm that you want to do so.
Step #8: Open the Recovered PowerPoint File
Now that you've restored the unsaved PowerPoint file, navigate to its original location and open it using Microsoft PowerPoint.
Step #9: Save the Recovered Presentation
Once you've successfully opened the recovered file, make sure to save it immediately with a meaningful name and in a location of your choice.

Time Machine is an excellent tool for recovering unsaved or lost files on macOS, as long as it has been set up and configured to back up the folder where your PowerPoint files are stored. This method can be applied to recover various types of files and is a lifesaver for Mac users who want to protect their work from accidental loss.
While built-in features like AutoRecover, Windows File History, and Mac Time Machine can help you recover unsaved PowerPoint files, they may not always cover every scenario. In situations where these methods fall short, a specialized data recovery tool like FoneDog Data Recovery can be a powerful ally.
Data Recovery
Recover deleted image, document, audio and more files.
Get deleted data back from computer (including Recycle Bin) and hard drives.
Recover loss data caused by disk accident, operation system crushes and other reasons.
Free Download
Free Download

FoneDog Data Recovery is a user-friendly, cross-platform tool that specializes in retrieving lost and deleted files, including unsaved PowerPoint presentations. In this section, we'll provide an overview of FoneDog Data Recovery and walk you through the steps on how to recover PowerPoint file not saved effectively.
Begin by downloading and installing FoneDog Data Recovery on your computer. The tool is available for both Windows and macOS, making it versatile for various users.
After installation, launch FoneDog Data Recovery from your desktop or applications folder.
If your unsaved PowerPoint file was stored on an external storage device (e.g., USB drive or external hard drive), connect it to your computer. FoneDog Data Recovery can recover files from a wide range of storage devices.
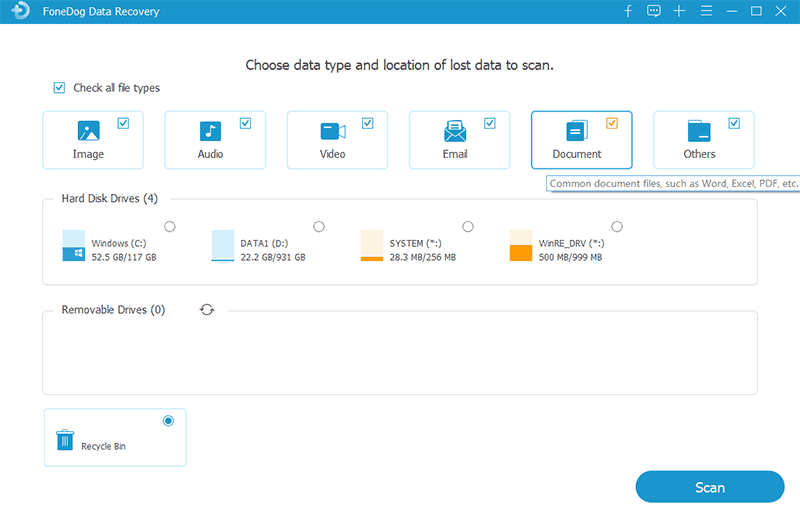
In the FoneDog Data Recovery interface, select the types of files you want to recover. In this case, you'll want to choose "Documents". Then, specify the location where the unsaved PowerPoint file was originally stored or choose "I can't find my partition" if it was on your computer's internal drive.
Click the "Scan" button to initiate a thorough scan of the selected location. FoneDog Data Recovery will search for lost and deleted files, including your unsaved PowerPoint presentation.
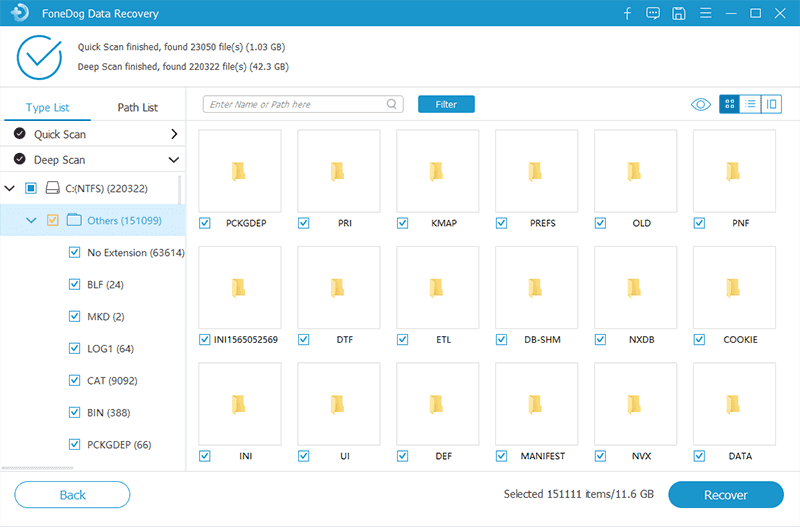
Once the scan is complete, FoneDog Data Recovery will display a list of recoverable files. You can preview these files to ensure you're selecting the correct PowerPoint presentation.
After confirming that you've found your unsaved PowerPoint file, select it, and click the "Recover" button. Choose a destination folder on your computer where you want to save the recovered file.
Navigate to the destination folder you selected in the previous step and open the recovered PowerPoint file using Microsoft PowerPoint. Be sure to save it with a meaningful name to prevent future data loss.
FoneDog Data Recovery provides a reliable and efficient solution for recovering unsaved PowerPoint files and other types of data. Its user-friendly interface and cross-platform compatibility make it a valuable tool for anyone seeking to retrieve lost or deleted files in various scenarios.
People Also ReadThe Best Guide on How to Recover Deleted Excel FilesHow to Find Temp Excel Files with Ease in 2023
In this comprehensive guide, we explored multiple methods on how to recover PowerPoint file not saved, ensuring that your hard work is never lost to unforeseen circumstances. We covered a range of techniques, from utilizing built-in features to employing specialized tools.
In conclusion, losing an unsaved PowerPoint presentation can be a stressful experience, but with the methods and tools outlined in this guide, you have a variety of options to rescue your work. Remember to save your work frequently to minimize the risk of data loss, and consider implementing regular backup practices to safeguard your important files. Whether you're using built-in features or specialized tools, the power to recover your unsaved PowerPoint files is at your fingertips.
Leave a Comment
Comment

iPhone/Android Devices’ Maintenance Expert
Staying home, listening to music, writing tech articles
Many people asked me to repair their mobile phones so I have a lot of experience in mobile phone repair, and I know a lot about Android or Apple phones.
Data Recovery
FoneDog Data Recovery recovers the deleted photos, videos, audios, emails, and more from your Windows, Mac, hard drive, memory card, flash drive, etc.
Free Download Free DownloadHot Articles
 /
/
INTERESTINGDULL
/
SIMPLEDIFFICULT
Thank you! Here' re your choices:
Excellent
Rating: 4.8 / 5 (based on 81 ratings)
