FoneDog Screen Recorder
FoneDog Screen Recorder
Special Offer
Special Offer


By Nathan E. Malpass, Last updated: October 24, 2023
As with any digital endeavor, unforeseen challenges can arise, leaving you in a dilemma when a crucial project file becomes corrupted or inaccessible. This is where the importance of knowing how to recover a Microsoft Project file becomes evident.
Losing access to a vital project file can spell disaster for your timelines, resource allocation, and overall project success. Fortunately, in this article, we will delve into the art of how to recover Microsoft Project file, equipping you with the knowledge and tools needed to retrieve your data when disaster strikes. Whether your file was lost due to a system crash, accidental deletion, or any other unexpected event, we've got you covered.
Join us on this journey to demystify the process of fixing these corrupted data. By the end of this guide, you'll be well-prepared to navigate the challenging terrain of file recovery and safeguard your projects from potential setbacks. Let's begin by understanding the common reasons for file loss and how to prevent them in the first place.
Part #1: How to Recover Microsoft Project FilePart #2: Best Tool on How to Recover Microsoft Project File: FoneDog Data RecoverySummary
One of the simplest methods to recover a deleted Microsoft Project file is to check the Recycle Bin. This method is effective if you or someone else accidentally deleted the file and it hasn't been permanently removed from your computer.
Step #1: Open the Recycle Bin
To open the Recycle Bin, simply double-click its icon on your desktop or search for "Recycle Bin" in the Windows search bar.
Step #2: Search for the Deleted Project File
Inside the Recycle Bin, you'll see a list of deleted files. You can sort these files by name, date deleted, or other criteria to make it easier to locate your Microsoft Project file.
Step #3: Restore the Project File
Once you've found the deleted Project file, right-click on it. From the context menu, select "Restore". This action will return the file to its original location on your computer.
Step #4: Verify the File Recovery
Navigate to the original location where the Project file was stored to ensure it has been successfully restored. If you're using Microsoft Project, open the software and check if your project file is accessible.

Checking the Recycle Bin is a straightforward and quick method for recovering a deleted Microsoft Project file. However, if you can't find your file there, don't worry; there are more advanced recovery techniques to explore.
If you can't find your Microsoft Project file in the Recycle Bin, don't lose hope. Microsoft Project often creates temporary copies of files, which can be a lifesaver in situations where the original file is lost or corrupted. Here's how to recover Microsoft Project file by searching for temporary copies:
Step #1: Navigate to the Temporary File Location
Open File Explorer on your computer. In the address bar at the top of the File Explorer window, type the following path and press Enter:
C:\Users\<Your Username>\AppData\Local\Microsoft\MS Project\<Project Version>\Backup
Replace <Your Username> with your actual username and <Project Version> with the version of Microsoft Project you're using (e.g., 2010, 2013, 2016).
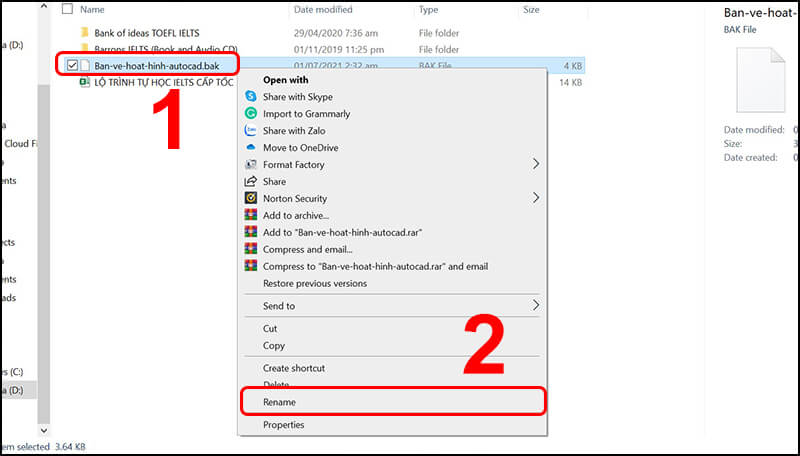
Step #2: Search for .bak Files
In the Backup folder, look for files with a ".bak" extension. These files are temporary backups created by Microsoft Project.
Step #3: Copy and Rename the .bak File
Identify the ".bak" file that corresponds to the project you want to recover. Copy the ".bak" file to a safe location on your computer or an external storage device. Change the file extension of the copied ".bak" file from ".bak" to ".mpp". This will convert it into a Microsoft Project file that you can open.
Step #4: Open the Recovered Project File
Open Microsoft Project. Go to "File" > "Open" and navigate to the location where you saved the recovered ".mpp" file. Select the file and click "Open" to access your recovered project.
Searching for and recovering temporary copies of your Microsoft Project file can be an effective way to retrieve lost or corrupted data without the need for specialized recovery software. However, if this method doesn't yield the desired results, continue exploring other recovery options, which will be covered in the following steps.
If you have enabled Windows File History, you may be able to recover previous versions of your Microsoft Project file. This method is particularly helpful if you need to access an earlier version of your project. Here's how to use Windows File History:
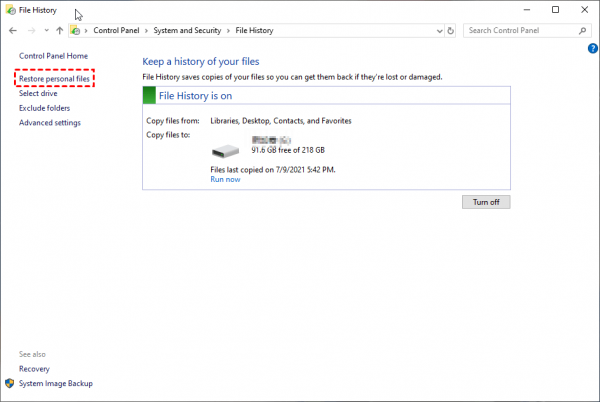
Step #1: Access File History
Click on the Windows Start button and type "File History" in the search bar. Select "File History settings" from the search results. In the File History settings window, click "Restore personal files" on the left-hand side.
Step #2: Browse File Versions
A File History window will open, showing your files and folders. Navigate to the folder where your Microsoft Project file was located. Select the folder that contained the lost project file.
Step #3: Restore a Previous Version
You'll now see a timeline at the bottom of the File History window. Scroll through the timeline to find a snapshot that contains the version of the file you want to recover. The snapshots are represented by date and time.
Select the snapshot that corresponds to the version of the file you want. Click the green "Restore" button at the bottom of the window. This will restore the selected version of the folder and its contents, including your Microsoft Project file, to its original location.
Step #4: Verify the File Recovery
Navigate to the original location where the Project file was stored to ensure it has been successfully restored. If you're using Microsoft Project, open the software and check if your project file is accessible.
Utilizing Windows File History is a useful built-in feature for recovering previous versions of your files, including Microsoft Project files. If this method doesn't yield the desired results, you can explore additional recovery options, which will be covered in the following steps.
Microsoft Project often creates AutoSave and AutoRecover files as a precautionary measure to help you recover your work in case of unexpected interruptions or crashes. For example, when your Excel suddenly stops functioning and you have to force quit it, it will create AutoSave files. These files can be invaluable for recovering your project data.
Here's how to recover Microsoft project file by checking AutoSave and AutoRecover files:
Step #1: Locate the AutoSave and AutoRecover Files Folder
Open File Explorer on your computer. In the address bar at the top of the File Explorer window, type the following path and press Enter:
C:\Users\<Your Username>\AppData\Roaming\Microsoft\MS Project\<Project Version>\AutoSave
Replace <Your Username> with your actual username and <Project Version> with the version of Microsoft Project you're using (e.g., 2010, 2013, 2016).
Step #2: Search for AutoSave and AutoRecover Files
In the AutoSave folder, look for files with the ".mpp" extension. These are your AutoSave and AutoRecover files. Identify the most recent ".mpp" file that corresponds to the project you want to recover. These files may be named something like "AutoSave of Project_Name.mpp" or "AutoRecover Project_Name.mpp."
Step #3: Copy and Open the AutoSave or AutoRecover File
Copy the identified ".mpp" file to a safe location on your computer or an external storage device. Double-click the copied ".mpp" file to open it with Microsoft Project.
Step #4: Save the Recovered File
If the file opens successfully, save it with a new name and location to prevent overwriting any existing versions. Go to "File" > "Save As" and choose a new location and name for your recovered project file.
Checking for AutoSave and AutoRecover files is an effective method to recover your work in case of unexpected disruptions or crashes while using Microsoft Project. If you don't find your project file in these locations or if you need more advanced recovery options, continue exploring the following methods.
Windows has a feature called Shadow Copies (also known as Volume Shadow Copies or Previous Versions) that can help you recover previous versions of files, including Microsoft Project files. This method allows you to access snapshots of your files at different points in time. Here's how to utilize Shadow Copies:
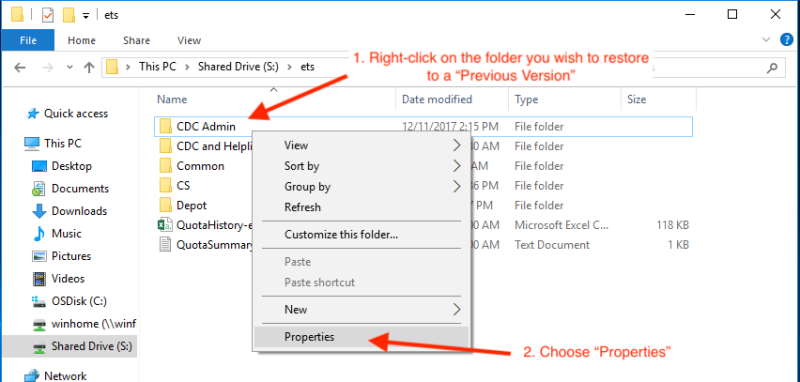
Step #1: Open the File Properties
Navigate to the folder where your Microsoft Project file was located. Right-click on the folder and select "Properties" from the context menu.
Step #2: Access the Previous Versions Tab
In the Properties window, go to the "Previous Versions" tab.
Step #3: Select a Snapshot
You'll see a list of previous versions of files and folders. Select a snapshot that contains the version of your Microsoft Project file that you want to recover. These snapshots are typically organized by date and time.
Step #4: Restore the File
After selecting the desired snapshot, click the "Restore" button. Windows will ask whether you want to restore the files to their original location or a different one. Choose your preferred option. If you're unsure, restoring to the original location is usually a safe choice.
Step #5: Verify the File Recovery
Navigate to the original location where the Project file was stored to ensure it has been successfully restored. If you're using Microsoft Project, open the software and check if your project file is accessible.
FoneDog Data Recovery is a versatile and user-friendly data recovery software that can be an excellent choice for recovering Microsoft Project files and other types of data from various storage devices. Whether your Project file was lost due to accidental deletion, formatting, corruption, or any other reason, FoneDog Data Recovery offers a reliable solution to recover Microsoft Project file quickly and effectively.
Data Recovery
Recover deleted image, document, audio and more files.
Get deleted data back from computer (including Recycle Bin) and hard drives.
Recover loss data caused by disk accident, operation system crushes and other reasons.
Free Download
Free Download

Visit the official FoneDog website to download and install the software on your computer. Ensure it's installed on a drive different from where your lost data is located to avoid overwriting.
Open FoneDog Data Recovery after installation. You'll be greeted with a simple and user-friendly interface.
Choose the appropriate recovery mode based on the reason for your data loss. For recovering a Microsoft Project file, select "Deleted Files Recovery" or the relevant mode.
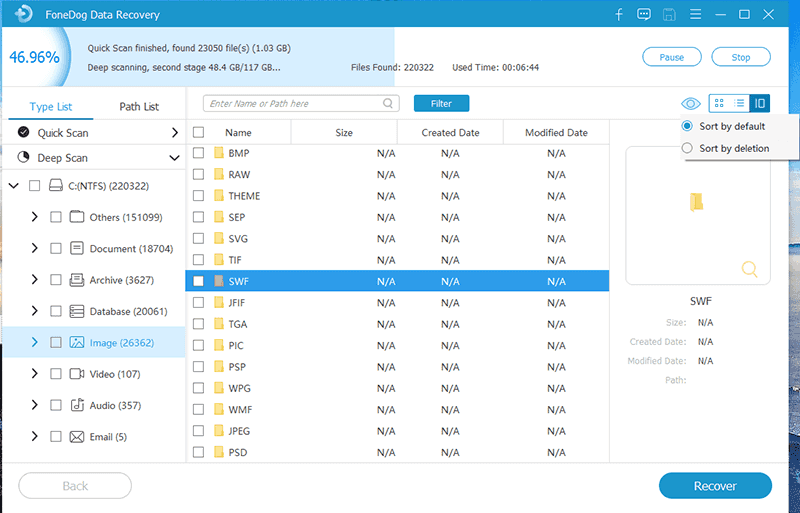
Select the drive or location where your Microsoft Project file was stored. Click "Scan" to initiate the scanning process.
After the scan is complete, FoneDog will display a list of recoverable files. You can preview these files to ensure they are intact.
Select the Microsoft Project file(s) you want to recover and click the "Recover" button.
Specify a location on your computer or an external storage device to save the recovered file. Avoid saving it to the same drive where you lost the data to prevent overwriting.
Click "Recover" once more to start the recovery process. FoneDog Data Recovery will retrieve your Microsoft Project file and save it to the selected location.
FoneDog Data Recovery offers a powerful and intuitive solution for recovering Microsoft Project files and other types of data. Its wide range of features and user-friendly interface make it a top choice for users looking to restore lost files quickly and efficiently.
People Also ReadFix Corrupted Recycle Bin in Windows Without Data Loss4 Proper Ways to Format Corrupted SD Card
Choosing to recover Microsoft Project file is a critical task to ensure that your project data remains intact and your work isn't disrupted. Select the most suitable method or tool based on your specific situation and the cause of data loss. It's essential to act promptly and carefully to maximize the chances of a successful recovery and prevent data overwriting. Regularly backing up your project files is also crucial to avoid data loss in the first place.
Remember that successful data recovery is often influenced by the timeliness of your actions and the extent of data damage, so it's important to choose the method that aligns best with your circumstances.
Leave a Comment
Comment

iPhone/Android Devices’ Maintenance Expert
Staying home, listening to music, writing tech articles
Many people asked me to repair their mobile phones so I have a lot of experience in mobile phone repair, and I know a lot about Android or Apple phones.
Data Recovery
FoneDog Data Recovery recovers the deleted photos, videos, audios, emails, and more from your Windows, Mac, hard drive, memory card, flash drive, etc.
Free Download Free DownloadHot Articles
 /
/
INTERESTINGDULL
/
SIMPLEDIFFICULT
Thank you! Here' re your choices:
Excellent
Rating: 4.6 / 5 (based on 72 ratings)
