FoneDog Screen Recorder
FoneDog Screen Recorder
Special Offer
Special Offer


By Vernon Roderick, Last updated: April 7, 2021
You have been so excited about your travel. Using your digital camera, you always capture photos of the beautiful places and attractions you have visited. These photos are automatically stored on the SD card. You eagerly connect the SD card to your computer and unexpectedly the photos cannot be accessed or have been deleted on your SD card. It even becomes a greater problem when you do not have backup copies of your photos. In this article, let’s discuss various ways on how to recover photos from SD card Mac.
Part 1. The Best Software to Recover Photos from SD Card in MacPart 2. Common Causes of Deleted or Lost PhotosPart 3. Important Tips to SD Card Recovery and Issue PreventionPart 4. How to Recover Photos from SD Card in Mac via Trash Part 5. How to Recover Photos from SD Card in Mac via Undo OptionPart 6. How to Recover Photos from SD Card in Mac with Time MachinePart 7. How to Recover Photos from SD Card in Mac via Disk Utility Part 8. How to Recover Photos from SD Card in Mac via Terminal In Summary
To help you recover your deleted or missing photos from your SD card, run a powerful and reliable data recovery tool such as FoneDog Data Recovery. The tool works in both Mac and Windows OS. It helps you recover any type of file such as photos from any of your devices. It can be an SD card, computer, internal or external drive, digital camera, smartphone, USB flash drive, and many more.
The tool has a simple and convenient to use interface wizard that provides step-by-step guidance to recover your important files. It scans your device in quick or deep scan modes. You can choose to preview each file result to see the contents, apply search filters to the results, and select specific files to recover.
FoneDog Data Recovery offers a highly safe and secured data recovery program without any data loss. No matter what recovery situation you are in, you are assured of a high success rate when using FoneDog Data Recovery.
Data Recovery
Recover deleted image, document, audio and more files.
Get deleted data back from computer (including Recycle Bin) and hard drives.
Recover loss data caused by disk accident, operation system crushes and other reasons.
Free Download
Free Download

When you have done with the download and install of FoneDog Data Recovery, launch the program in your Mac computer. You can access the data recovery program through the programs in the Start menu, shortcut icon on the desktop, or pinned icon on the taskbar.
On the home screen of the FoneDog Data Recovery tool, select the file types as photo/image and the SD card drive where you will recover the deleted photos.
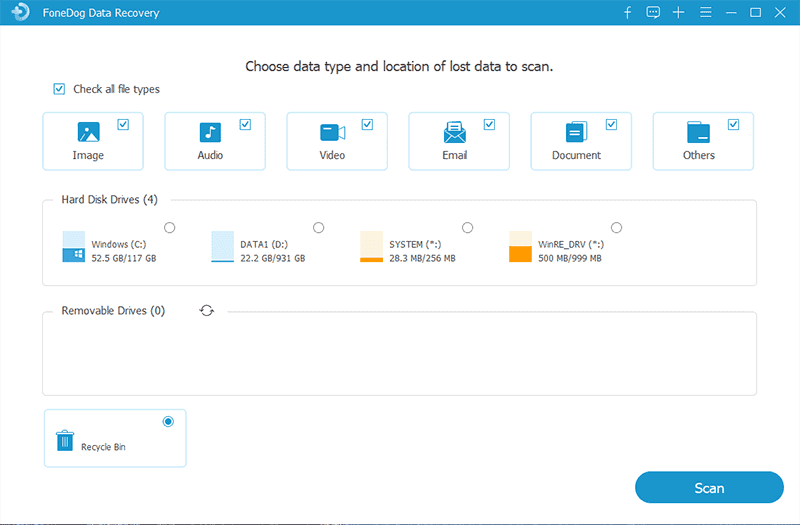
In this step, perform a Quick Scan or Deep Scan of your device by clicking on the Scan button. The deep scan will return more results and will take a longer time to complete. The results that are returned are put into categories for easy searching. You can also apply filters to limit the results and preview each file to see its contents.
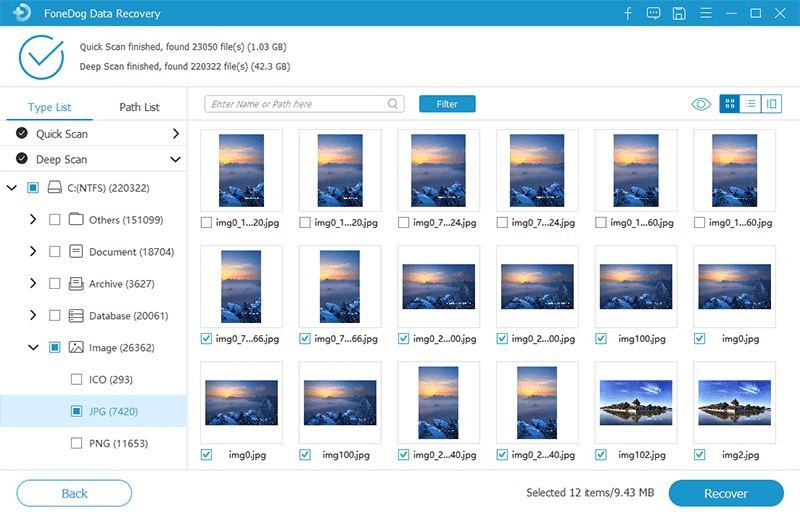
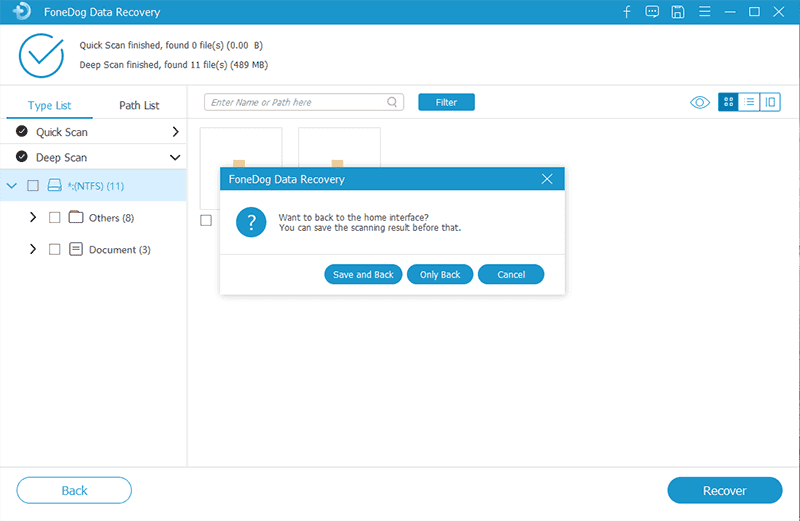
When the scan process is complete, choose the photo files that you want to recover. You can choose all or specific files, preview the files, select and recover them by clicking the Recover button. Wait for the data recovery process to finish ensuring there are no disruptions. Make sure to establish a good connection with the SD card and the computer and a stable power source.
There are certain causes why the photos become deleted or lost in your device such as an SD card. Your device may be corrupted or physically damaged. Interrupted data transfer, sudden power failure, system crash, accidental deletion, drive formatting, virus threats, wrong way of ejecting the SD card, using the device with SD card in the very low battery may possibly result in a problem with your SD card.
To successfully recover deleted or lost photos from your SD card, make sure that you stop all operations as soon as you realize that deletion has been done. Do not do any overwrites or formatting to your device. Recover the photos as soon as you can with utility tools and a data recovery program.
To avoid issues with your SD card, make sure that there are no interruptions during data transfer. Eject your SD card safely from your device. Make sure that you do not drop your SD card, avoid physical damage, heat, and moisture. Clean the SD card dry to free from any dust.
This section provides helpful information that will teach you on how to recover photos from SD card in Mac. Files that are temporarily deleted will be sent automatically to the Trash. But when the files are permanently deleted, these are not sent to the Trash and will need you to run a data recovery software to recover the files.
Step 01: On your Mac computer, head on to Finder.
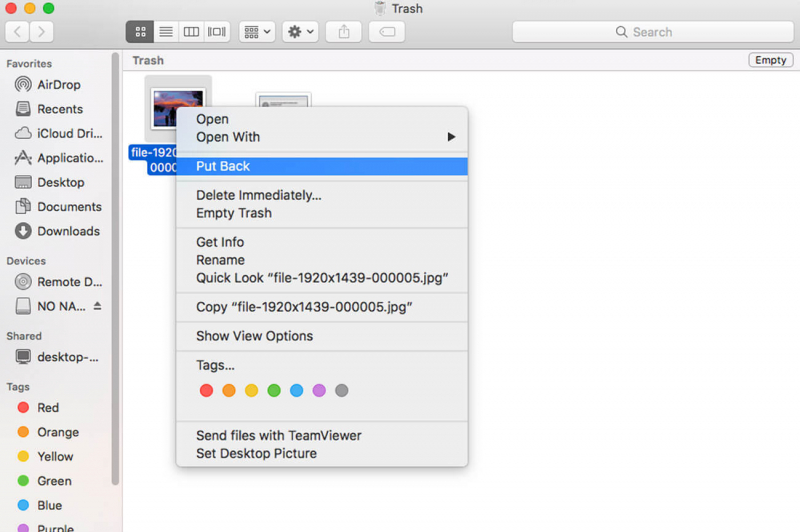
Step 02: On the dock, click on the Trash icon and look for the deleted photos from the list.
Step 03: Drag the deleted photos to your desktop or to another location on your PC. You can also right-click on the deleted photo and select Put back to move the deleted photos from Trash to the original file location.
If the deleted photos are not found because those are already permanently deleted, you can use the data recovery tool such as FoneDog Data Recovery to recover the deleted or lost photos which are tackled more in detail in another section of this article.
This section provides a basic process on how to recover photos from SD card in Mac using the Undo option. This method will only work if the deletion is done recently and there are no further operations or overwrites done on the device. This must be performed immediately following the file deletion. This method will not be possible if the Trash is already emptied out or files are permanently deleted.
Step 01: On your Mac computer, head on to Finder.
Step 02: Click on Edit.
Step 03: Select Undo Move of <file name of the deleted photo> to undo the deletion.
Step 04: Check that the photos are now restored to the original location.
If the deleted photos are not successfully restored, you can use the data recovery tool such as FoneDog Data Recovery to recover the deleted or lost photos which are tackled more in detail in another section of this article.
This process provides detailed instructions to help you on how to recover photos from SD card in Mac by using the built-in Time Machine tool. The Time Machine app is a utility program in Mac that executes regular backups of your data when you set it to run automatically.
Step 01: On your Mac computer, head on to Finder.
Step 02: Click Application.
Step 03: Select to open the Time Machine app.
If the backup disk is on another removable device, connect it to your Mac computer. On the Status menu, click the Time Machine app.
Step 04: Go to Finder.
Step 05: Click on Pictures.
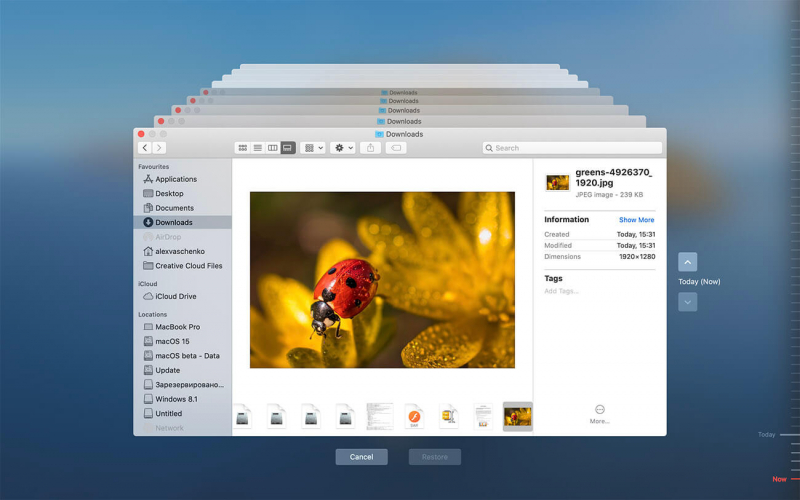
Step 06: On the Time Machine app, find the associated backups of the deleted photos.
Step 07: Scroll to the timeline found on the screen to see the dates of your deleted photos. At the right side of the Time Machine window, click the arrow up to find the backup version.
Step 08: Select the backup version of the deleted photos that you want to restore. You can choose to preview the photos, just press the space bar key.
Step 06: Click the Restore button to retrieve the previous backup version of the deleted photos.
Step 07: Navigate to the location where your deleted photos are restored to check if you can now see the photos.
If ever that your deleted photos cannot be restored on your Mac computer, you can use the FoneDog Data Recovery tool to recover the deleted files which are discussed in another section of this article.
This section provides the step by step instructions to guide you on how to recover photos from SD card in Mac with the use of the Disk Utility tool. The macOS Recovery tool comprises of the different utility programs pre-built in Mac that can help repair or erase a disk, re-install Mac OS, restore file backups from Time Machine, and many more. Make sure to create a backup of your SD card data first before running the tool.
Step 01: Connect the SD card to your Mac computer.
Step 02: On your Mac computer, go to the Finder menu.
Step 03: Select the Go menu.
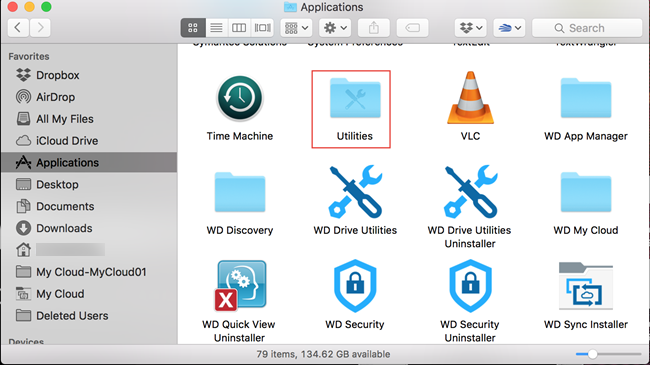
Step 04: Select Utilities from the dropdown menu.
Step 05: Select and double click to open Disk Utility from the list of Mac OS utilities.
Step 06: Click Continue.
Step 07: On the Disk Utility window, select the SD card device listed on the left pane.
Step 08: Click on the First Aid tab from the Disk Utility tool to repair the selected SD card drive.
Step 09: Click the Repair Disk button located in the bottom right corner. The tool will start to scan and repair your SD card drive. Wait until the process is finished.
Step 10: After the scan, the Disk Utility tool will return the result. If it successfully repairs your SD card, close the Disk Utility tool and go to Finder. Your SD card is mounted. Check to see if the photos are now recovered.
If it still fails, run the Disk Utility tool for the second time. If it fails after attempting to repair it, backup your SD card data and follow the guidelines on how to recover the photos from SD card using FoneDog Data Recovery in another section of this article.
You might also need to reformat your SD card. This will erase all the files from your SD card and will need you to run the data recovery tool to recover the deleted data after.
This alternative process contains steps that will teach you on how to recover photos from SD card in Mac using Disk Utility via the Terminal app. Make sure that you create a backup of your SD card data first before running the tool.
Step 01: Connect the SD card to your Mac computer.
Step 02: On your Mac computer, go to the Finder menu.
Step 03: Select the Go menu.
Step 04: Select Utilities from the dropdown menu.
Step 05: Select and double click to open Terminal.
As a shortcut, press and hold Command + Space keys until the Spotlight search appears and type in Terminal. Double-click the Terminal app from the results.
Step 06: On the Terminal app, type in cd /Volumes. This will switch you to the Volumes directory.
Step 07: Type in ls and press the Return key. This will show a list of disks on your Mac PC. Your SD card must be shown in the list.
Step 08: Type in diskutil verifyVolume SD. A file system verification will be performed on your SD card.
Step 09: After the test, the result is returned that says it has finished with the file system verification. If it returns a message that says that the volume tested is found to be corrupt, then it needs to be repaired.
Step 10: Type in diskutil repair volume /Volumes/SD/ to start the repair and press the Return key.
Step 11: Wait until the repair process is completed. It returns a message that says that it has finished with the file system repair on the SD card.
If it still fails, run the Disk Utility in the Terminal app for the second time. If it fails after attempting to repair it, backup your SD card data and follow the guidelines on how to recover the photos from SD card using FoneDog Data Recovery in another section of this article.
People Also ReadHow to Recover Lost Pictures from Samsung SD CardHow to Recover Deleted Files from SD Card
It would be a great frustration when in a dilemma with your data files such as loss or deletion. Important files such as photos of best-kept memories and travels stored on an SD card may suddenly become unreadable or inaccessible.
To help you recover photos from SD card in Mac computer, this article provides different methods that you can follow. A data recovery program called FoneDog Data Recovery supports recovery of any type of files such as photos from any of your devices like an SD card. It can do data recovery in any situation in three simple steps as launch, scan, and restore.
Leave a Comment
Comment

Technical Expertise for PC/Website Optimization
One of my passion is to develop software of my own
I write articles to share knowledge about IT technology and some experience in developing my own software, and developing my own software is one of my passions for work.
Data Recovery
FoneDog Data Recovery recovers the deleted photos, videos, audios, emails, and more from your Windows, Mac, hard drive, memory card, flash drive, etc.
Free Download Free DownloadHot Articles
 /
/
INTERESTINGDULL
/
SIMPLEDIFFICULT
Thank you! Here' re your choices:
Excellent
Rating: 4.8 / 5 (based on 87 ratings)
