FoneDog Screen Recorder FoneDog Screen Recorder
Special Offer Special Offer
Only Only
$4.49 $4.49
to get a ONE-month license to get a ONE-month license
Sale ends in xx days Sale ends in xx days
Buy Now
sale

The Top Write-Protected SD Card Format Software

By Nathan E. Malpass, Last updated: July 29, 2020

Want to know which write-protected SD card format software is best? We’ll give you a list of options to choose from including their features and limitations.

Your SD card is a tiny storage device that allows you to place pictures, videos, audios, documents, and even contacts in it. It comes in different sizes from a few gigabytes to a massive terabyte of storage space.

If you have an SD card, it makes sense to know the top write-protected SD card format software. This is a great way to make sure you can still format your card even if it’s write-protected. And, it makes sense to format your card every now and then to free it from malware.

This article will give you the top write-protected SD card format software available nowadays. This software has its own pros and cons. And, of course, they have features, capabilities, and limitations. Let's get started by answering the question below.

Part 1. Can You Format A Write-Protected SD Card?Part 2. How Do I Remove Write-Protection?Part 3. The Top Write-Protected SD Card Format SoftwarePart 4. Bonus Recommendation: Recover Data With FoneDogPart 5. Conclusion

Part 1. Can You Format A Write-Protected SD Card?

When an SD card is write-protected, it means it is in read-only mode. It is a feature that allows storage devices, including SD cards, to hinder new data from being placed into it. It prevents data from actually being written into the storage media.

So, this means it is possible to read or open the data within the storage media. However, you are not able to delete them, copy them, or add new files into them. This means it is not possible to format a write-protected SD card.

Thus, what you have to do first is to eliminate the write-protection of the SD card. After you have removed the write-protection, you can use different methods including varying software to format your SD card. This is also true for other storage devices.
Can You Format A Write-Protected SD Card

Part 2. How Do I Remove Write-Protection?

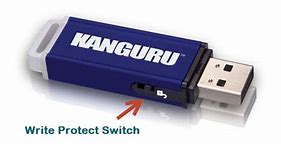
So, now that you’ve come to your senses that write-protected SD card format software cannot actually format a write-protected SD card, then you have to know how to remove the write-protection from your storage device first.

Here are the methods you can implement to remove the write-protection from your SD card and prepare it for formatting by write-protected SD card format software:

Method 01. Removing Its Physical Lock Protection

The first thing you have to do before you use write-protected SD card format software is to remove the write-protection. And, the first method would be to check if there is a physical lock that makes your SD card write-protected. Here are the steps to implement it:

  1. Position Your SD Card – Put your SD card within a surface making sure the platform is flat. Place it in a position where the label is faced upwards. This will help you locate the lock of your SD card. When you have a mini or a micro SD card, you should plug it into your card adapter first. Then, you should position the adapter in such a way that the label is faced up.
  2. Find the Lock Protection Switch – Typically, the write-protection switch is located on the top left part of the SD card. It looks like a tiny, silver, or white tab that sticks out from the left part of your SD card.
  3. Remove The Write-Protection – Slide the lock protection tab from its position towards the location of the gold connectors. These connectors are located at the lower portion of the SD card. This will allow you to turn off the write-protection of the SD card and you can use the write-protected SD card format software afterward.

Removing Its Physical Lock Protection

Method 02. Eliminating The Write-Protection Using Windows Computers

Before you use write-protected SD card format software, you must remove the write-protection on the SD card. You can do it through your Windows PC or your macOS computer. In this section, we will be focusing on Windows PCs first. Here are the steps on how to do it:

  1. Use Your Admin Account – Ensure that once you are on your Windows PC, you must be an administrator in order to launch the tool called Disk Partition. This will be used to eliminate the write-protection from your SD card.
  2. Connect The SD Card To Your Computer – Plug your SD card to the computer using the built-in or external card reader. It should slide with the label upwards. Its gold connectors should be the first one to touch the card reader. If you don’t have a card reader on your laptop, then you must use a card adapter for SD cards plugged into your USB port.
  3. Launch Start And The Command Prompt – The next thing you have to do is to click the Windows key in order to launch Start. Type the words “Command Prompt” and then click it to launch it.
  4. Enter Your Command – It is important that you enter the command without the quotes “Diskpart”. After this, you should press the “Enter” key.
  5. Press Yes Once A Prompt Appears – When a prompt appears, click “Yes”. This will enable you to confirm the decision you have made. And, it will launch the window for Disk Partition which looks like that of another Command Prompt box.
  6. Type In The Next Command – The next command you have to type without the quotes in it is “list disk”. After that, press the Enter key again.
  7. Determine The Number Of Your SD Card – The displayed “Size” column will show you the storage space correlated with your SD card. You can locate your SD card within this by finding the row that correlates to the size of that storage device. Now, check out the “Number” you can find towards the right part of the “Disk” section. The value that you will see is the card number of the SD card.
  8. Select The Specific SD Card – Type out the command “select disk number”. The “number” part should be replaced by the card number you have seen previously. After that, press the “Enter” key. This tells your Disk Partition utility to implement the next command you will place to your own SD card.
  9. Remove The Write-Protection – Now, you have to remove the write-protection by typing in the following “attributes disk clear read-only”. After that, you have to press the “Enter” key. To confirm that the SD card has been removed from its write-protection, a label will tell you that it has successfully cleared the disk attributes.

By this time, you should start using the write-protected SD card format software to format your SD card. Again, this method is used in Windows PCs only. If you want the method for macOS, you should check the next section below.
Eliminating The Write-Protection Using Windows Computers

Method 03. Eliminating The Write-Protection Using macOS Computers

  1. Connect The SD Card To The Mac Computer – Connect the SD card to your macOS computer. Now, check the status of files by clicking “File” and then choosing “Get Info”. Check out the section for “Sharing and Permissions”. If your file is said to be “Read-Only” you must change the status to “Read And Write”. Check out if that removes the write-protection of your SD card.
  2. Launch Spotlight – Now, you have to launch Spotlight and type out “Disk Utility” within the search bar that is displayed. To open Disk Utility, double-click it.
  3. Choose The SD Card – Select the SD card through its name. This is usually located in the top-left part of the window for Disk Utility.
  4. Choose First Aid – This can be seen as a tab within the upper part of the Disk Utility interface. Now, First Aid will run within your SD card. If there are any instructions that show up, you should follow them.
  5. Allow Scanning By First Aid – If the SD card is write-protected because of errors, the First Aid tool will be removing these errors.

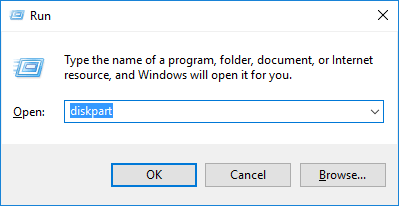
By this time, you have removed the lock from your SD card. And, you can use a write-protected SD card format software for you to format your storage device. Below are some of the software you can use.
Eliminating The Write-Protection Using macOS Computers

Part 3. The Top Write-Protected SD Card Format Software

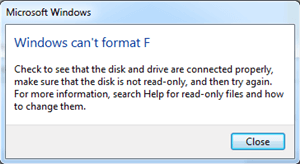
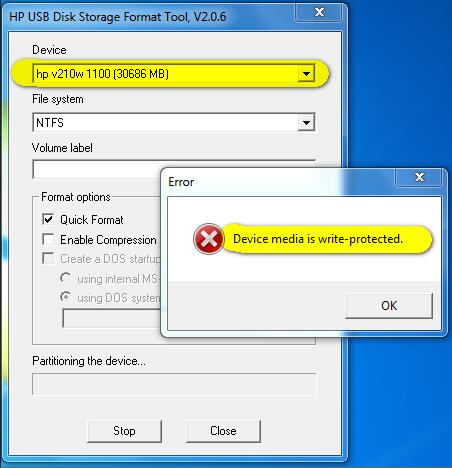
This write-protected SD card format software isn’t able to format your card when it is write-protected. That’s why we have implemented how you can remove the write protection in the 2nd section of this article. Check out the software you can use below:

Tool 01. USB Disk Storage Format Tool

This is a great write-protected SD card format software that you can utilize in order to format your storage device. It enables you to format your SD card without resulting in errors. This is a very popular tool because of its amazing features. It’s very effective with regard to SD card formatting processes.

Pros:

  • The interface of the tool is very user-friendly.
  • Memory cards, including SD cards, can be formatted totally without leading to errors or incompletion.
  • A variety of memory cards are supported by the tool including mini SD cards, micro SD cards, and a whole lot more.

Cons:

  • About 4 different file formats are only supported by the tool.
  • There is no feature to partition your storage media.

Tool 02. Windows’ Built-In Tool for Formatting

This is another option for a write-protected SD card format software. It’s a great tool to try out because it enables the formatting of SD cards. Even if you’re not a technical person, you can easily use this tool for formatting purposes.

Here are the steps on how to use it:

  1. Launch Disk Management – The first step would be to go to the Windows search bar and type “diskmgmt.msc”. After options are displayed, launch your Disk Management utility by clicking on it.
  2. Right-Click On Disk – Then, after making sure your SD card is plugged into the computer through a card reader, right-click on it within the Disk Management tool. Click the option to “Format”.
  3. Adjust Settings – You should customize Volume Label if you want a name for your SD card. You should also select a file system and allocation unit size. Uncheck the option for “Quick Format” to make a more thorough formatting process.
  4. Click OK And Confirm – Now, click OK to begin the process. Confirm it when it prompts you that all the data will be erased in your SD card. Do this by clicking “OK” again. Now, your SD card will be formatted by this built-in write-protected SD card format software.

Tool 03. SD Card Formatter

It is one of the best tools out there with regard to formatting your SD cards within Windows computers. The interface is very easy to use and anybody can understand the tool. There are a lot of features included in the tool as well.

For instance, internal disks, external disks, MMC cards, and SD cards are formatted through the tool. Total formatting of your SD card is possible and this doesn’t leave any original data within it. In addition, it comes with two different supported versions for both macOS and Windows PCs.

The tool is totally free and you can use it by downloading it and setting it up on your computer. Below are the steps you can follow in order to format your SD card with this write-protected SD card format software:

  1. Plug Your SD Card To The Computer – First, you have to connect the SD card you wish to format to your computer. It is important to launch SD Card Formatter and run it as an administrator.
  2. Choose The SD Card – Now, on the interface that appears, you have to choose the SD card you wish to format. Choose the option to “Format”. You can either choose between “Overwrite Format” or “Quick Format”.
  3. Click Format – Now, click Format in order to begin the process of using this software for formatting.

SD Card Formatter

Part 4. Bonus Recommendation: Recover Data With FoneDog

If you have implemented a formatting process on your SD card with a write-protected SD card format software, and you noticed that you lost certain files you haven’t backed up, then you may want to use FoneDog Data Recovery.

This software can be used to recover files including images, audio, videos, emails, documents, and a whole lot more from your SD card, hard drives, flash drives, Windows computers, and even macOS computers.

It’s a powerful tool that is totally secure since only you can gain access to your files. In addition, a free trial is available enabling users to test it out first before they buy it. USB flash drives can be plugged into your computer to retrieve deleted or lost files as well.

Data Recovery Recover deleted image, document, audio and more files. Get deleted data back from computer (including Recycle Bin) and hard drives. Recover loss data caused by disk accident, operation system crushes and other reasons. Free Download Free Download FoneDog Data Recovery

Part 5. Conclusion

This article has taught you about write-protected SD card format software. It is important that you remove the write-protection from your SD card first before formatting. We have given 3 different methods for removing the write-protection from your SD card and another 3 methods for formatting it.

As such, if you have forgotten to back up your SD card and you have already formatted it, you can use FoneDog Data Recovery to retrieve back your files and have them safe again in your computer or your SD card.

If you wish to grab FoneDog Data Recovery, you can do so immediately. Just download the installation package depending on whether you have a macOS or a Windows computer. After that, install it and you’re good to go!

Leave a Comment

Comment

Comment ()
author image

Nathan E. Malpass

iPhone/Android Devices’ Maintenance Expert

Staying home, listening to music, writing tech articles

Many people asked me to repair their mobile phones so I have a lot of experience in mobile phone repair, and I know a lot about Android or Apple phones.

Data Recovery logo

Data Recovery

FoneDog Data Recovery recovers the deleted photos, videos, audios, emails, and more from your Windows, Mac, hard drive, memory card, flash drive, etc.

Free Download Free Download

How Do You Like This Article?

Check icon/ Check icon

INTERESTINGDULL

Check icon/ Check icon

SIMPLEDIFFICULT

Thank you! Here' re your choices:

Rate This Article: Excellent

Rating: 4.6 / 5 (based on 93 ratings)

Data Recovery logo

Data Recovery

FoneDog Data Recovery recovers the deleted photos, videos, audios, emails, and more from your Windows, Mac, hard drive, memory card, flash drive, etc.

Free Download Free Download

FoneDog uses cookies to ensure you get the best experience on our website. Click here to learn more.