FoneDog Screen Recorder FoneDog Screen Recorder
Special Offer Special Offer
Only Only
$4.49 $4.49
to get a ONE-month license to get a ONE-month license
Sale ends in xx days Sale ends in xx days
Buy Now
sale

How to Retrieve Unsaved Word Documents on Mac And Windows

By Nathan E. Malpass, Last updated: February 16, 2024

Losing hours of hard work on an accidentally closed unsaved Word document can be a nightmare for anyone, whether you're on a Mac or Windows computer. Fortunately, there are methods and tools available to help you retrieve those precious files and minimize the panic that follows a sudden loss.

In this article, we'll walk you through the process of how to retrieve unsaved Word documents on both Mac and Windows platforms, ensuring that your valuable content is never lost to the digital abyss again. Whether you accidentally closed a file without saving, your system crashed, or you encountered an unexpected issue, we've got the solutions to help you retrieve your work.

Part #1: How to Retrieve Unsaved Word Documents on MacPart #2: How to Retrieve Unsaved Word Documents on Windows ComputersPart #3: The Best Tool on How to Retrieve Unsaved Word Documents: FoneDog Data RecoverySummary

Part #1: How to Retrieve Unsaved Word Documents on Mac

Method #1: Using AutoRecover

AutoRecover is a built-in feature in Microsoft Word for Mac that can help you retrieve unsaved documents in the event of a crash or accidental closure. By following these steps and enabling AutoRecover with a short time interval, you can significantly reduce the risk of losing your work in the future.

  1. Open Microsoft Word on your Mac.
  2. Click on the Word menu in the top-left corner of the screen.
  3. Select "Preferences" from the drop-down menu.
  4. In the Preferences window, click on "Save".
  5. Under the "Save documents" section, check the box next to "Save AutoRecover information every X minutes".
  6. You can set the time interval for AutoRecover to save your work. It's recommended to set it for a short interval, such as every 5 minutes, to minimize data loss.
  7. If your Word document crashes or you accidentally close it without saving, relaunch Microsoft Word.
  8. Word will attempt to recover unsaved documents automatically. Look for a prompt or a document recovery pane on the left-hand side of the application window.
  9. In the recovery pane, you should see a list of recently unsaved documents. Click on the one you want to recover.
  10. Once you've selected the document, save it immediately to avoid losing any progress in the future.

Method #2: By Accessing the Temporary Folder

Accessing the Temporary Folder on your Mac can be a lifesaver when it comes to recovering unsaved Word documents. This method allows you to explore temporary files created by Microsoft Word, which might include your lost document. Here are the steps on how to retrieve unsaved Word documents by Temporary Folder:

  1. First, make sure that Microsoft Word is closed on your Mac.
  2. Open a Finder window. You can do this by clicking the Finder icon in your Dock or by pressing Command + N.
  3. In the Finder menu, click on "Go".
  4. From the drop-down menu, select "Go to Folder..."
  5. A dialog box will appear. In the box, type or paste the following path: ~/Library/Containers/com.microsoft.Word/Data/Library/Preferences/AutoRecovery
  6. Then, click "Go".
  7. You will now be in the AutoRecovery folder where temporary files are stored. Here, you may find files with names like "AutoRecovery save of [your document name]". These files might contain the unsaved content you're looking for.
  8. Select the most recent file, which corresponds to the lost document you want to recover.
  9. Copy the file to a safe location, such as your desktop or a dedicated folder, to prevent accidental deletion.
  10. Change the file's extension from ".asd" to ".docx" or ".doc", depending on the Word document format.
  11. Double-click the recovered document to open it in Microsoft Word.

How to Retrieve Unsaved Word Documents on Mac by Accessing the Temporary Folder

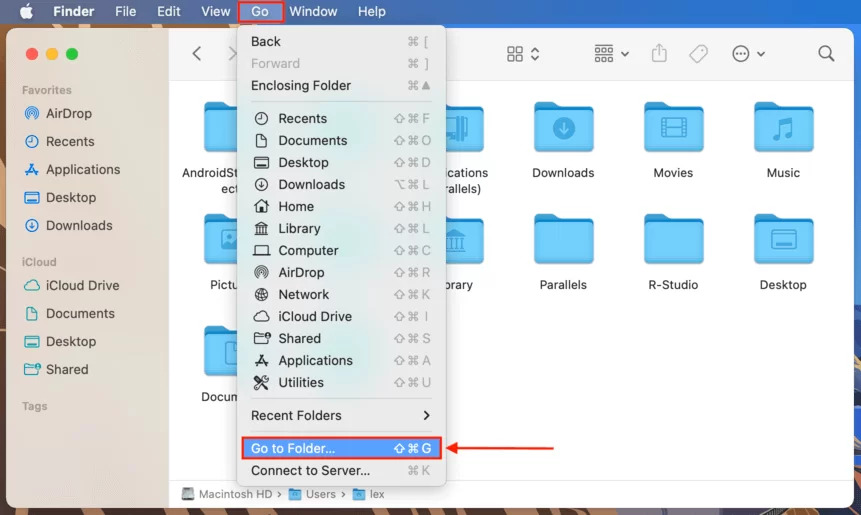
Accessing the Temporary Folder is an effective method for retrieving unsaved Word documents on your Mac. By exploring the AutoRecovery folder and identifying the relevant temporary files, you can recover your work with ease. Just remember to rename and save the recovered file properly to ensure you don't lose your progress in the future.

Method #3: Using the Time Machine

If you've enabled Time Machine, the built-in backup feature on your Mac, you can restore your Mac from Time Machine, including unsaved Word documents. Time Machine allows you to recover previous versions of your files, including those you may have accidentally lost in Microsoft Word.

  1. Close Microsoft Word if it's open.
  2. Click on the Apple logo in the top-left corner of your screen and select "System Preferences".
  3. In the System Preferences window, click on "Time Machine".
  4. Ensure that Time Machine is turned on and that it's been regularly backing up your files. If it's not turned on, you won't be able to retrieve previous versions of your documents.
  5. Now, navigate to the location where you last saved or were working on your Word document.
  6. Once you're in the right folder, click the Time Machine icon in your menu bar (it looks like a clock).
  7. A new window will open, showing your files in the Time Machine interface.
  8. You can scroll through time using the timeline on the right side of the screen to find the date when your document was last saved or worked on.
  9. Once you've located the appropriate date, you'll see your files for that specific time. Look for your Word document and select it.
  10. Click the "Restore" button to retrieve that version of your document.
  11. The restored document will be placed in the same location where it was when it was last saved or worked on.

How to Retrieve Unsaved Word Documents on Mac Using Time Machine

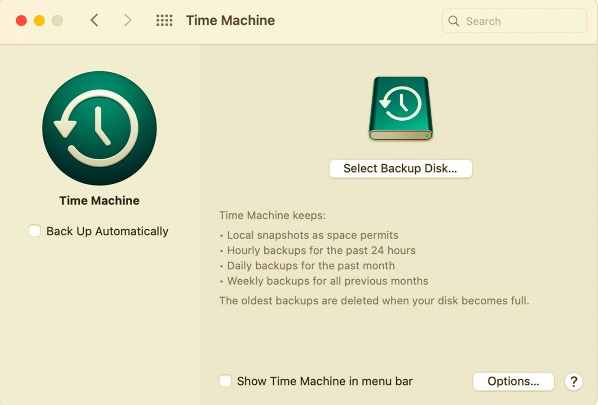
Utilizing Time Machine can be a powerful method to recover unsaved Word documents on your Mac. It allows you to access previous versions of your files and restore them to their original locations, providing an effective way to retrieve lost work and minimize potential data loss.

Part #2: How to Retrieve Unsaved Word Documents on Windows Computers

Method #1: Using AutoRecover for WindowsTop of Form

To recover unsaved Word documents on a Windows computer using the AutoRecover feature, follow these steps on how to retrieve unsaved Word documents using AutoRecover for Windows:

  1. Open Microsoft Word on your Windows computer.
  2. Click on the "File" tab in the top-left corner.
  3. Select "Open" from the menu on the left.
  4. In the "Open" dialog box, look for the "Recent" section on the left-hand side.
  5. Under "Recent", you'll find a list of recent documents, including unsaved versions. Look for the unsaved document you want to recover.
  6. Click on the unsaved document, and it will open in a new Word window.
  7. Save the recovered document immediately to prevent future data loss.

How to Retrieve Unsaved Word Documents on Windows Using AutoRecover

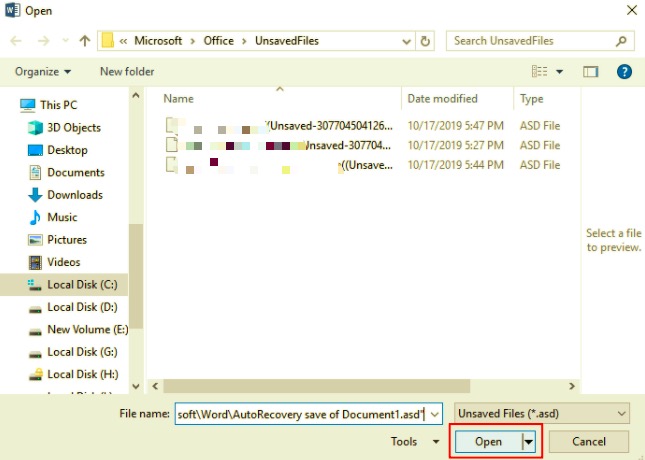
Microsoft Word's AutoRecover feature for Windows makes it easy to retrieve unsaved documents, and the Recent section provides quick access to these documents. Follow these steps to find and recover your unsaved work effortlessly.

Method #2: Checking the Backup Folder

To recover unsaved Word documents on a Windows computer by checking the Backup folder, follow these steps:

  1. Close Microsoft Word if it's open.
  2. Open File Explorer on your Windows computer. You can do this by pressing the "Windows Key" + "E" on your keyboard.
  3. In File Explorer, navigate to the following directory, replacing "YourUsername" with your actual Windows username: C:\Users\YourUsername\AppData\Local\Microsoft\Office\UnsavedFiles
  4. Inside the "UnsavedFiles" folder, you may find a list of unsaved Word documents. Look for the one you want to recover.
  5. Copy the unsaved document to a safe location, such as your desktop or a dedicated folder.
  6. Change the file's extension from ".asd" to ".docx" to make it accessible in Microsoft Word.
  7. Double-click the recovered document to open it in Microsoft Word.

Checking the Backup folder is an effective way to retrieve unsaved Word documents on Windows. By locating and renaming these files, you can easily recover your lost work and continue your tasks without significant data loss.

Method #3: By Searching for Temporary Files

To recover unsaved Word documents on a Windows computer by searching for temporary files, follow these steps:

  1. Close Microsoft Word if it's open.
  2. Click the "Windows Key" and "R" simultaneously to open the "Run" dialog box.
  3. In the "Run" dialog box, type the following and press "Enter": %temp%
  4. This will open the "Temp" folder, which contains temporary files.
  5. In the "Temp" folder, look for files with names starting with "Word" or "ASD." These files may be temporary versions of your unsaved Word document.
  6. Once you find the relevant temporary file, copy it to a safe location, such as your desktop or a dedicated folder.
  7. Change the file's extension from ".asd" to ".docx" or ".doc" to make it accessible in Microsoft Word.
  8. Double-click the recovered document to open it in Microsoft Word.

Searching for temporary files is a valuable method for retrieving unsaved Word documents on Windows. These temporary files may contain the unsaved content you need, and by locating and renaming them, you can quickly recover your work.

Method #4: By Using Command Prompt

To recover unsaved Word documents on a Windows computer using Command Prompt, follow these steps:

  1. Close Microsoft Word if it's open.
  2. Press the "Windows Key" and "R" simultaneously to open the "Run" dialog box.
  3. In the "Run" dialog box, type "cmd" and press "Enter" to open Command Prompt.
  4. In Command Prompt, type the following command and press "Enter": cd %userprofile%\AppData\Roaming\Microsoft\Word
  5. Next, enter this command to list all the available .asd files: dir /s /b *.asd
  6. The Command Prompt will display a list of .asd files in the specified location.
  7. Look for the unsaved Word document you want to recover in the list.
  8. Once you've identified the relevant .asd file, copy it to a safe location, such as your desktop or a dedicated folder.
  9. Change the file's extension from ".asd" to ".docx" or ".doc" to make it accessible in Microsoft Word.
  10. Double-click the recovered document to open it in Microsoft Word.

Using Command Prompt allows you to locate and recover unsaved Word documents by navigating to the specific directory where these temporary files are stored. This method can be especially useful if the previous methods haven't yielded the desired results.

Part #3: The Best Tool on How to Retrieve Unsaved Word Documents: FoneDog Data Recovery

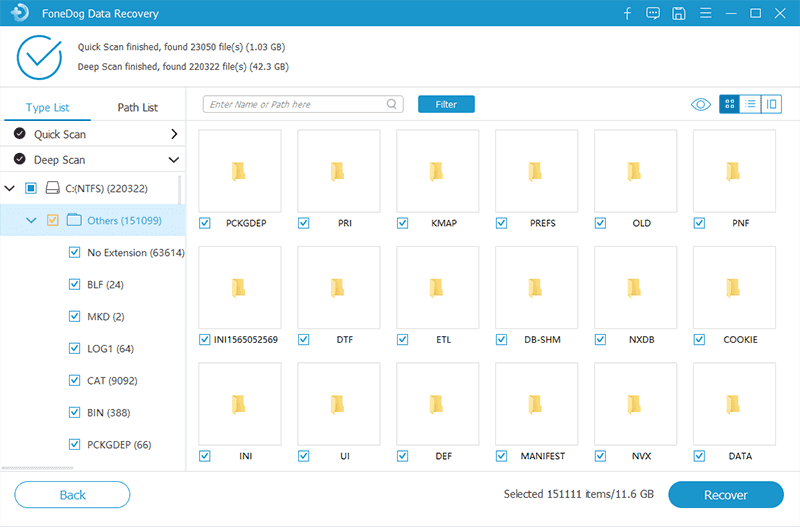
FoneDog Data Recovery is a powerful and versatile software solution that can help you recover unsaved Word documents, among other file types, on both Mac and Windows platforms. It provides a user-friendly interface and a range of features that make the recovery process quick and efficient.

Data Recovery Recover deleted image, document, audio and more files. Get deleted data back from computer (including Recycle Bin) and hard drives. Recover loss data caused by disk accident, operation system crushes and other reasons. Free Download Free Download FoneDog Data Recovery

Key Features:

  1. Support for Various File Types: FoneDog Data Recovery can recover a wide range of file types, including Word documents, photos, videos, and more.
  2. Compatibility: It is available for both Mac and Windows operating systems, making it a versatile choice for users on different platforms.
  3. Multiple Recovery Modes: The software offers various recovery modes, such as "Deleted Files Recovery," "Partition Recovery," and "Raw Recovery," to cater to different data loss scenarios.
  4. Preview Function: FoneDog allows you to preview recoverable files before restoring them, ensuring you recover the right documents.
  5. Filter and Search Options: You can use filters and search functions to locate specific files quickly.
  6. User-Friendly Interface: The software is designed with an easy-to-navigate interface, making it accessible to users of all skill levels.

How to retrieve unsaved Word documents with FoneDog Data Recovery:

Step #1: Download and install FoneDog Data Recovery on your computer. Ensure it's the appropriate version for your operating system (Mac or Windows).

Step #2: Launch the software and select the recovery mode that best matches your data loss scenario. In this case, you can choose the "Deleted Files Recovery" mode.

Step #3: Choose the location where your unsaved Word document was stored, such as the specific drive or folder.

Step #4: Click the "Scan" button to initiate the scanning process. FoneDog Data Recovery will search for lost or unsaved Word documents in the selected location.

Retrieve Unsaved Word Documents: FoneDog Data Recovery - Quick Scanning

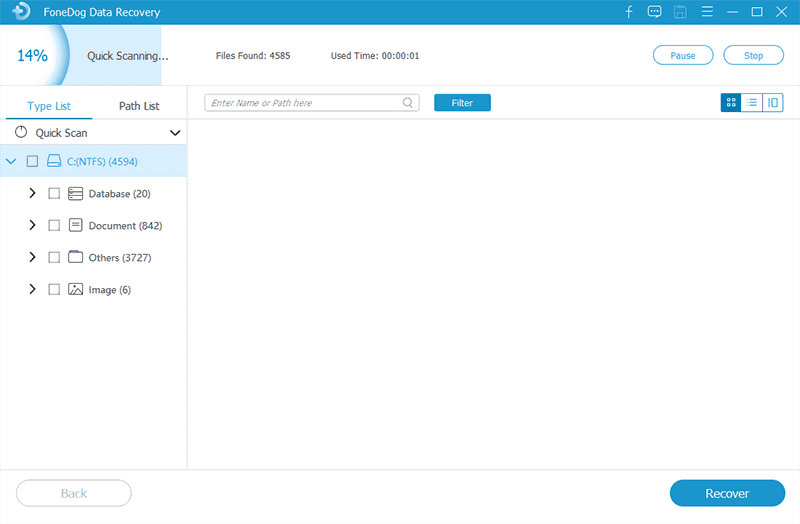
Step #5: Once the scan is complete, you can preview the recoverable files, including your unsaved Word documents.

Step #6: Select the unsaved Word document you want to recover and click the "Recover" button.

Retrieve Unsaved Word Documents: FoneDog Data Recovery - Recover

Step #7: Choose a safe destination folder to save the recovered file. Do not save it in the same location where it was lost to prevent overwriting.

Step #8: Click "Recover" once more to complete the process. Your unsaved Word document is now restored to the selected location.

FoneDog Data Recovery offers a comprehensive and reliable solution for retrieving unsaved Word documents and other types of files. Its user-friendly interface and powerful features make it a valuable tool for data recovery on both Mac and Windows systems.

People Also ReadBEST GUIDE: How to Recover PowerPoint File Not SavedHow to Recover Previous Version of Excel File with Ease

Summary

In this comprehensive guide, we've explored a range of methods on how to retrieve unsaved Word documents on both Mac and Windows platforms. On Mac, you can utilize built-in features like AutoRecover, access the Temporary Folder, and employ Time Machine if enabled.

For Windows, options include using AutoRecover in Microsoft Word, checking the Backup folder, searching for temporary files, and even utilizing specialized data recovery software like FoneDog Data Recovery. By understanding and applying these methods, you can ensure that your valuable work is never lost, even in the face of unexpected computer crashes or accidental closures.

Leave a Comment

Comment

Comment ()
author image

Nathan E. Malpass

iPhone/Android Devices’ Maintenance Expert

Staying home, listening to music, writing tech articles

Many people asked me to repair their mobile phones so I have a lot of experience in mobile phone repair, and I know a lot about Android or Apple phones.

Data Recovery logo

Data Recovery

FoneDog Data Recovery recovers the deleted photos, videos, audios, emails, and more from your Windows, Mac, hard drive, memory card, flash drive, etc.

Free Download Free Download

How Do You Like This Article?

Check icon/ Check icon

INTERESTINGDULL

Check icon/ Check icon

SIMPLEDIFFICULT

Thank you! Here' re your choices:

Rate This Article: Excellent

Rating: 4.7 / 5 (based on 67 ratings)

Data Recovery logo

Data Recovery

FoneDog Data Recovery recovers the deleted photos, videos, audios, emails, and more from your Windows, Mac, hard drive, memory card, flash drive, etc.

Free Download Free Download

FoneDog uses cookies to ensure you get the best experience on our website. Click here to learn more.