FoneDog Screen Recorder
FoneDog Screen Recorder
Special Offer
Special Offer


By Nathan E. Malpass, Last updated: August 25, 2018
I use my iPhone does a lot of stuff. I use it to surf the net, capture photos and videos, send text messages, and call other phone numbers. I use my voicemails too. It’s very handy to have voicemails as you simply have to listen to a message sent by another person. One thing I want to do is to save my voicemails from my iPhone. How to save voicemails from iPhone?
How to save voicemails from iPhone is a very simple matter, as long as you read the following guide, you can understand what is going on.
Part 1. Why save your phone's voicemail?Part 2. How to Selectively Save Voicemails from iPhone to Windows or Mac?Video Guide : Using FoneDog's Toolkit to save voicemails from iPhonePart 3. How to Save Voicemail from iPhone 4 as a Note or Voice Memo?Part 4. How to Save Voicemail from iPhone 4 to iCloud Drive?Part 5. Conclusion
People Also ReadHow to Fix iMessage Activation Error?Top 10 Anonymous Text App
When you have saved your voicemails, it is similar to saving videos, images, contact information, and other important business files. Plus, voicemails can be very important when it comes to difficult situations.
It can help you out of a disaster. Thus, if you have an iPhone it is recommended for you to save your voicemails whenever possible. There are different methods for saving voicemails.
Each method is recommended and is very important if you want to save your voicemails. We’ll tell you various methods in this guide and it’s up to you on which one you will choose.
Let’s start with the first one.
You can actually save voicemails from your iPhone to your Windows PC or Mac device using a tool called FoneDog’s iOS Data Backup & Restore.
Below are the features and advantages of the said tool:
01 - It is 100% secure. You won’t get any viruses or malware from the FoneDog Toolkit.
02 - The iPhone Restore feature will not overwrite any of your data. Thus, your data is kept safe and secure and will not be lost due to the processes the tool operate.
03 - During the restore process, no data loss occurs on any device you use.
04 - It allows you to back up any file (or even the whole iOS device) to your computer.
05 - It gives you the ability to preview the items you want to backup or restore. You are in control of these items.
06 - You can instantly restore the files you want from the specific backup to your device.
07 - You can also restore specific files you want from a backup to the computer itself.
08 - You are given a 30-day money-back guarantee. If you are not satisfied with your purchase, even after using it, you can ask for a full refund.
09 - You are given a free trial of the tool before purchasing it. In this way, you don’t have to shell out money before actually using the tool. You can check out all the features without having to pay for it first.
Here’s how to use FoneDog’s iOS Data Backup & Restore tool step-by-step:
First, you have to backup your iPhone.
Here’s how to do it step-by-step:
Simply connect the iOS device to your Windows PC or Mac device. Both types of devices are actually supported. Do this by using the USB connector that goes with the iOS device when you purchased it.
Install the software named FoneDog's Toolkit - iOS Toolkit on your computer.
Launch the FoneDog Toolkit - iOS Toolkit on your computer. The software will instantly recognize the connected iOS device.
Look at the main interface and select iOS Data Backup & Restore.
In this part, you have to choose iOS Data Backup in order to backup your voicemails. After which, continue to follow the next steps.

Select the backup mode that you want. You can either choose Standard Backup or Encrypted Backup. The second one allows you to protect your backup with a password. This is to ensure private information or any sensitive information is kept secure.
After you have chosen your preferred backup mode, press the Start button in order to continue.

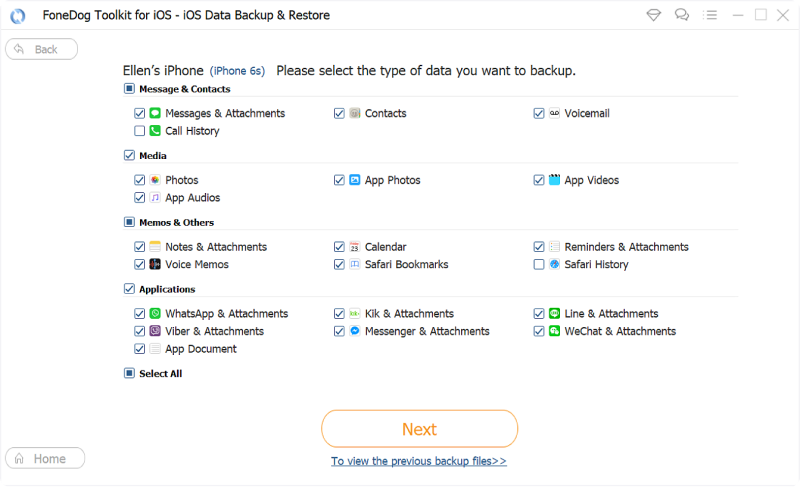
The software will now show you the different files located on your iOS device. It will display the various categories in the screen. These categories include Photos, App Videos, Messages & Attachments, Notes & Attachments, Calendar, Voice Memos, and Reminders, among others.
Select the type of data you want to back up.
Click Next to back up your selected data types.
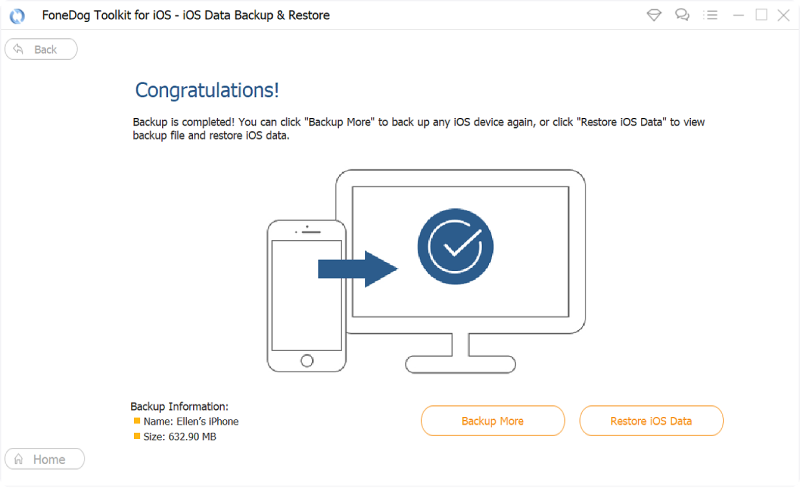
Wait for FoneDog Toolkit - iOS Toolkit to finish backing up your data. When it is complete, the name and the actual size of the backup file will be displayed. You can either backup more data by choosing Backup More.
Or you can also click Restore iOS Data to be able to restore the files you want from a backup file.
Now that you have backed up your phone, it is time to restore it if you want to.
Below are the steps on how to do it:
If you haven't downloaded it yet, you can download and install FoneDog Toolkit - iOS Data Backup & Restore.
Connect the iOS device to your computer.
The said tool will easily recognize the iOS device you connected to your computer.
Look at the main interface. Select iOS Data Backup & Restore.
Select iOS Data Restore afterward.
After you have clicked iOS Data Restore, FoneDog Toolkit will show you all the backups you have. You will be able to see Name, iOS Version, Latest Backup Data, Serial Number, and Backup Size.
Select the backup file you want to preview.
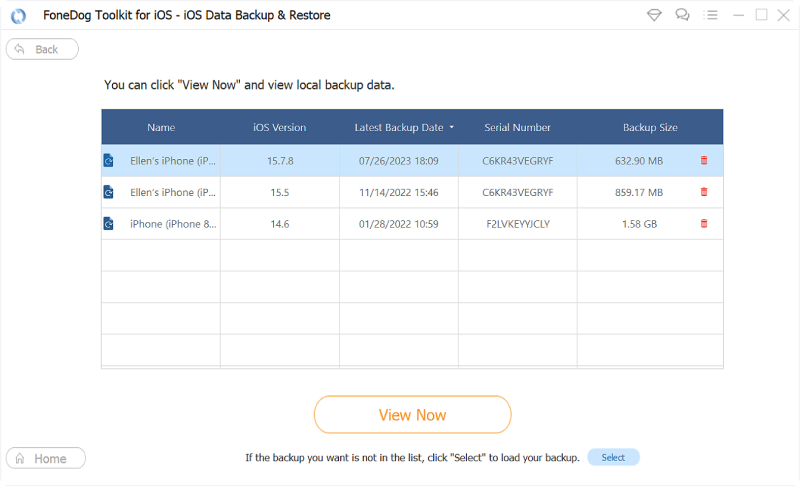
Press the View Now button to preview the selected backup. FoneDog will start scanning the backup to check out the files contained within it. The progress of the scanning process will be displayed. You can either press the Pause button to pause the process.
Or, you can click the Stop button to finish the entire scanning process.
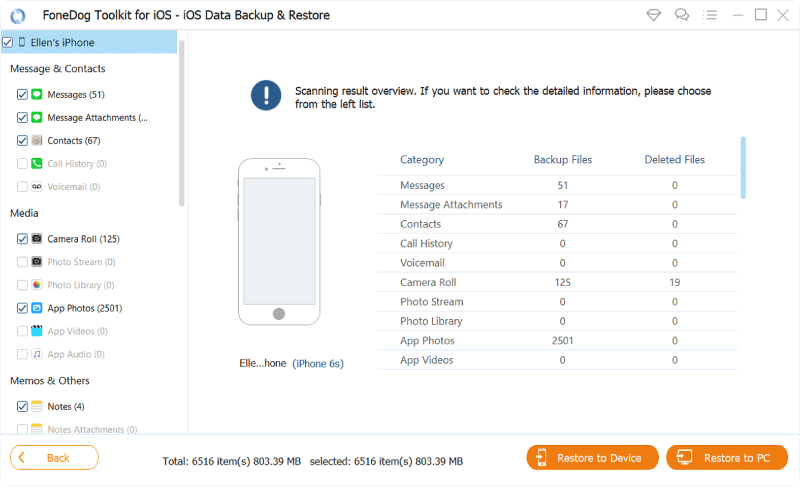
After the scanning process is complete, the files contained within the selected backup will be shown to you. You can preview all the files in it.
From the left side of the screen, it will show various categories or classification. Select a specific classification.

Select the files you want to be restored from a particular classification. You can preview each also.
Click Restore To Device to restore your files to the Apple device. Or, you can click Restore To PC to restore the files you selected to the Mac device or Windows PC.
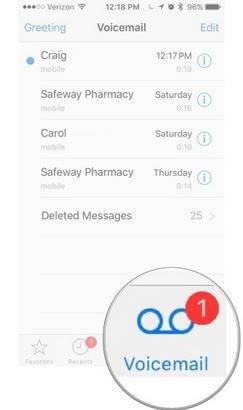
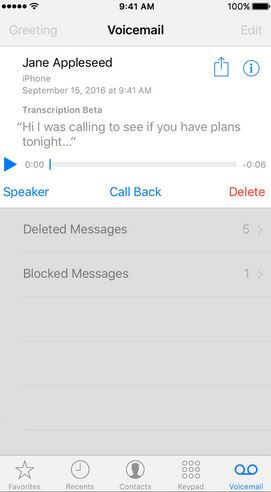
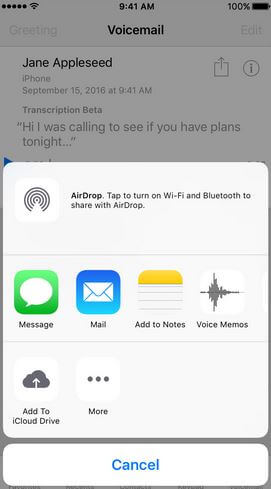
Visual messages can actually be saved as voice memos or notes. To save these visual messages of yours, it is necessary to have another iOS device. It is also required to have a network carrier that actually supports visual voicemail messages fully.
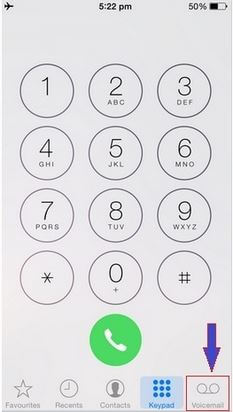
Here are the steps you should follow in order to save your voicemail from your iPhone.
That’s it! It’s as easy as 1-2-3. Now, let’s move on to the next method.
You can also save your voicemail on your iCloud account. This is also easy like the ones stated above.
Here’s how to do it step by step:

As you can see saving your voicemails is very easy. You can do it in different methods outlined above. Plus, you can even create a backup with FoneDog’s iOS Data Backup & Restore.
Use the backup you’ve made with this tool to restore your voicemails whenever needed.
Leave a Comment
Comment

iPhone/Android Devices’ Maintenance Expert
Staying home, listening to music, writing tech articles
Many people asked me to repair their mobile phones so I have a lot of experience in mobile phone repair, and I know a lot about Android or Apple phones.
iOS Data Backup & Restore
Back up your data to PC and selectively restore iOS data from backups.
Free Download Free DownloadHot Articles
 /
/
INTERESTINGDULL
/
SIMPLEDIFFICULT
Thank you! Here' re your choices:
Excellent
Rating: 4.6 / 5 (based on 64 ratings)
